Deep Dive — Learning Dimir Midrange with Reid Duke

Note: This article was translated from Chinese by AI and may contain errors. Read the original Chinese version.
Before We Start
In the Magic community, Reid Duke (hereafter “RD”) needs no introduction. Besides being a Hall of Fame member, he most recently won the Pro Tour New Phyrexia piloting an Izzet Indomitable Creativity deck, and he remains active in major tournaments. But beyond those achievements, what Magic players know him for most is that he keeps selflessly sharing his insights with readers. Search the keyword Reid Duke on Channelfireball and you will find all the articles he has published since 2020, which are well worth going back to read!
But reading articles is just RD outputting to you one-way. How do you get the chance to discuss things with RD? This time a friend happened to send me this video from Rebell Spike, Reid Duke SHARES HIS SECRETS to dominating MTG, and it hit exactly the need I had. Sharing is better than enjoying alone, so I wrote this article, which is also an attempt at a new genre.
In the video, Rebell Spike (hereafter “Rebell”) plays a best-of-three Dimir Midrange mirror practice match on MO, and uses MO’s replay feature to review it with RD. Why did I choose this video? Besides the selfish need mentioned above, as a long-time Dimir Midrange player I also relearned many concepts worth sharing from the discussion in the video. In the annotations of the article I also raise some points of my own while watching. I hope this article can pass these takeaways on to readers who need them.
- Interested readers are very welcome to go watch the video directly.
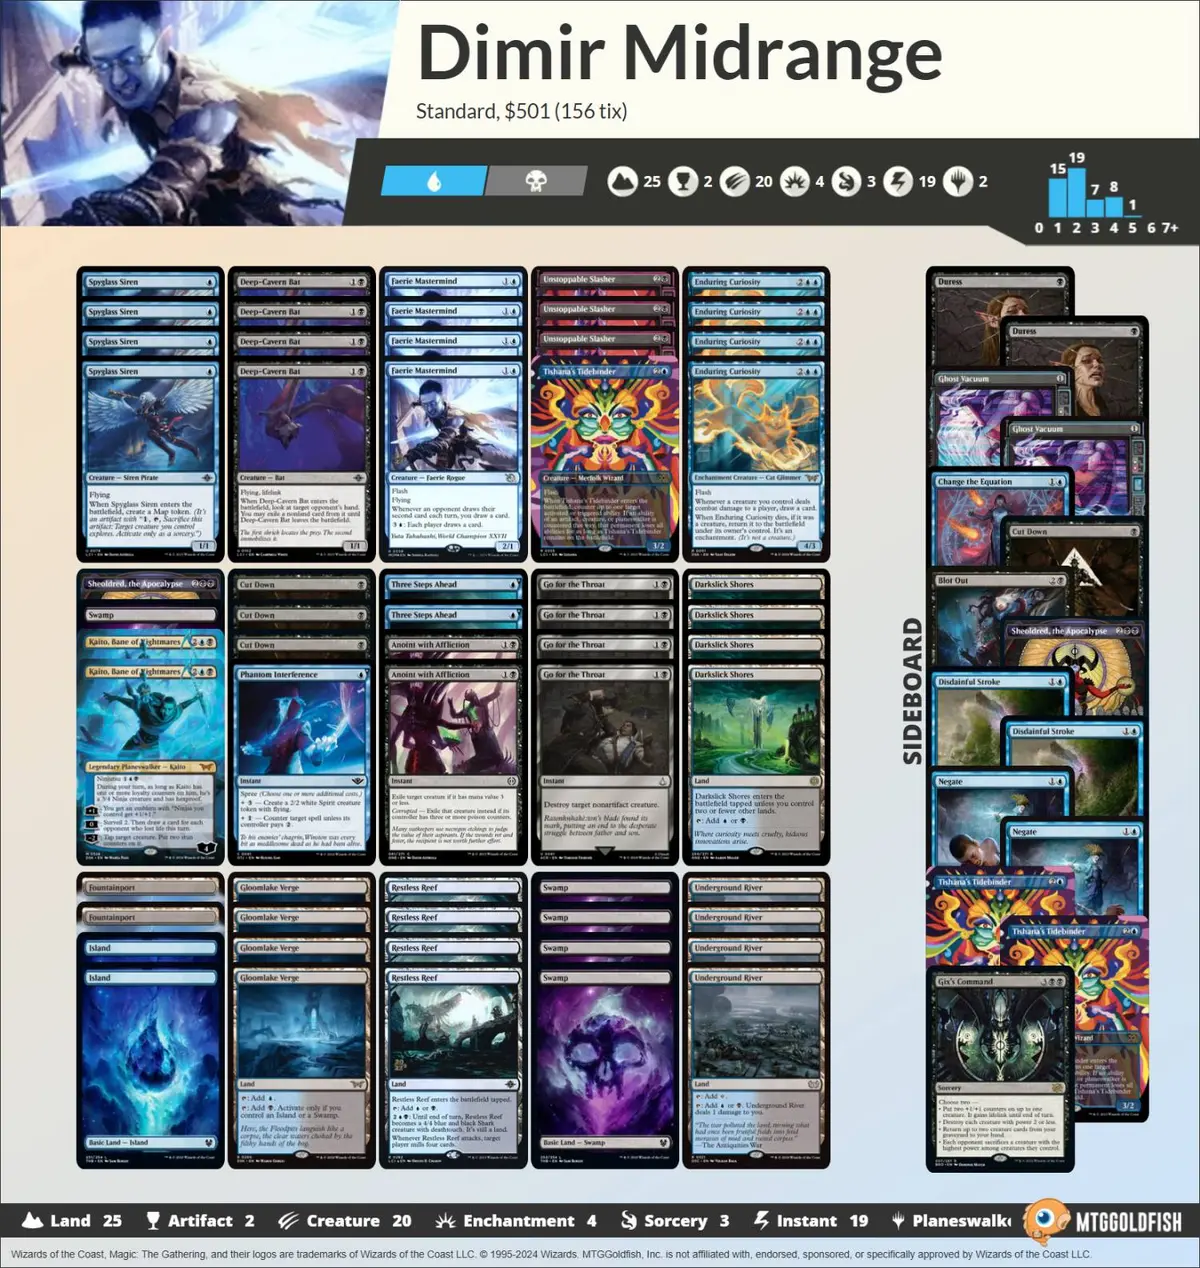
- For the Dimir Midrange deck that Rebell Spike uses, see the display at 0:22, or refer to the image below.
Game 1
Turn 0 (Opening Hand Discussion) — 0:27
Rebell is on the draw, with the following opening hand:

The opponent is playing the Dimir deck with Unholy Annex // Ritual Chamber. Compared with the more tempo-oriented Dimir Midrange Rebell Spike is using, the two play very differently.
Although this hand has no mid-to-late-game threats like Sheoldred, the Apocalypse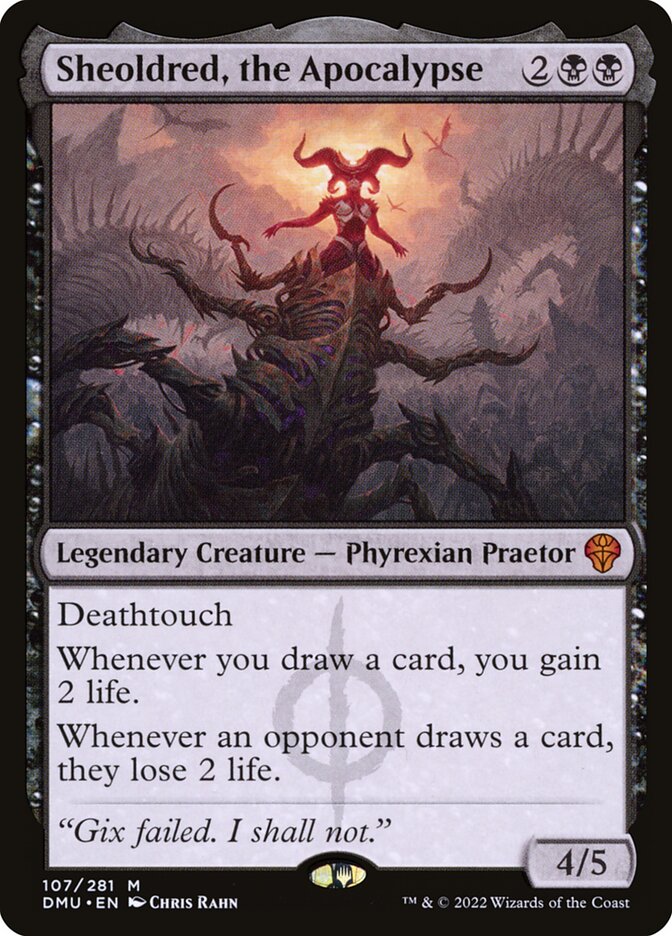 or Enduring Curiosity
 , it guarantees the deck’s early tempo runs smoothly. Four lands can produce double blue and double black, which also avoids the risk of being short on lands or colors, and among them is Fountainport
 , a high-value colorless utility land. The Map token that Spyglass Siren
 makes, with its explore-style ability, also helps push forward and find the threats you need. In addition, both RD and Rebell think Deep-Cavern Bat
 basically can’t survive on the battlefield for long against the endless removal in the Dimir mirror XD
Discussion result: Keep this hand.
Turn 1 — 3:24
From the opponent’s library/hand counts shown in MO’s interface, RD noticed the opponent is on a 61-card deck. But this doesn’t give much information. At most you could guess the opponent might be greedy? In a real match without MO’s hints, you probably couldn’t tell whether the opponent has 60 or 61 cards XD
The opponent plays a Swamp and passes. Rebell draws a second Spyglass Siren.
Here you can use the two Sirens to start the early offense, and put out two Map tokens, pairing them with Fountainportto draw extra cards, or simply beef up the creatures to go down an aggro route. And if the opponent spends removal on a Siren, the survival rate of the Deep-Cavern Bat, Sheoldred, the Apocalypseor Enduring Curiosityyou play later goes up with it.
Discussion result: Play Darkslick Shores, cast Siren #1.
Turn 2 — 4:17
The opponent plays a Gloomlake Verge and passes. Rebell also draws a Gloomlake Verge
Here the complexity of Dimir Midrange shows. On turn two there are at least the following three options:
- Before combat, use a Map token on Siren #1 to try to bait out the opponent’s removal; after combat, play Siren #2.
- Play the Bat to check the opponent’s hand (basically trading for a removal spell).
- Attack with Siren #1, then pass with two mana open, holding removal for a possible Faerie Mastermind
 from the opponent.
Rebell says he wouldn’t go with Option 2 and play the Bat at this point, because he doesn’t care much about what the opponent’s hand looks like right now, but he would basically guess the opponent has removal. He prefers Option 1, and RD agrees.
Discussion result: Option 1.
Actual play: Option 2. He sees the opponent’s hand as follows (plus an Anoint with Affliction that killed the Bat):
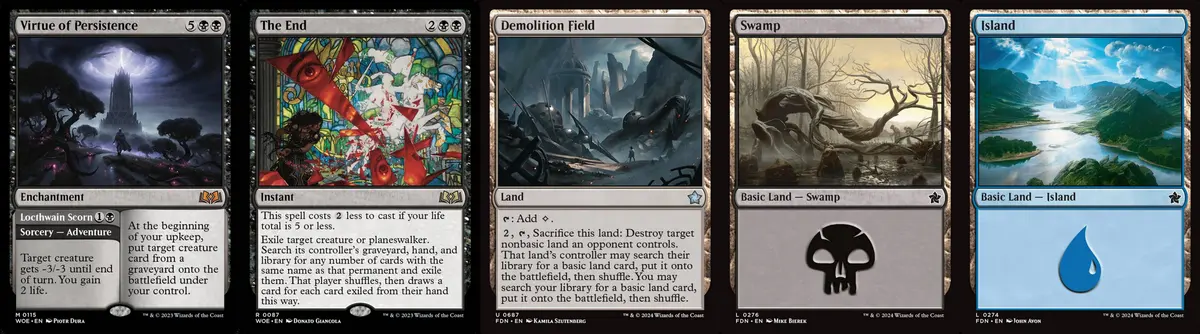
After seeing the hand, both Rebell and RD realized this would be a long game (the opponent has a lot of removal but no significant threats), and the Anoint with Afflictionin their hand might have to be saved for a creature targeted by Virtue of Persistence // Locthwain Scorn .
Turn 3 — 8:17
The opponent plays a Swamp and continues to pass. Rebell draws a second Anoint with Affliction.
Here Rebell plays a land, casts Siren #2, and passes. As planned last turn, the removal in his hand is aimed at the opponent’s Virtue of Persistence // Locthwain Scorn; meanwhile, he holds on to Fountainport in hand to avoid the opponent blowing it up with a land destruction spell on the backswing.
Turn 4 — 10:52
After playing an Island, the opponent casts his Sheoldred, and the game reaches its first turning point. Rebell draws a land, and his life drops to 18.
- At this point, if Rebell can’t draw an answer to Sheoldred within the next 9 cards at most, the game is basically over; worse still, Sheoldred’s own attacks make the situation even more dire.
- The opponent casting Sheoldred right on turn four also invalidates Rebell’s strategy from last turn of holding up two mana to stop the opponent’s creatures, or Virtue of Persistence // Locthwain Scorn
- Of course, if the two mana Rebell left open were Go for the Throat
or Phantom Interference
, the situation would be completely different. All I can say is that in MTG, although “probability” estimates and “luck” play a part, many times it still comes down to a person’s nerve and intuition to create opportunities to win.
Here you must find an answer to Sheoldred as soon as possible. So it matters a lot that the Map token can bypass Sheoldred’s drawback, but the key question is: how to use it?
In RD’s view, the first Map token is crucial, as it can help you find a better topdeck; whether to use the second Map token is an open option. We can use both, or keep one for Fountainport to draw a card.
Discussion result: Use a Map token on one of the Sirens, and use Fountainport to eat the other Map token and draw a card.
Actual play: Used one Map token on each of the two Sirens.
In the actual play, the explore effects of the first and second Map tokens saw Kaito, Bane of Nightmares and Enduring Curiosityrespectively, both put into the graveyard, and the two Sirens grew to 2/2. The two Sirens attack, and the opponent’s life drops to 14.
In the actual play, Rebell tapped Fountainport directly to pay for the first Map token’s activation cost. This blocked the option of later using Fountainport to draw a card.
In the post-game review, RD also mentioned he still leaned toward Option 1. And as for the cards the Map tokens put into the graveyard, although the goal was to find Go for the Throat to kill Sheoldred, eating the second Map token and drawing Enduring Curiosity
Turn 5 — 13:36
The opponent draws, gains 2 life to 16 from Sheoldred’s passive effect, casts Demolition Field , and uses Virtue of Persistence // Locthwain Scorntargeting one of the Sirens, which Rebell counters with Anoint with Afflictionas planned.
The opponent mishandled two things here:
- Tapping Demolition Field
- Sheoldred didn’t attack!!! That 4-point life difference matters a great deal for this game.
Rebell’s turn: he draws another land, and his life drops to 16. Rebell plays the Restless Reef in his hand as bait to feed Demolition Field. The 2/2 Siren attacks, and the opponent drops to 14.
Turn 6 — 16:04
The opponent draws and gains life to 16. Demolition Field blows up the Restless Reef, and the opponent casts Unholy Annex // Ritual Chamber . Sheoldred attacks, and here Rebell chooses to take 4 directly, dropping to 12. At end of turn, in response to Unholy Annex’s draw effect, he activates Fountainport to make a Treasure token. Rebell and RD had some discussion on whether to make a 1/1 Fish token or a Treasure token with Fountainport:
- Make a 1/1 Fish: it can block Sheoldred next turn (effectively gaining back 3 life), or block the turn after and be eaten by Fountainport to draw a card (effectively gaining 1 life plus drawing a card).
- Make a Treasure: draw a card, or help cast mid-to-large spells later.
RD’s final advice here: he thinks the two choices are very close, but if he were facing this situation, he would lean toward making the Fish. That doesn’t mean making the Treasure is wrong, though. As he said, the two choices are very close. This also brings up RD’s philosophy of play:
In a game, many small decisions may have important effects, and we don’t know it at the time. If there is enough time, of course we would like to treat every small decision as an important one and consider it carefully. However, a match contains thousands upon thousands of decisions, and we can’t, and don’t have time to, exhaust every possibility on the spot and conduct a thesis-style investigation. Given that, we simply need to calmly make the best choice available at the moment.
(The author gives a summary translation of RD’s sharing in the video, not a full quote)
Here the side effect of Unholy Annex’s draw costing 2 life is offset by Sheoldred’s passive effect, so the opponent’s life stays at 16.
Rebell’s turn: he draws, Go for the Throat!!! His life also drops to 10, though. On his main turn he kills Sheoldred right away and keeps four mana open with Fountainport, ready to make a Fish. The 2/2 Siren attacks, the opponent drops to 14 again, but this time they can’t gain it back.
One small detail here is that RD said: you will definitely kill Sheoldred on your own main turn, so there’s no need to give the opponent any chance to stop you. This holds even though Go for the Throat is an instant.
I’d like to add a common misconception about tempo decks. Many people think instants and flash cards should be used on the opponent’s turn whenever possible to optimize mana efficiency, which is sometimes right. However, in a situation like the timing of Go for the Throat above, the most important thing you need to do is remove Sheoldred, and you have been waiting for this chance for several turns. With the opponent tapped out, killing Sheoldred on your main turn is the perfect timing.
Turn 7 — 21:33
After drawing, the opponent plays a seventh land and passes. Unholy Annex draws 1 and costs 2 life, dropping to 12; Rebell responds by paying 1 life to make a Fish, dropping to 9.
On Rebell’s turn he draws Faerie Mastermind. The 2/2 Siren and 1/1 Fish token attack, and the opponent drops to 9.
At this point RD asked a great question:
“The opponent can spend five mana to open Unholy Annex // Ritual Chamberand make a 6/6 Demon token. Why doesn’t he do that?”
Rebell’s answer here boils down to:
- The opponent may be holding The End
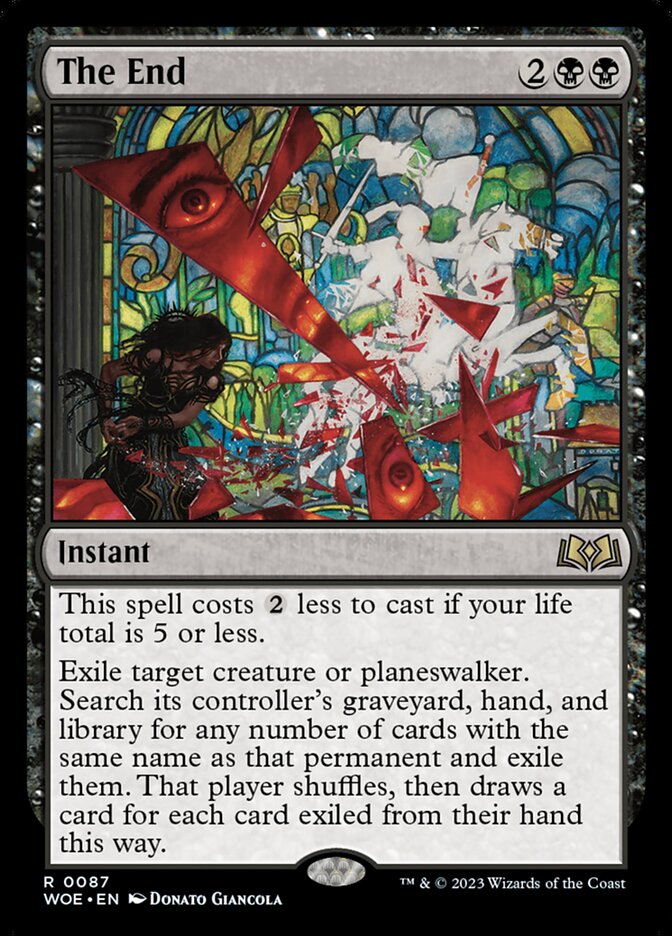 , saving it for our high-value Sheoldred, the Apocalypseor Enduring Curiosity.
- The opponent may not have drawn well, so wants to keep mana open to handle the situation.
This is an open question, as the video doesn’t give an answer either, so readers can think it over along with us!
Turn 8 — 23:51
Here the opponent finally opens the Ritual Chamber and makes a 6/6 Demon token, passing with two mana open.
Here Rebell chooses to respond to Unholy Annex’s ability by flashing in Faerie Mastermind. It resolves, both players draw a card, the opponent’s life goes back up to 11, and Rebell drops to 7, drawing a land off the Faerie Mastermind’s effect. After that he uses Fountainport to eat his own Fish and draw a card, which is another land.
On Rebell’s turn, he draws a third land XD and uses Anoint with Affliction on the 6/6 Demon during his main turn. The opponent responds with Go for the Throat to remove Faerie Mastermind. In combat the 2/2 Siren attacks, and the opponent is left at 9.
A note: in the Game 1 post-game review, RD said that here he wouldn’t jump in with Faerie Mastermind and would just remove the Demon directly; if it gets countered, so be it. In this spot he would still prioritize mana efficiency
and if it didn’t get countered he could have held onto the 4-point life difference.
Turn 9 — 26:09
The opponent uses Duress and sees three lands, then plays Restless Reef and attacks. Rebell makes a 1/1 Fish to block, dropping to 6. Unholy Annex’s draw costs 2, leaving the opponent at 7.
On Rebell’s turn, he draws Enduring Curiosity. After the 2/2 Siren attacks, he flashes in Enduring Curiosity, leaving the opponent at 5; Rebell draws Unstoppable Slasher off it and casts it.
Turn 10 — 26:54
On the opponent’s main turn, The Endtakes out Enduring Curiosity, and he opens a second Ritual Chamber to make a 6/6 Demon to block. At end of turn Unholy Annex’s ability resolves, leaving the opponent at 7 and Rebell at 4.
On Rebell’s turn, he topdecks a second Go for the Throat to kill the Demon, then attacks in combat with the 2/2 Siren, the 2/3 Slasher, and the 4/4 Restless Reef for the win.
Working backward from the ending, both sides made some mistakes that gave the opponent a chance to turn the game around:
- On Turn 5 the opponent’s Sheoldred didn’t attack. That was a 4-point life difference. If it had attacked and everything else stayed the same, the opponent would have won on Turn 10.
- On Turn 8 Rebell didn’t remove the 6/6 Demon directly. The 4-point life difference from gaining 2 and losing 2 was actually deadly.
- On Turn 8 Rebell kept only Fountainport to make a Fish as a blocker. If the opponent still had cheap removal like Cut Down
in hand on Turn 9 and the Restless Reef had connected for 4, combined with the following Unholy Annex trigger it might have been lethal.
Sideboard Discussion — 29:22
| Side In | Side Out |
|---|---|
| +1 Sheoldred, the Apocalypse | -3 Cut Down |
+2 Disdainful Stroke | -4 Deep-Cavern Bat |
| +2 Duress | -2 Anoint with Affliction |
+2 Negate | |
+1 Blot Out | |
+1 Gix's Command |
Take out Cut Down, which is nearly a dead card, the Bat, which is as good as dead, and the two Anoint with Affliction, which have low reach; bring in more counterspells, discard, better removal, and Sheoldred, who is key in the mirror. However, RD also said that even Anoint with Affliction still has a target like the 6/6 Demon in this matchup, so he might not take out all of them.
This also brings up the right mindset for sideboarding. You may have heard it before, but it’s well worth restating here: understand the core of your deck, and don’t over-sideboard and end up weakening it. The example Rebell gave here is Siren. It is a one-mana 1/1 flyer, but Dimir Midrange essentially relies on Enduring Curiosityand Kaito, Bane of Nightmaresto show strong pressure and gain a card advantage in the early-to-mid game. If you take out all the Sirens when sideboarding, that indirectly makes those cards not as good.
A little murmur of my own: I’d be a bit more hesitant about bringing in Gix's Command
would be more flexible.
Game 2
Turn 0 (Opening Hand Discussion) — 33:29
Since Rebell Spike won the last game, he is still on the draw this game. The image below is his opening hand this game:

This is a very aggressive opening hand. Two Faerie Masterminds can make the opponent’s Unholy Annex keep costing life without being able to pull ahead on cards; and the Disdainful Strokebrought in from the sideboard can also hold off the opponent’s powerful four-mana curve nicely.
Discussion result: Keep this hand.
Turn 1 — 34:07
The opponent plays a Swamp on turn one and Duresses away Disdainful Stroke. On Rebell’s turn he draws a Darkslick Shores. In the video he naturally plays the fast land and casts Siren, but there is still something worth discussing here.
If he hadn’t drawn the fast land, following the original plan from the opening hand:
- Play a pain land and cast Siren; next turn play Restless Reef and cast another Siren (2 more life lost in total).
- Play Restless Reef, and next turn he can cast two Sirens or jump in with Faerie Mastermind (maybe the opponent opens Unholy Annex on turn three!).
Drawing the fast land makes the decision very simple. Considering the opponent has already seen our hand with Duress, hiding a fast land whose shelf life is only the first three turns, just to add unknown options for the opponent, isn’t necessarily a worthwhile trade. Putting the fast land onto the battlefield on turn one, besides saving life, also means our later game plan is no longer constrained by whether to play a tapped land or an untapped land. This draw came at a very opportune time!
Turn 2 — 35:05
On turn two the opponent plays a second Swamp, then uses Cruelclaw's Heist to take out Faerie Mastermind (without gifting a card).
On Rebell’s turn, he draws a third Faerie Mastermind, uses a Map token to explore and sees Go for the Throaton top of the library, and makes Siren #1 a 2/2. After attacking, the opponent is at 18. After combat he casts Siren #2.
Turn 3 — 35:44
On turn three the opponent plays Restless Reef and passes. Rebell draws Go for the Throat, and after the two Sirens attack the opponent is at 15. After combat he plays his own Restless Reef and passes with two mana open.
Here you can see the strength of casting Sirens back to back in this matchup: you keep attacking to reduce the opponent’s life while setting up your formation and waiting for Enduring Curiosity
Turn 4 — 36:20
The opponent uses Fabled Passage to find an Island, Duresses away Go for the Throat, then casts Unholy Annex, drawing 1 and losing 2, down to 13; Rebell here jumps in with the long-awaited Faerie Mastermind, and draws Enduring Curiosity.
On Rebell’s turn, he draws a fourth untapped land, and after the three flyers attack he flashes in Enduring Curiosity. The opponent is at 8, and Enduring Curiosity’s ability draws three cards. At this point the game is decided.
Turn 5 — 36:50
The opponent casts Sheoldred and passes with one mana open. On Rebell’s turn he draws Go for the Throat, kills Sheoldred, and attacks with everything for the win. Even without drawing it, playing a fifth land so the Restless Reef can come online and attack together would basically have won too. If the opponent had Cut Down in hand, they would have used it the previous turn when casting Sheoldred, for the same reason as Game 1 - Turn 6.
Conclusion: Replay, and Keep Improving.

After a whole video of discussion and analysis, I believe most of the details in this match have been covered, but many plays and fine adjustments, in-the-moment reactions, and game plan ideas will never come up in exactly the same situation or fit a formula 100%. But that is also what makes MTG fun, especially with a midrange deck like this, where sometimes swapping just one or two cards, or even a few lands in the configuration, can significantly change the experience of the match.
At the end of the video, Rebell asks RD to grade his performance, a segment I really like. It’s not that the score itself matters so much, but that by following this discussion, you really do get RD to give you a reasonable critique at the end. Although we don’t get the chance to ask RD directly, through this video I believe we also picked up many valuable concepts along the way.
For a deck like Dimir Midrange, the course of a match involves many big and small decisions, making it perfect for players to practice polishing their play to the extreme while training their intuition at the same time. Pursuing “the best play” is always fascinating, but the purpose of a match is to win. As RD said, sometimes you also have to let go of some minor details and rely on intuition to let the match proceed efficiently. As for the detailed review, we can save it for opportunities like this, to savor and study.
Unrelated Extended Thoughts
While writing this article, I strongly felt the similarity between MTG and Go. The discussion between Rebell and RD is an MTG match commentary, and I in turn made a derivative work from that commentary and added my own understanding to make this article. However, if we simply watch Rebell’s match replay without their discussion and explanation, it’s hard for us to fully understand these details and how the decision points shift. Just as we laymen watching Hikaru no Go or a formal Go tournament would find it hard to appreciate the subtleties without the corresponding commentary; even worse, without the corresponding knowledge before watching, even listening to the commentary is like looking at flowers through fog. Promoting MTG is like two people walking toward each other from opposite ends of a tunnel. How far each gets depends on how much each side puts in along the way, and only when the two meet and the spark lights up can they see each other’s true face. This is a double-blind process, and it is usually the obstacle that keeps laymen from understanding the charm of MTG and Go.
Jumping to another topic, I’d like to talk about the impact of AI on MTG. In 2017, AlphaGo defeated Ke Jie, then ranked number one in the world at Go, and from that point on AI had no human opponents left in Go. However, compared with purely rational Go, MTG has an additional variable, “luck.” Through lands, color screw, game mechanics, and constantly evolving card design, this variable plays a decisive role at critical moments (or a decisive helplessness XD); but this also seems to build a strong moat against the AI challenge. In recent years, I’ve seen online that some people are trying to build AI MTG players on MTGA. I think this track of humans versus AI will keep extending, but as a player, I am quite optimistic about the AI challenge in MTG. MTG is not like Go, which has a limited space of game variations. The 19-line board and the black and white stones of Go inherently make it a bounded game, and MTG is different. Over 30-plus years, tens of thousands of cards with different functions have accumulated. Even if one day AI could master all the variations and find the best solution for the environment at the time, with the addition of new sets AI would inevitably need to learn anew to readapt, and that is only about finding the best solution for the environment at that moment. In actual matches, AI is just a very strong player with a high win rate, and can’t possibly win every time.
Magic: the Gathering is translated in Traditional Chinese as 魔法風雲會 and in Simplified Chinese as 萬智牌. In terms of game experience and community interaction, I feel the Traditional Chinese translation is closer to the original meaning; but when facing the AI challenge, the connotation of the Simplified Chinese 萬智牌 (roughly “ten-thousand-wisdom cards”) better illustrates the game’s strong moat, which lies not only in the “luck” factor created by card design mentioned earlier, but also in the collective creativity of all players and the inevitable rotation of the meta. With the addition of new sets and new players, the whole game’s vitality can keep renewing itself!
Plots within plots, changes breeding more changes. The exchange with friends and top players along the way is exactly the core of why we never tire of this.
- Title
- Deep Dive — Learning Dimir Midrange with Reid Duke
- Author
- cephille
- Created at
- November 29, 2024
- License
- This work is licensed under CC BY-NC-SA 4.0 .