The Hobbit (HOB) Limited Guide — Multicolor, Colorless, Lands

Note: This article was translated from Chinese by AI and may contain errors. Read the original Chinese version.
The Hobbit (HOB) prerelease events run on August 7, 2026, with the official release a week later on August 14, 2026. Want to know more about how individual cards rate in limited, with recommendations? Then check out this series of HOB limited guides!
- For the mechanics, see this article: The Hobbit Mechanics Explained
Color Pair Themes
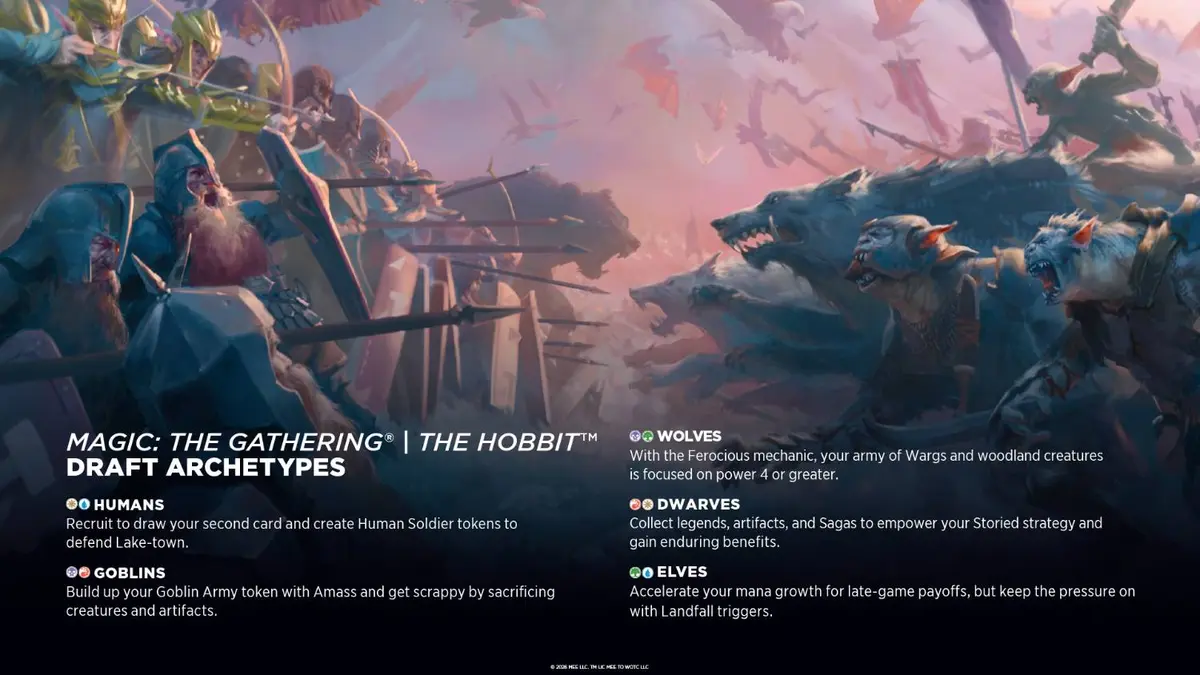
HOB is a small set of 193 cards, built from 5 main two-color draft themes that correspond to the important battle at the end of the story, the Battle of the Five Armies. Players can imagine themselves representing the corresponding race, fighting the other tribes to win!
BlueWhite Humans Recruit
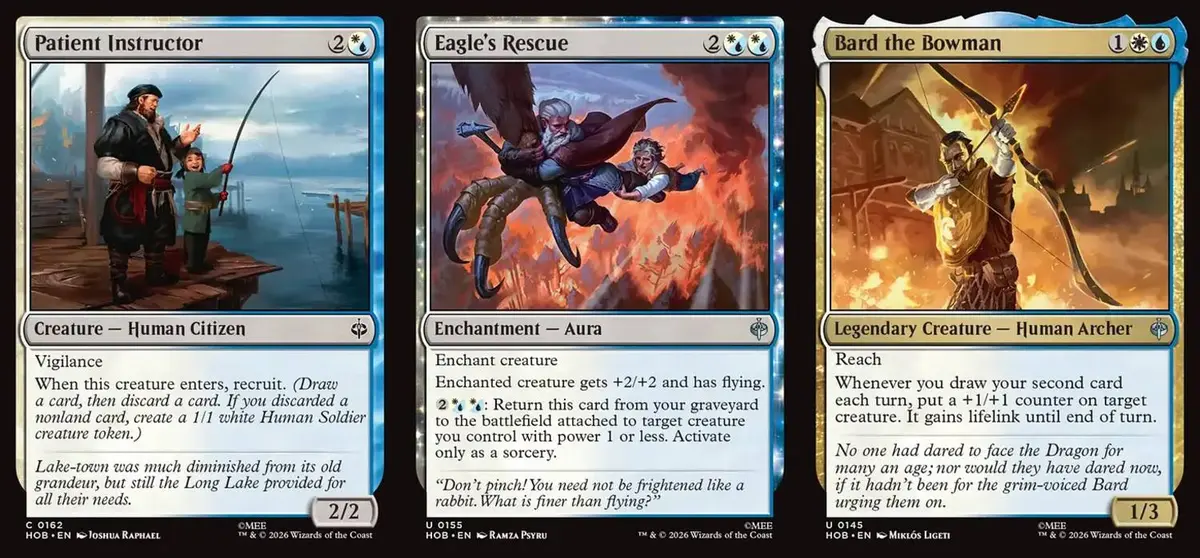
How the mechanic works: When you Recruit, first draw a card and then discard a card. If the card you discarded is a nonland card, you additionally create a 1/1 white Human Soldier token. Mechanically it is a variant similar to Connive, but creating tokens and putting counters (+1/+1 counters) provide different board advantages in different situations.
Game plan: When you Recruit, you need to evaluate whether to keep that nonland card or discard it right away to create a 1/1 token and widen the board. Either way, the Recruit mechanic makes your deck run more smoothly, so as long as your curve isn’t high, you can consider playing only 16 lands.
Synergy: Some cards in the Blue-White pair care about whether you draw a second card, such as Bard the Bowman , and can all be rewarded by the Recruit mechanic.
RedBlack Amass Goblins
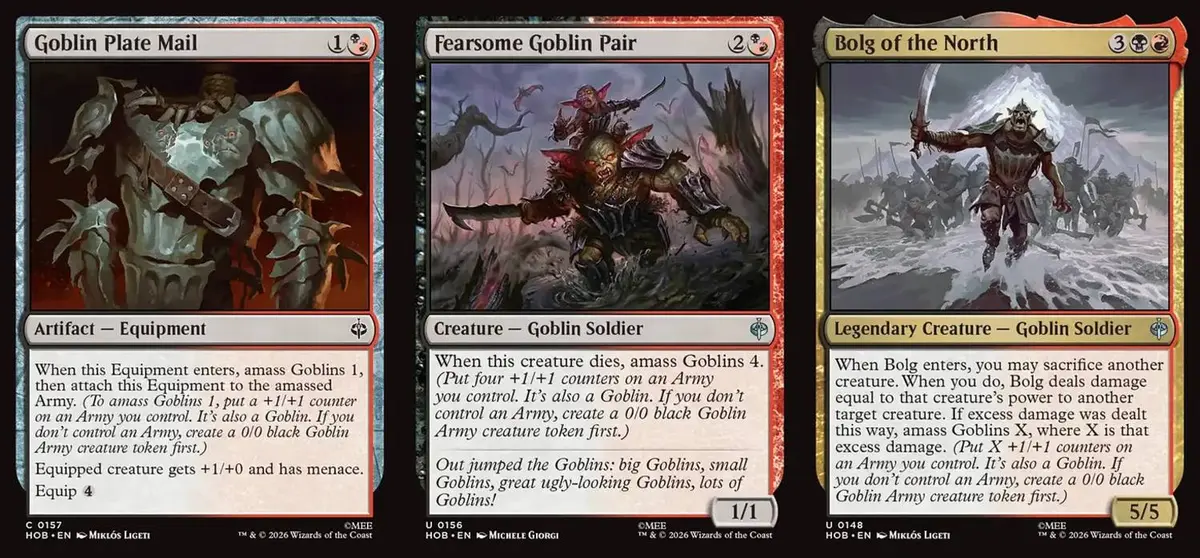
How the mechanic works: When you Amass Goblins X, if you don’t control an Army token, first create a 0/0 black Army token, then put X +1/+1 counters on it, and it also has the creature type Goblin. If you already control one, put X +1/+1 counters on that token.
Game plan: Amass Goblins isn’t simply a go-wide mechanic; it has the flexibility of growing a single body. You can pair it with sacrifice effects to consume the tokens you create, or keep amassing until a single Army grows large enough to change the game.
BlackGreen Hordes Ferocious
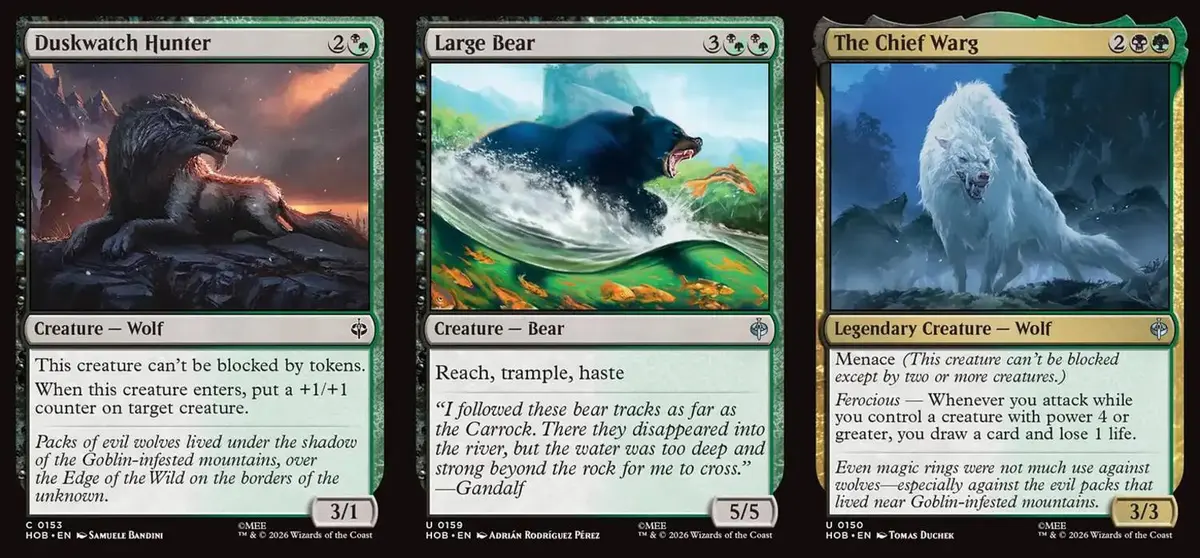
How the mechanic works: As long as you control a creature with power 4 or greater, cards with the Ferocious ability get an extra bonus.
Game plan: This is a standard midrange approach that needs no complex combinations and can suppress the board with excellent, powerful creatures alone. However, although you need creatures with 4 or more power to trigger Ferocious reliably, don’t put in too many high-cost cards. In the two-to-three-mana curve, cards like Desolation Prowler or Duskwatch Hunter
 , which can satisfy Ferocious on their own, will be one of the keys to whether the deck runs smoothly. Besides the main Wolves, the Black-Green pair also has Bears in green, with plenty of high-power, strong creatures. And an Army token amassed up to 4 or more can also trigger Ferocious.
RedWhite Dwarves Storied
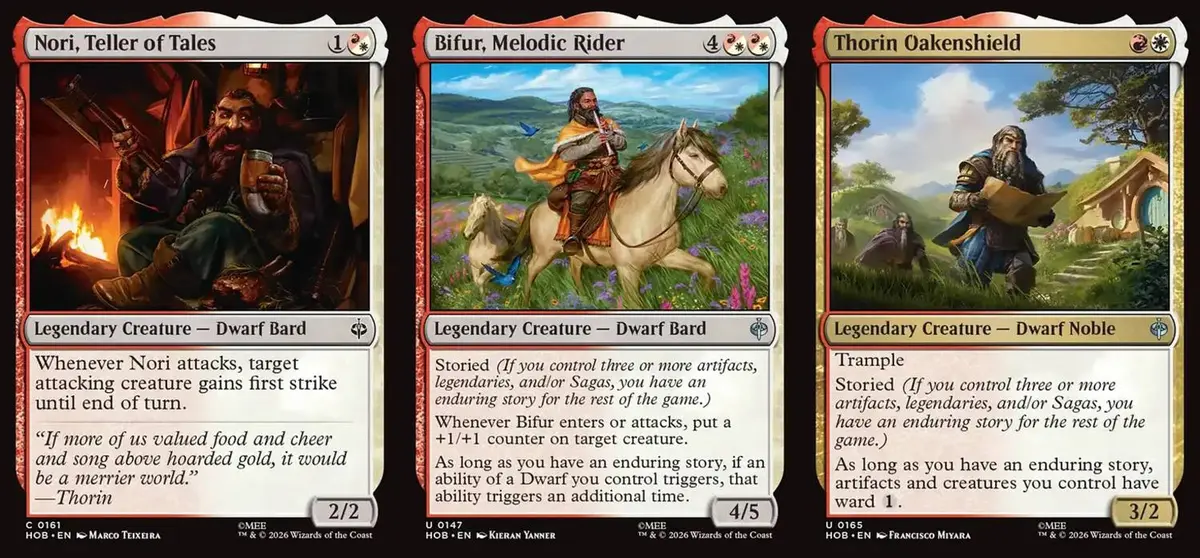
- How the mechanic works: When you control a combined total of at least 3 artifacts, legendaries, or Sagas, you unlock the player title Enduring Story. Once achieved, you keep enjoying the bonus for the rest of that game, and you won’t lose the title even if the number of qualifying permanents drops.
- Game plan: Although you need a high density of artifacts and legendaries to meet the condition, don’t put in mediocre cards just to fill the count. A smooth curve of creatures and quality removal are still the first priority. In addition, this color pair has a large number of Equipment, whose artifact type not only speeds up meeting the Enduring Story condition but also has many synergies with the Dwarf creatures, making them indispensable pieces. Cards like Iron Hills Blacksmith
 , which both support the game plan and streamline your card slots, are important cards for the Red-White pair.
GreenBlue Elves Landfall
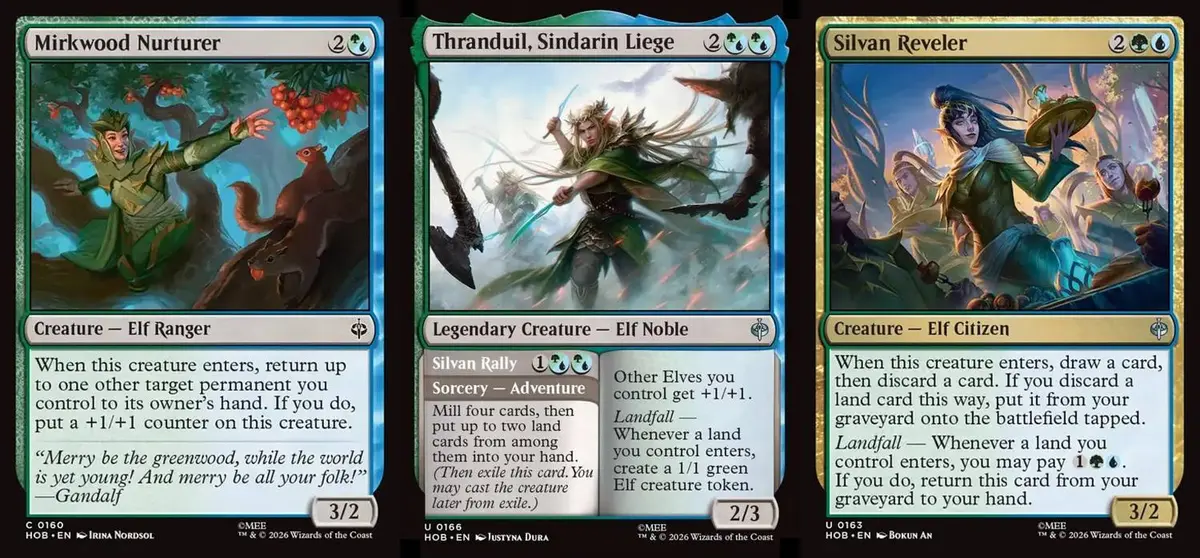
How the mechanic works: Whenever a land enters the battlefield under your control, you can trigger the Landfall ability.
Game plan: Playing lots of lands ensures you can smoothly cast midgame and late-game spells. Even if you flood late in the game, the reward cards of the Landfall mechanic can still let you benefit from it. A potential weakness is that the Blue-Green pair often lacks removal, so when building, pay attention to whether you have enough removal.
Rating Scale
5.0: Unconditional must-pick, brings a near-winning advantage
4.5: Unconditional must-pick if you’re in the right colors, brings a huge advantage
4.0: First-pick quality, extremely good fit with the color pair’s theme, can be the deciding card to splash / switch colors or to move into the colors
3.5: Top uncommons and commons of the set and other sufficiently strong cards, good fit with the color theme, can be the key card for moving into the colors
3.0: Important cards for the color theme and other above-average cards, you want them in your final deck
2.5: Average, usually a decent curve filler
2.0 to 1.0: Below average, generally not played, can be used as filler if necessary but not too many
0.5 to 0.0: Unplayable, basically don’t play it, playing it will only make you lose
Ratings
Multicolor

Rating: 4.0
Comment: Setting aside the 6-mana 3/5 reach body, when you draw cards outside your draw step you draw two instead, and when you create tokens you create double the number. This card has the words “please support Recruit” written right on it, and it’s a very powerful engine. The body itself has ordinary combat ability, but just by standing there the opponent has to find a way to deal with it first. However, if the game goes late and your library is nearly drawn out, be more careful when using cards or effects that draw extra cards, since the change to drawing two is mandatory.
Rating: 3.5
Comment: Each time you draw your second card, you can distribute a counter and give that creature lifelink. Drawing cards and gaining life both let you gain bigger resources in a game and help you win the long game. Paired with the Recruit effect, you can easily trigger its ability.

Rating: 4.5
Comment: In the Blue-White pair, even if you Recruit only once, you’ll have a 1/1 Human token on the battlefield, so we can treat casting it with flash as the norm. A flash Glorious Anthem creature that also Recruits extra on entering and attacking, as long as you can keep it alive, you’re not far from victory.

Rating: 3.5
Comment: A 6-mana 4/5 that can place counters freely on entering or attacking. After you meet Enduring Story, your Dwarves’ triggered abilities trigger one extra time, which at least lets it put counters on any two targets every time it attacks. The Red-White pair has plenty of legendaries, Equipment, and Sagas to choose from, so assuming it meets Enduring Story the moment it enters isn’t overly optimistic.

Rating: 3.0
Comment: This one has a good body, but if you want it to remove an opponent’s creature on entering and also Amass Goblins, you need to sacrifice a creature with enough power. If you have a large enough Goblin Army token, you have a chance to accomplish both goals at once.

Rating: 3.0
Comment: This card is a bit hard to evaluate. Even as a 2/2 haste, it may not be able to join the fight in attacks, but if you activate its ability, it depends a lot on whether you’ve already amassed Goblins on the battlefield. If you can Amass Goblins on turn one on time, play it on turn two, and on turn three you can cast a 5-mana spell. But drawing it in the midgame or late game can be a bit awkward.

Rating: 3.5
Comment: A 4-mana 3/3 menace. When the creature attacks with Ferocious achieved, you can draw 1 and lose 1, which shouldn’t be too hard in green. If it really can’t, let this creature put a counter on itself or attach Equipment to it, and it can meet the condition by itself and start drawing cards.

Rating: 4.0
Comment: A 3-mana 5/3 trampler that also creates a 2/2 Wolf every upkeep, a very powerful card. If you want it to join the attack the turn after it arrives, you need to cast some small Wolves beforehand to back it up (this card needs two other Wolves on the battlefield to attack); but even if it doesn’t attack, simply treating it as a factory that produces 2/2 Wolves is enough to make the opponent miserable.

Rating: 3.0
Comment: A Red-White pair theme, Dwarves / Equipment, both satisfied at once. The body is a 2/2, and with other Dwarves it also gains lifelink. It’s a quality curve card that still delivers some value after cashing in its enter-the-battlefield ability.
Rating: 3.0
Comment: 4 power is very important in the Black-Green Ferocious theme. You can simply put the counter on it to make a 4/2, or put it on another, stronger creature to increase board pressure!

Rating: 4.0
Comment: This weapon master isn’t just called one for show! On entering and attacking, it puts a hone counter on every Equipment you control, giving the Equipment +1/+0, so killing the opponent by attaching Equipment is no longer a dream. The body itself has first strike, and as long as it attacks with Equipment attached, it becomes a relentless killing machine that gets stronger the more it fights! Even after it dies, its disciples can keep slashing the opponent with the boosted +X/+0 divine weapons!

Rating: 3.5
Comment: For four mana, first give a ground creature +2/+2 and flying to break through the board, and it’s even better that it can be used repeatedly from the graveyard, but because its restriction attaches to creatures with 1 power or less, it’s harder to repeatedly pair with big green creatures. It’s more likely that in the midgame to late game it gives the 1/1 tokens created by Recruit the power to join combat.

Rating: 3.0
Comment: This is fodder you’d want to die early, but if it doesn’t die, it gets a bit awkward.

Rating: 3.0
Comment: At first glance it’s a two-mana Equipment that makes a 2/1 menace creature, but don’t forget that if you already have Amass Goblins X on the battlefield, then when this Equipment enters, the strength of the creature it makes will be quite different. Suddenly making a medium-to-large Goblin with menace for two mana is entirely possible.

Rating: 4.0
Comment: Each time you Amass Goblins or put a counter on a Goblin, it deals 2 to the opponent. With a large number of Amass Goblins cards, you can even kill the opponent with this effect. And even when those creatures die, they can be converted into resources usable between turns, which is quite powerful! Although its individual combat power is weak, with proper pairing it will be the most dangerous card in the Red-Black pair!

Rating: 3.5
Comment: It has everything Black-Green needs: a 5-mana 5/5, the noble Bear creature type, reach to block fliers, trample to break through defenses, and haste to have an impact the same turn. The great Bear is too awesome! You’ve grown up and don’t need Doraemon anymore!

Rating: 3.0
Comment: This effect is usually used by playing it first after your land drop this turn, returning a land to hand to become a 4/3, then triggering Landfall on your next land drop. Of course, if you have other targets more worth reusing, even better (for example, a Saga that will be sacrificed after the next chapter resolves).

Rating: 3.0
Comment: As long as it attacks, it can give a target creature first strike, and at worst it’s a 2/2 with first strike when attacking by itself. But to have it survive attacking later, you may need to equip some Equipment onto it first.

Rating: 3.0
Comment: A 3-mana 2/2 vigilance that can Recruit on entering, a perfect fit for what the Blue-White pair needs: drawing a second card and making 1/1 Humans to widen the board.

Rating: 3.5
Comment: Draw a card, discard a land, pull the discarded land from the graveyard onto the battlefield, and trigger Landfall. And even if it gets removed, as long as you pay {1}{G}{U} at the next Landfall, you can return it to hand and reuse it repeatedly, which is quite profitable. A 4-mana 3/2 body isn’t necessarily a drawback: the more often we use it to trade resources with the opponent, the more we win the resource battle, which is exactly the tactic the Blue-Green pair is best at.

Rating: 4.0
Comment: A powerful 5-mana 5/5 Dragon, and this set shouldn’t lack artifacts on the battlefield, especially against Red-White Dwarves who are good at forging Equipment, so on entering it can earn a lot of Treasures. As long as it survives to the next turn and you start casting spells with the Treasures it created, you can earn cards for a small life cost. However, considering the opponent may well have no artifacts at all, I lowered the rating slightly.

Rating: 2.5
Comment: A 2-mana 3/2 trampler, mostly used to help meet Enduring Story. Once achieved, creatures and artifacts additionally have ward {1}, which has little effect on the board, so there’s no need to pick it especially early.

Rating: 3.5
Comment: A three-mana Adventure helps you find lands and fill the graveyard, and the body is an Elf lord. Paired with the lands found by the Adventure, every Landfall becomes a 2/2 Elf token (a 1/1 receiving its lord bonus). It’s a strong card that the opponent must remove early, or they’ll gradually lose their board advantage.

Rating: 3.0
Comment: As it stands, there are only 3 Elves in the set with activated abilities, and there are only 4 legendary Elves. Its two static abilities are both hard to use in limited, and the only qualifying part should be its 5-mana 5/6 body, but there’s no need to splash a third color for it.

Rating: 4.0
Comment: A 4-mana 3/4 that lets you play an additional land as long as you control another Elf. But the powerful part is the second ability: each Landfall can put two counters on a target creature and give it vigilance, which makes your creatures easily become powerful attackers that break through the board. If you’re worried about the body itself getting removed, you can cast it first and then play a land next to make it a 5/6, dodging most non-destroy removal.

Rating: 4.5
Comment: A 5-mana 5/5 that also has a chance to sacrifice some mid-to-small creatures that can’t get through in exchange for cards, which is quite powerful. And even when it dies, it can come back from the graveyard as a noncreature artifact that’s harder to interact with. Paired with the 2/2 Wolf tokens produced by the Black-Green pair, or Amass Goblins, you’ll hold the upper hand in the resource battle for a long time.
Note: If you’re on the side facing it, black’s Gnashing of Teeth
, whose effect exiles instead after it dies, is the best weapon against it. Red’s Pinecone Strike
also works, but you must first deal two or more damage to it before you can remove it.
Colorless and Artifacts

Rating: 2.5
Comment: A 3-mana flash 2/2 reach may not be very impressive, but the extra tapped Treasure it creates untaps for a small acceleration, or to cast a splash bomb, making it a decent filler.

Rating: 2.5
Comment: A two-mana 1/2 flying bird that gains 2 life on entering and lets you choose whether to put a basic land on top of your library. So versatile!

Rating: 3.0
Comment: A lower-cost Burnished Hart. Although the other land doesn’t enter directly, once activated it basically guarantees two Landfalls, making it a terrific two-drop.
Note: Thanks to these three colorless creatures, fixing in HOB is very easy; but whether it’s worth including these rather mediocre creatures just for fixing depends on your deck’s theme. Of course, in sealed these creatures should all be quite useful.

Rating: 5.0
Comment: The Adventure side can find you powerful legendary creatures, helping you meet Enduring Story as soon as possible. The 5-mana artifact itself is also no slouch: a team-wide Glorious Anthem and one extra card of hand advantage at end of turn. Even if you can’t cast the Adventure side, it’s absolutely worth a first pick, and any limited deck that has it sees its power greatly increased!

Rating: 3.0
Comment: It can finish off creatures at instant speed, has a cheap equip cost, and can help ground creatures gain reach to block fliers. If you know the opponent has Dragons, remember to bring it in from the sideboard.

Rating: 3.0
Comment: For 2 mana you can attach it to a target Dwarf to give +2/+2 and ward {1}, and even if it later falls off onto the battlefield, three mana to enlarge your most threatening creature is also quite good. But if you aren’t playing Dwarves, it looks somewhat mediocre.

Rating: 2.0
Comment: Scry 2 on entering is decent, suitable for feeding cards like Stir Up Trouble . Drawing it in the very late game can also serve as a removal spell, but don’t expect much.

Rating: 1.0
Comment: I mainly want to discuss the 4-mana sorcery Adventure side: for four mana you look at six cards and take all the instants/sorceries among them into your hand. Assuming the deck has 9 instants/sorceries, the expected value works out to probably less than 1.5 cards. As for the Equipment part… why not just spend that four mana on casting spells instead?
In sealed, if you have enough good instants/sorceries, you can try it; but in draft I probably wouldn’t recommend it. Digging with a four-mana sorcery is too clunky, and there should be other good options.

Rating: 2.5
Comment: For two mana it can make a target creature unblockable, which is undoubtedly a big boost on green creatures that already have a size advantage. The other effect lets you discard a legendary permanent card with the same name as one on the battlefield, similar to the earlier SOS Grandeur ability, helping you swap duplicate legendary cards in hand for two more useful cards.

Rating: 4.0
Comment: Early on you can use the two-mana Adventure for a Village Rites. By paying 2 life to attach it to your strongest creature, you buy a ceiling of winning the game single-handedly! Hexproof + can’t be blocked, and basically the opponent can no longer interact with it.

Rating: 4.0
Comment: Three mana to summon, three mana to equip is a bit clunky, but the bonus it gives is quite good, and the trample ability is also quite key. But if you want to create Treasures, you must first connect with a player.

Rating: 3.0
Comment: Quite flexible: it comes down with flash for two mana, and if the opponent has already spread out their board, the attack bonus from attaching it is considerable; however, early on or when the opponent is at a disadvantage, this Equipment can’t help you much. It’s an Equipment whose effect varies enormously depending on the timing of its arrival.

Rating: 3.0
Comment: A colorless land-fetching artifact that finds a basic land to your hand on entering and keeps filtering while it stays on the battlefield. A solid card.

Rating: 2.0
Comment: In other sets it might be a 2.0 secondary filler, but since this set can accumulate Equipment and speed up Enduring Story, in the Red-White pair it can be the 23rd card in the maindeck. Other color pairs don’t necessarily need it.
Lands

Rating: 3.0
Comment: At first glance it’s a Fabled Passage that costs life, but if you Behold an Elf it becomes a Prismatic Vista. In the Blue-Green Landfall theme you can pick it early, but if you need fixing, the other land-fetcher Hobbit Hole may be a better choice.
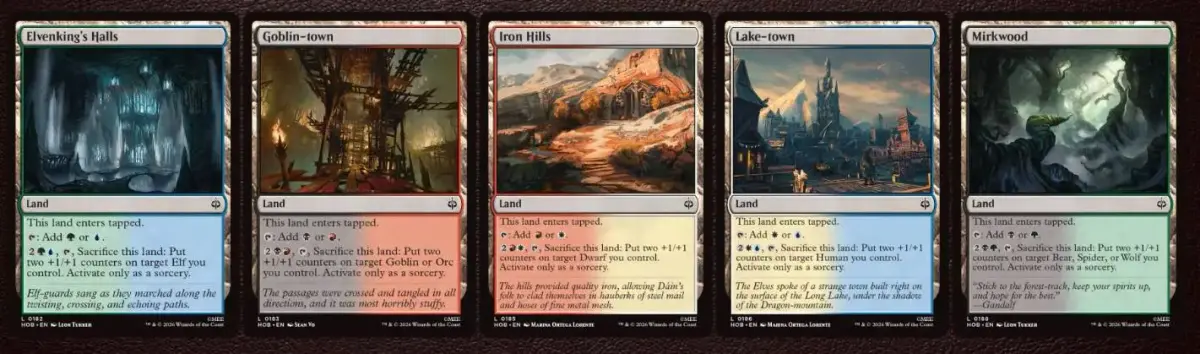
Rating: 2.5
Comment: These five dual lands correspond to the color pair themes, fixing early and later in the game converting into the body of a creature of the corresponding race. Worth mentioning is that Black-Green has the Ferocious theme, and Black-Green’s Mirkwood has a chance to help you make a 4-power creature in the midgame to late game. Even if your powerful big Wolves/Bears are all killed and only 2/2 Wolf/Bear tokens remain on the battlefield, you can still sacrifice this land to make a 4/4 creature and keep enjoying the Ferocious bonus.
Note: The sacrifice-and-put-counters ability is restricted to the corresponding race, so if you build a multicolor mishmash deck, this ability may not come into play.
Rating: 3.0
Comment: A good helper for Landfall and fixing. Halflingcycling can find the Hobbits in your library for you, and it still delivers extra value when you flood in the midgame to late game.

Rating: 3.5
Comment: Paired with Equipment it reliably creates 2/2 Dwarves, which is quite good. Its Mountain type also gives you a chance to find it with the corresponding land-fetching cards, such as Last Light of Durin's Day ? (Just kidding, that card is terrible and I don’t recommend playing it)
Conclusion
Because the set has fewer cards this time, I tried putting colorless and multicolor cards in the same article, but as I wrote, I actually got the feeling of taking a grand tour around the Hobbit’s Middle-earth! From the legendary characters and the various inhabitants they met on their journey in the multicolor section, to the important treasures of the story and the protagonists’ signature weapons in the colorless section, and finally revisiting the story’s key scenes again in the lands section.
Writing this felt like reading a Hobbit setting book, with Magic: The Gathering cards as the vehicle for unfolding the look of Middle-earth in front of players once more. The only regret is probably that there really are too few cards this time. Why not make it a big set of 260-plus cards?
- Title
- The Hobbit (HOB) Limited Guide — Multicolor, Colorless, Lands
- Author
- cephille
- Created at
- August 3, 2026
- License
- This work is licensed under CC BY-NC-SA 4.0 .