How Beginners Can Improve at Limited: Draft Edition

Note: This article was translated from Chinese by AI and may contain errors. Read the original Chinese version.
Before We Start
This article is a sequel to How Beginners Can Improve at Limited: Sealed Edition. Many basic Limited concepts were already covered in the previous article and will not be repeated here, so I hope readers will read it first before coming back to this one.
Why Is Draft Hard?
Although Draft and Sealed are both part of Limited, they are very different in how you build a deck. In terms of the goal of deck building, Sealed asks you to find the best way to build from limited resources; Draft asks you to find the best-fitting build from limited resources through a series of conscious choices.
Let me quote once more the definition of Draft from the previous article:
Definition of Draft
- Booster draft: At least 4 and at most 8 players, each using 3 booster packs. Once the match begins, each player opens their first booster pack, picks one card from it, then passes the remaining cards to the left to the next player, and so on, continuing to pass left until every card in all the packs has been picked. Then the second booster pack is opened and drafted in the same way, except the passing direction changes to the right; finally the third booster pack is opened, passing left as with the first pack. After all the cards in the three booster packs have been drafted, players build a deck of at least 40 cards to play with, and any cards not used become your sideboard.
Every pick you make in a draft is a conscious choice. Let me say it again: conscious choice is the core spirit of Draft.
Of course, the last card or last few cards of each pack may not matter much, but for at least 80% or more of your picks, you are constantly choosing. Before you build your deck and start playing, by the time the picking ends, your performance in this draft has basically been decided.
So, back to the point of this section: why is Draft hard?
In Sealed, even if the strength of the cards you open has an element of luck, there are always one or two color pairs with a relative majority of playables that let you build the backbone of your deck, and then you mix in strong cards from a third or even more colors to reinforce it. It’s like facing a tray of building blocks whose count is known: based on the shapes and sizes of the blocks you have, you build a castle of suitable size. If, after building the castle, you find a great many blocks left over (strong cards not used), or your castle looks oddly proportioned (the deck’s curve isn’t ideal), anyone with a bit of experience will re-examine it and adjust. Or at least, you can ask an experienced player for help.
In Draft, however, if you lack the following abilities, it is hard for you to pick and build a decent deck:
- Understanding the draft environment and preparing in advance
- Knowing how to make the right choices during the draft
- Following a reasonable drafting plan and adapting on the fly
Returning to the metaphor of building a castle from blocks, Draft is more like selecting, through a series of picks, the blocks you will use to build the castle (drafting), and only then building the castle (building the deck). But how do we know whether the castle is built correctly or well? The Art of War, “Military Disposition”, says: “Thus the victorious army wins first and only then seeks battle; the defeated army fights first and only then seeks victory.” The difficulty of Draft lies in how to grasp the keys to victory and become the “victorious army”, which is also the main point this article wants readers to understand.
How Do You Grasp the Keys to Victory in Draft?

The following content will make heavy use of Bloomburrow (BLB) Limited cards and situations as examples, with a few other sets as supplements. It will also draw on Limited data on MTGA compiled by 17 Lands to explain things to readers. Readers are welcome to try the other links in the article or use them for further reading.
Note: 17 Lands data was retrieved on August 9, 2024.
Preparation Before the Draft
1. Understand the Set Themes of the Draft Environment
Articles on set themes, color pairs, mechanics, and the like are relatively easy to find online. The search keywords are “Draft” plus the set’s three-letter code, for example “BLB” for Bloomburrow. The main purpose of this kind of article is to give you a preliminary understanding of that set’s Limited, so you can quickly get up to speed when you encounter it.
Readers are welcome to read these two articles to better understand what this subsection is actually talking about:
2. Understand How Friendly the Environment Is to Multicolor Decks
Whether an environment is friendly to multicolor decks is something you need further analysis to know. We can examine it using the following points:
- The number of dual lands, or even multicolor lands,
- The fixing ability of green and of artifacts,
- The rarity of the fixing cards
Taking BLB Limited as an example, there are no dual-color lands at all like the dual-color Deserts in OTJ such as Festering Gulch, or like Evolving Wilds in WOE that can produce two colors. Although there is a great fixing card like Fabled Passage, it is a rare and not easy to obtain. Furthermore, the environment doesn’t even have effective low-cost fixing artifacts like Prophetic Prism. Even though Patchwork Banner, a Manalith-style card, exists, first, a three-mana mana rock is rather slow, and second, it is an uncommon, so it can’t count as a plus for multicolor friendliness. However, when we turn our eyes to BLB’s green cards, Heaped Harvest and Three Tree Rootweaver are both excellent fixing/ramp cards, and both are commons, which gives us a valuable signal: if you want to play three or even more colors in the BLB environment, green will be a very important main color.
Combining the above, we can draw a small conclusion: BLB is an environment unfriendly to multicolor decks, lacking effective dual lands and fixing cards; however, the excellent fixing and ramp ability of green cards is the key to going multicolor in BLB.
3. Understand the Speed of the Draft Environment
How do you understand whether an environment is fast or slow? This sounds rather difficult, but in today’s era of big data, and thanks to tools like 17 Lands that compile game data from MTGA, we’ll use the Format Speed data on 17 Lands for the Limited sets MTG has released from September 2023 up to now to do an unprofessional analysis:
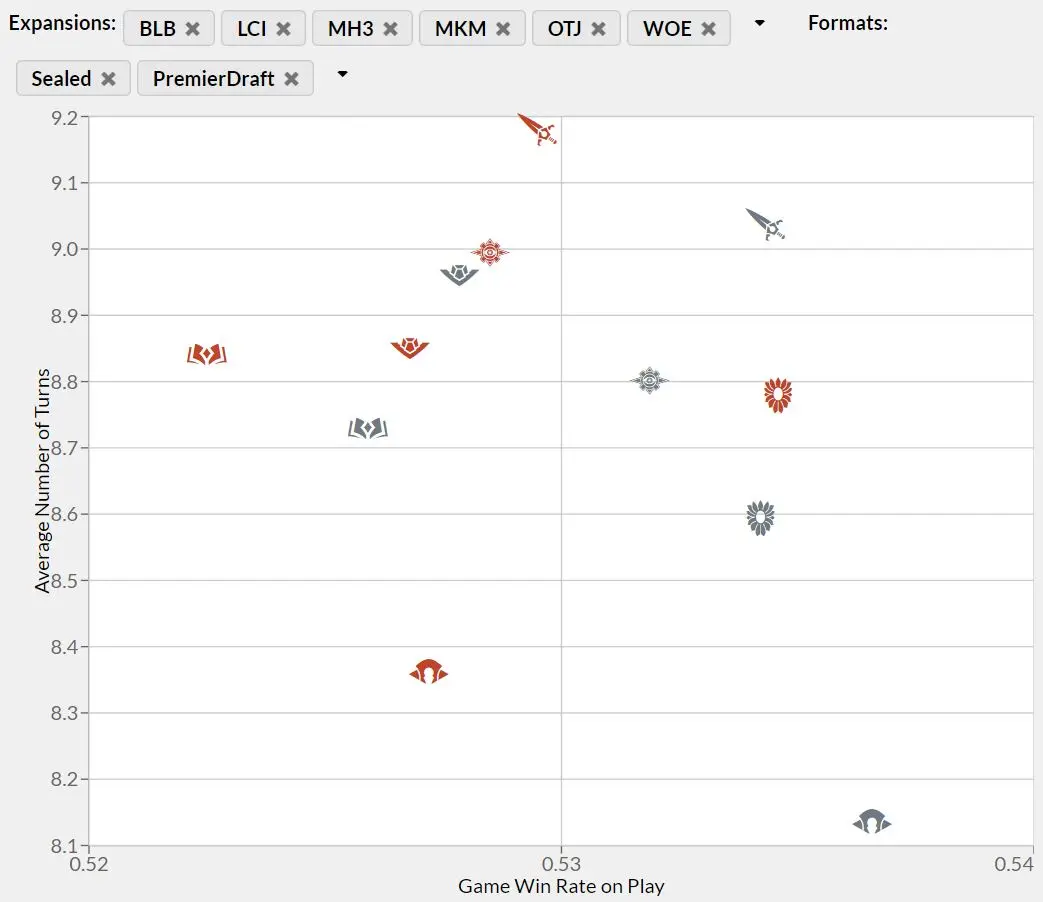
- In the chart above, the horizontal axis is the win rate of the player on the play, and the vertical axis is the average turn on which games are won. The gray markers are the average data for Premier Draft (draft, BO1) on MTGA, and the red markers are for Sealed (BO3) on MTGA.
- The sets included are the five Standard sets WOE, LCI, MKM, OTJ, and BLB, and MH3, a Modern set, for comparison.
From the chart above we can see that BLB Draft is the second fastest set after MH3 Draft, and the fastest of the five Standard sets, with an average winning turn of about 8.6. That MH3 is the fastest draft set is beyond doubt. In terms of card strength, the stronger a set is, the faster games tend to be decided; conversely, if a set is slower, games often fall into both sides lining up creatures, and the winning turn gets pushed later and later. This also explains why MKM is the slowest: mainly because of its headline disguise mechanic. When the set encourages you to spend three turns to put out a 2/2, games will inevitably drag on.
The data above tells us that BLB is a fast-paced set. And the information extended from this is: in BLB Limited, especially Draft, focusing on aggressive color pairs and studying how to draft them helps raise your win rate.
4. Understand Card Strength
Strength is a subjective concept, but by working backwards from the average win rate of games in which a card is used, you can assign objective data to every card. Here we again use the information from BLB card data comparison on 17 Lands for analysis:

- In the chart above, the horizontal axis is the win rate when the card is in the opening hand, and the vertical axis is the win rate when the card is drawn during the game. The further toward the upper right a card is, the higher its objective strength, and these are basically what we commonly call bombs; conversely, the further toward the lower left, the lower the strength, down to what is basically duds.
- Each dot in the chart represents a card. Besides the obvious blue, black, red, and green, ochre here is white, gray is colorless, and multicolor cards are shown in purple. Also, the size of each dot has meaning: the larger it is, the more times it was used during the retrieval period.
Based on the objective data above, you can identify important information such as bombs, key cards, and duds. But don’t forget that the data above was compiled from MTGA only after the set was released. From the spoiler season until the prerelease begins, well-known overseas sites such as Channelfireball and Draftsim also publish their expected evaluations of the cards in the environment. Of course, compared with the objective information from big data, subjective ratings inevitably deviate somewhat from real testing, but this bias also provides a more human point of view beyond the cold data, and may hide special uses that haven’t yet been developed by the mainstream!
Since Guildmages’ Forum began operating, we have not been absent from any Standard Limited format. If you need card rating information in Traditional Chinese, you are welcome to look through the rating articles in Limited.
5. Understand Which Color Pairs Are Strong and Weak
Based on the understanding of theme, multicolor friendliness, speed, and strength from the previous subsections, you may already have some simple knowledge before you take part in a draft, but how do we find out information like which color pairs are strong or weak?
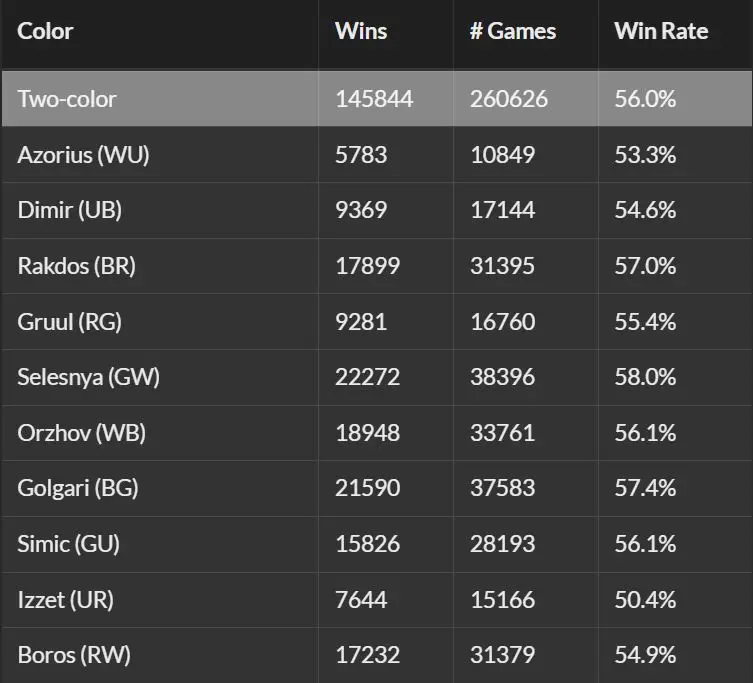
Here we again cite the statistics from BLB Deck Color Data on 17 Lands. The chart above shows the win rates of BLB’s two-color pairs. We can see that Selesnya has the highest win rate at 58.0%, while Izzet has the lowest at only 50.4%. But does this mean we must go all out to get into the super strong Selesnya and must never touch the weakest Izzet? The author thinks not necessarily.
The reason is that the table above only captures the win rates of BLB’s two-color pairs. In fact, the statistics also include mono-color, mono-color with a splash, two-color with a splash, even three-color, three-color with a splash, four-color, and even five-color data, and there exist color combinations with a higher win rate than Selesnya and a lower win rate than Izzet. Only the two-color win rates are listed because they have the largest deck base, but to pursue a high win rate you can’t treat simple, blunt conclusions as gospel; at most they are a small hint before entering the draft. Which color pair you end up drafting, and whether you draft it well, still has to be adjusted by following the flow of the draft.
Through the preparation above, you will have a comprehensive understanding before the draft, and in the choices that follow in the draft we will repeatedly use these concepts to help us make better picks. Let’s begin!
Choices During the Draft (Opt)
With the preparation done, we now move into hands-on practice, making picks based on our understanding of the environment.
1. In Pack 1 Pick 1, Take the Strongest Card
If the first card you pick from your first booster pack pushes you too early into a two-color or even multicolor theme, then even if that card is very strong, it also limits your freedom in the rest of the draft. You would only have a chance to assemble a deck of reasonable strength if that color pair is lightly contested and your cards have enough payoff cards for that color pair; otherwise, you may have to keep taking cards of only passable strength for the rest of the draft, or even be forced to abandon your original colors and play other colors midway.
However, in a case like Cruel Ultimatum being the strongest card in your first pack, although its colors are very restrictive and demanding and there is a considerable chance that you take it and never play it, if you can’t bear the consequences of being beaten by it, then hate-drafting it is a reasonable choice. Maybe you’ll even get a chance to make it the final ultimatum of your opponent’s cruel end!
The two paragraphs above seem contradictory but are actually compatible; we will analyze this further in the pick strategies section below.
Takeaway: If you can, in Pack 1 Pick 1 please take the strongest card.
2. Identify the Priority of Each Passed Card
Next, as the draft goes on, we need to grasp “priority”. Corresponding to the “card strength” mentioned earlier, strength is information drawn from objective data or subjective judgment. Priority is a comparative concept, based on the cards you have picked before, continually stacking up to make dynamic fine adjustments. This is a complex reflex that takes a lot of practice to master, and we can’t simply give readers some easy-to-understand mantra.
Even so, we have prepared a few small questions that may help readers understand the concept of priority:
- Have I already picked this card?
- Is this a card where the more of it the better? —> Example: bombs you can actually cast
- Is this a card my deck still lacks? —> Example: a black-based deck short on removal is passed a Nocturnal Hunger
- Is this a card that could punish me heavily if I pass it? —> Example: while you are drafting Rakdos Lizards you are passed a Starfall Invocation
Choosing means trade-offs, and priority is the ultimate basis on which your scale of taking and leaving swings. You may choose wrong once, or twice, but you will always learn so that you don’t get it wrong a third time.
Takeaway: Always keep an eye on the number of cards you’ve picked, the curve, and the ratio of creatures to non-creature spells, and repeatedly practice balancing priority throughout the draft.
3. Recognize When to Change Your Plan
If you can stick to the colors you started drafting and finish your picks, congratulations, you are lucky. However, sometimes you pick a pack full of blue cards in your first pack, but from the second pack onward blue stops showing up. This is when you need to take note: it’s very likely that one or more of the players downstream of you (the people sitting on your left in the draft) are playing blue. At that point you fall into the dilemma of whether to switch colors, or to stubbornly stay in blue to the end, hoping the upstream players will pass you a steady stream of blue cards in the third pack.
Both routes carry risk. When you switch colors, your third pack may still not give you enough cards for your new colors, and the few blue cards may also be cut off by players further upstream; you are then forced to pick a third color and end up with an evenly split three-color deck. And when you don’t switch colors, you may not have collected enough blue cards in the second pack, and only pull in a second color in the third pack, but because there are few usable cards you end up with a weak blue-based multicolor deck.
Of course, the above are rather extreme situations, but they can always happen. To avoid the problems above, you need to remember a little of what you have picked. Suppose in the example above, in Pack 1 Pick 1 you took the strong blue card Kitsa, Otterball Elite, and the same pack also had two other blue cards, Lightshell Duo and Splash Lasher. When Lightshell Duo wheels back to you at pick nine of the first pack, you happily take it, but you should also notice that Splash Lasher was taken. This may mean that after you took blue cards in the first pack, the blue cards in the second pack will first reach the downstream player who took Splash Lasher, and so good blue cards may not get passed to you. If you notice this, you can start picking good cards in other colors earlier, instead of waiting until blue is cut off to pick weaker cards in other colors.
Takeaway: Always watch whether other second-tier cards in your chosen colors are wheeling back, and prepare early to mix in strong cards from unchosen colors.
Optimization of Choices: Pick Strategies

The following pick strategies are presented only to give readers some “forms” to refer to and to understand their respective strengths and weaknesses. When you feel these strategies don’t work, don’t worry: strategies exist to be broken, and once you break them you’ll discover a whole new world!
1. Thematic Pick Strategy
This strategy is a relatively beginner approach: follow the set’s themes and pick up all the theme payoff cards. Because of how the set is designed, as long as one of your colors isn’t cut off, it is a comparatively easy way to pick. The downside is also obvious: when you have few theme payoff cards but have picked many theme enablers, your deck will often be a notch weaker than others.
2. Many Colors Pick Strategy
The aim of this strategy is to ignore color on every pick and focus only on taking the strongest card in that pick, unless that pick has a fixing card available. The priority order is also relatively simple: fixing > strong cards >> everything else. This is further divided into several schools: the green multicolor school, the dual land school, and the Prophetic Prism school.
- Green multicolor school: Basically available in every set. As the name suggests, this is picking green-based decks mixed with many colors, built around green’s fixing and ramp cards; take enough of those cards and you can play it. For an example, you can go back and look at the section Understand How Friendly the Environment Is to Multicolor Decks.
- Dual land school: Limited to specific sets; it can only be used when a set has cards like OTJ’s dual-color Deserts. The hallmark of the strategy is to pick up every dual land you see, so you can mix in bombs of many colors. However, relying on dual lands alone can still get you stuck on a color, so you usually fix on one two-color pair as the main body and additionally include dual lands and strong cards that touch a splash third color. The downside is that when someone competes with you for dual lands, you may be forced into a fragile four-color deck without enough fixing lands.
- Prophetic Prism school: Limited to specific sets; it can only be used when a set has cards like WOE’s Prophetic Prism. The hallmark of the strategy is to use lots of fixing artifacts like Prophetic Prism to let the deck mix bombs of many colors. Likewise, three Prophetic Prisms is not too many and four is just right. The downside is similar to the dual land school: the strategy doesn’t work with two or fewer Prisms.
3. Single Color Pick Strategy
This is the example mentioned earlier in the section Recognize When to Change Your Plan: insisting on cutting off one color in the first pack so you get rewarded in the third pack. However, the downsides are also obvious, as roughly outlined earlier. Another problem is that although the proportion of cards of each color in a booster pack is usually fixed, extreme cases occasionally occur. If you and another player are both locked onto the same color, and in the first pack that color happens to make you both feel it should be cut and continue this strategy, the result will be rather brutal, so be careful. Although it is a high-risk, high-reward strategy, I also recommend not taking just one color indiscriminately. When the color you’ve locked into only has duds left to take, also taking a few versatile cards from other colors to keep the flexibility to add a secondary color in packs two and three is the safer approach.
4. Removal-Focused Pick Strategy
As the name suggests, this strategy is to take all the removal available in your chosen colors first, and finally pick up some mid-sized creatures or creatures with evasion to attack and win after the trades. However, removal is inherently one-for-one, and this line of thinking may not perform well in a fast environment like BLB. For example, if your removal spells all cost three or more, but your opponent starts attacking on turns one and two and even has abilities that make a creature bring along a second body, then in that situation your strategy of controlling the board with removal will gradually collapse under repeated assaults from an endless stream of small creatures. Of course, this strategy naturally has environments that suit it. The counterexample here is OTJ’s black-based removal approach: the ideal plan is to plot Rictus Robber on turn three, and on turn four follow up with a removal spell and then cast the Robber to get two bodies for one card. That tempo and board trading makes a very good start in the early game. Another example: in an environment like MKM, themed around three-mana disguise creatures, even if you are on the draw and your opponent disguises a 2/2 ward (two) creature on turn three, as long as you follow up by removing it with removal like Extract a Confession or Long Goodbye, you can immediately swing the tempo between both sides and widen your advantage.
5. The All-Embracing Pick Strategy (Advanced)
Finally, here is a fifth pick strategy. Rather than a strategy, it is more a combination of grabbing strong cards with the concept of “priority” mentioned earlier. Likewise, you take the strongest card on each of the first 5 to 7 picks of the first pack, and from picks 6 to 8 you should slowly start to catch the wind, making the single color that is passing you more strong cards your main color. After the second pack starts, you gradually lock in a second, secondary color according to the signals coming back, and finally complete a two-color deck. Although this method may cost you a few cards from the first pack that you took but can’t use, it lets you assemble a deck of reasonable strength at lower risk. However, this pick method requires players to be sensitive enough to “priority”, and the difficulty of picking up enough cards to form the main body of a deck starting from the second pack is also somewhat higher than the other four.
These five pick strategies each have strengths and weaknesses. Although the first four each carry certain risks, if any one of them is carried through to the end, the strength and synergy they produce is often higher than the fifth. The author won’t say which strategy is best; you will need to feel for yourself, in the course of practicing Draft, which approach you use most comfortably, and perhaps one day you may even forge a path of your own! Of course, whichever strategy you use, you need to combine it with the key points mentioned earlier. Don’t forget to stay flexible at all times and not to go against the current.
Conclusion: Be Water
When you enter a draft, if you have done all the preparation beforehand, then staying open without a preset route is the best way to face this draft. With no preset route, every route is possible!
You can’t be sure that, once you set a route, color pair, or strategy in your mind, there will be enough cards in all the booster packs of this draft to let you build a reasonable deck; and that doesn’t even take into account the other players competing with you! Since that is the case, being unrestricted, making the most suitable pick every time, and going with the flow as picks move around is the best strategy.
And when you can reach this level, I believe you can also gain corresponding enjoyment from every pick and every choice in this flowing process! This joy lies not only in winning but in your continued understanding and evolution of the game.
Finally, allow me to quote the philosophy of martial arts star Bruce Lee to echo the title of this conclusion: “Be Water”. Formless like water is the best mindset for Draft; by practicing continuously with this mindset and feeling the flow of one draft after another, and thereby breaking free of the constraints of rules, you will be free and at ease wherever you go.

- Title
- How Beginners Can Improve at Limited: Draft Edition
- Author
- cephille
- Created at
- August 13, 2024
- License
- This work is licensed under CC BY-NC-SA 4.0 .
Related Articles

I Drafted Alone: Solo Drafting with Reality Fracture (FRA)
October 16, 2026
Article Translation — Reid Duke's "Level One": Choosing Your Deck
August 17, 2026

Article Translation: Reid Duke's "Level One": Sequencing
July 24, 2026

Article Translation: Reid Duke's "Level One": Playing in a Grand Prix: Part I
June 13, 2026