cephille's MIT#6 Preparation and Tournament Report: Sultai Midrange in Taichung

Note: This article was translated from Chinese by AI and may contain errors. Read the original Chinese version.
Introduction
Sticking with Dimir Midrange, and Letting Go
This is a rather long introduction, so if you can’t be bothered, skip straight to the next section.
I qualified for MIT#6 with Dimir Midrange. If you’re interested, take a look at cephille’s Standard Dimir Midrange analysis and tournament report; I won’t repeat it here.
Apart from preparing for Modern at MIT#5, I kept playing Dimir Midrange in Standard and tried all sorts of different builds. Even when Esper blanketed more than 30% of the field at PT-OTJ, I still stuck with Dimir Midrange, for the following reasons:
- I believe Tishana’s Tidebinder (hereafter “the Merfolk”) is the strongest card in Standard. By “strongest” I don’t mean it is powerful in itself, but that in a Standard environment where single-card power rises with mana cost, it lets you interfere with abilities and the stack for relatively little mana. Once Cavern of Souls was printed alongside it in LCI, counterspells were no longer reliable, and the Merfolk’s interference is a very unique angle of attack that gets around your opponent’s Cavern of Souls. I think that is the main reason I consider it strong.
- I wanted to play the deck that gets the most out of the Merfolk, and Dimir Midrange is the best fit, deck-construction-wise, for this kind of flash-based interference.
This choice meant that against many Domain Ramp decks trying to use Cavern of Souls to guarantee Atraxa, Grand Unifier and Archangel of Wrath, I could shut down the big play they thought was safe to resolve with the Merfolk plus a removal spell. But two weeks before MIT#6 began, after tallying up an utterly dismal win rate in MTGA Diamond ranked, I gave up on the idea of taking the Dimir Midrange I had been drilling for so long to the event. How dismal? Let’s look at the note below.
The Appalling MTGA Win Rate of Dimir Midrange
5 wins, 16 losses, BO3 in MTGA Diamond ranked, 23% win rate
The Dimir Midrange list I used. Do not copy it! It can’t win!Azorius Control 1-3
Dimir Midrange 1-1
Golgari Midrange 1-1
Boros Convoke 0-1
Dimir Control 1-0
Traditional Domain 0-1
Bant Toxic 0-2
Temur Fireball 0-4
Gruul Big Creatures (Terror of the Peaks combo) 0-1
Esper Midrange 1-2 (the game I won was because my opponent built their deck wrong. They played a black 1/1 Faerie, and I can barely beat the versions with Enchantments and the 3-mana Rat King)
My original plan of using plenty of Merfolk in Dimir to keep pace with all the major decks also fell apart, because every major blue-based deck started playing the Merfolk at the same time, and that advantage vanished. It was common for me to Merfolk a control player’s The Wandering Emperor ability, only for my opponent’s Merfolk to counter my Merfolk’s ability and leave it falling flat.
That’s right, “Merfolk” is a verb here! I Merfolk your Merfolk, you Merfolk my Merfolk again. Truly a Stifle war made flesh!
Trying Golgari Midrange, and a Change of Heart
On ClarkShih’s suggestion I used Reid Duke’s PT-OTJ version of Golgari Midrange and climbed to Mythic ranked on MTGA. However, while playing the deck there were several matchups that were very hard to win, such as Dimir Control, Gruul Big Creatures, and even Temur Fireball, which is basically impossible to stop and only ever loses to itself. These very bad matchups made me hesitant about entering with Golgari Midrange, and that was when I thought of the Merfolk. It’s always so good. Old flames are always the most beautiful, right?
Pre-Tournament Preparation: Iterating on Sultai Midrange
MIT#6 Sultai Midrange decklist
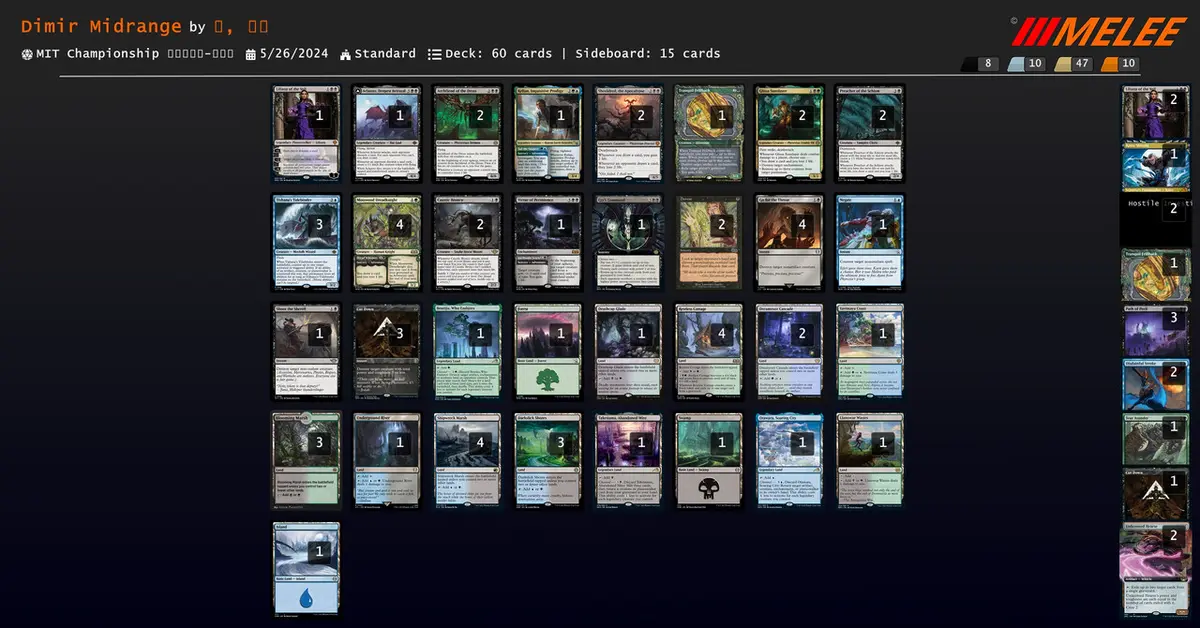
The sideboard cards that don’t display properly are 2 Hostile Investigator.
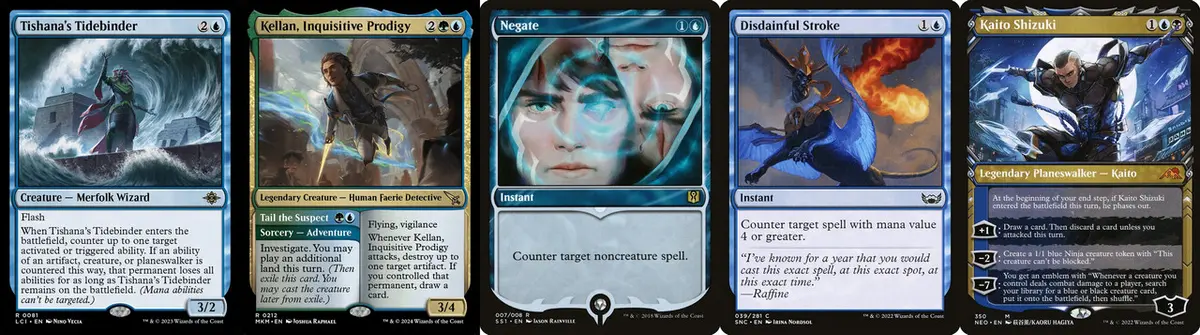
Basically, this is Golgari Midrange splashing blue. On top of the strong creatures of the original Golgari Midrange, I added blue as extra interference. The main point of blue is that I put 3 Merfolk, 1 Kellan, Inquisitive Prodigy // Tail the Suspect, and 1 Negate in the main deck, and 2 Disdainful Stroke and 1 Kaito Shizuki in the sideboard.
The main targets of the interference are as follows:
- Tishana’s Tidebinder: For every matchup that isn’t a Golgari mirror. It’s the soul of this deck; the only reason I didn’t run a full set is that there truly was no room.
- Kellan, Inquisitive Prodigy // Tail the Suspect: A small accelerant I tried, and a clock that holds up against The Wandering Emperor. More on it below.
- Negate: One copy in the main deck to threaten the noncreature bombs the opponent tries to resolve, improving the win rate against Temur Fireball and control.
- Disdainful Stroke: Temur Fireball and control.
- Kaito Shizuki: Midrange matchups.
That said, in the short week after deciding to play three-color Sultai, this version actually went through several iterations. I’m very grateful to my friends at Guildmage’s Forum for discussing it with me and giving me better ideas. A brief summary follows.
Adjusting the Mana Base for Three-Color Sultai
The original configuration was extremely black-heavy, because I didn’t want to stall my early black removal and Duress.
- Slow lands: 2 each of Dimir, Golgari, and Simic
- Fast lands: 4 each of Dimir and Golgari
- Pain lands: 1 each of Dimir and Golgari
However, after playing a few games I found I often drew fast lands late and clogged my own mana curve, which was super annoying. After changes, it became the following final version:
- Slow lands: 4 Dimir, 2 Simic, 1 Golgari
- Fast lands: 3 each of Dimir and Golgari
- Pain lands: 1 each of Dimir, Golgari, and Simic
The rest of the mana base is the 4 immovable Golgari creature lands Restless Cottage, plus one each of the channel lands: black Takenuma, Abandoned Mire, green Boseiju, Who Endures, and blue Otawara, Soaring City. Also, I really did not want to get blown up by Field of Ruin and get stuck on colors, so I dutifully put in one basic land of each type.
Setting Up the Two-Drop Curve
At first I followed the Golgari configuration and played 4 Caustic Bronco, but because of how I built the deck, my three-drop slot has to be left open for the Merfolk, so often I couldn’t Saddle, and the drawback of attacking with the Bronco was too big for me to dare to attack. Later I also tested a version with Deep-Cavern Bat, but found that this card is made for Dimir and Esper; if I wanted to play it I might as well play Esper. It was basically giving up Golgari’s size advantage and crippling myself. But after switching back to the Bronco I could never find a balance point, so in the end I settled on the odd configuration of 2 Bronco and 2 Preacher of the Schism.
I later thought that if I wanted to fill the tempo gap on turn three when I’m not jumping to the Merfolk, the best option would be to swap the Bronco slots for 2 Faerie Mastermind, but I really didn’t have that much confidence in my mana base reliably having blue by turn two, so I still played the Bronco, resulting in this so-so version.
You can also see here that the game plan of this version is actually somewhat mutually exclusive, especially on the two- and three-drop curve. Golgari wants to curve out on turns two and three to apply maximum pressure, while Dimir, if not going Bat into Gix, can use the flash axis of Faerie Mastermind into the Merfolk, letting you shift tempo freely whether on the play or the draw. The three-color configuration is a bit of a stretch at the moment, but I just wanted to use the Merfolk in Golgari. If Dimir worked I wouldn’t have to settle like this…
Reasons for a Few Individual Cards

Kellan, Inquisitive Prodigy // Tail the Suspect: At MIT#5 I watched 約力昂大叔 use this card to great effect in Modern in Temur Rhinos. Since I had the chance to use it, I wanted to try it too, and it felt quite good! Tail the Suspect, the two-mana Adventure, makes a Clue and lets you play an extra land, which is very important in a mana-tight midrange matchup and can pull you from being on the draw to level with being on the play. A common situation is that after the turn-two Adventure you unlock a slow land that enters with black, and can follow up with Duress or hold mana for Cut Down! And the four-mana 3/4 flying vigilance body is excellent, making him completely immune to interference from The Wandering Emperor when attacking, and he can even push back and kill her. Blowing up artifacts when attacking is super, super strong! Sacrificing your own artifacts to draw cards is also excellent. That might be Map tokens from an opponent’s Get Lost, Food tokens sent out after a Golgari creature land attacks, your own Adventure, and Clue tokens from Hostile Investigator; not to mention that he can blow up deadly artifacts like Urabrask’s Forge and a whole bunch of other nasty ones! Against Bant Toxic you can happily destroy your opponent’s artifact creatures too. White-blue artifacts? Eat my Kellan’s stratospheric attack!
Kellan is also a card that made splashing blue feel very worthwhile to me. At least I no longer have to play weak cards like Sentinel of the Nameless City the way Golgari might out of fear of The Wandering Emperor. If I could re-register my MIT#6 list, I would definitely move a slot to a second Kellan, at least in the sideboard.

Virtue of Persistence // Locthwain Scorn is a somewhat outdated choice, but I think it may still fit the current meta quite well! The two-mana Adventure Locthwain Scorn gives -3/-3 and gains you 2 life, which is just enough to kill a lot of the mid-sized creatures in the environment. Most creatures in Esper Legends are within range, as are Gix, Yawgmoth Praetor in black-based decks and Nissa, Resurgent Animist from Temur Fireball. And the seven-mana Virtue cast straight is a late-game bomb after a round of trades. You don’t have to use it, but as long as it sits in exile on an Adventure it is a considerable deterrent to your opponent. At worst, you can attack with the Bronco to bait your opponent’s Sheoldred into blocking it, then give her -3/-3 to finish her off.

Tranquil Frillback: I briefly took it out of the list out of worry that I wouldn’t have enough green to use it, but in the end I put it back as 1 main deck and 1 sideboard, for no reason other than saving slots. It may not be the most efficient card, but the three options it offers fit the current meta quite well: gain 4 life against aggro and get an extra 3/3 blocker, graveyard hate, and removing artifacts and enchantments. And the creature type gives it more chance of being picked back up by Takenuma, Abandoned Mire or Gix’s Command for reuse. At worst, it can also saddle the Bronco.
When practicing on MTGA, be careful: when you want to cast the dinosaur, remember to choose manual payment. Otherwise, if you have a green pain land and choose auto pay, the pain land will be tapped as colorless. I got killed by this twice XD
Sideboard Plan
With the help of my friends at Guildmage’s Forum, we each prepared a Sideboard Guide and discussed and fine-tuned it. Here is the Sideboard Guide I prepared. If you’re interested, take a look, and feel free to contact me to discuss it.
MIT#6 Main Event Round Notes
R1 Dimir Midrange 2-1
I registered the deck as Dimir Midrange, which confused my opponent a little. Sorry about that, but my soul really is Dimir Midrange XD
I’ve sort of forgotten how I won game one. In game two, my opponent had Bat plus Gix that I couldn’t remove, then landed the card-draw enchantment Proft’s Eidetic Memory, and I couldn’t claw back the resources. GG. In game three I was slightly behind on board when I top-decked Aclazotz, got killed once to ramp, then spread out; the next turn I flipped it back and stabilized the life gap to win.
After sideboarding I’ve somewhat forgotten exactly what I swapped, but since my opponent can theoretically draw a lot, making them discard with Liliana of the Veil isn’t necessarily effective, so I kept all the Archfiend of the Dross and pressed through on the size advantage.
R2 Mono-Blue Cauldron 2-1
In game one the Merfolk was MVP! After sideboarding, my opponent raced me for life with Sleep-Cursed Faerie. I tried to resolve Liliana of the Veil and it got hit by Negate; Path of Peril was answered by Slip Out the Back, which phased out and grew the creature, and then my following removal spell was also dodged by a second Slip Out the Back. GG. In game three I again used the Merfolk to hold down the Cauldron, and a 4/4 Unlicensed Hearse along with a bunch of creatures swung all-out to win.
R3 Boros Convoke 2-1
In game one I shouldn’t have attacked with the Bronco and Mosswood Dreadknight. After I landed Archfiend of the Dross, I was at 5 life. The opponent had two Warleader’s Call on the battlefield, and I had four lands with two removal spells, a Merfolk, and a belated Negate in hand. The opponent had two Novice Inspector buffed +2/+2 by the enchantments and a lot of cards in hand (one known to be a Voldaren Epicure fetched by Knight-Errant of Eos), and was at 14 life. I decided to attack with the Demon, and then the opponent hit back and I killed two of their creatures with removal, leaving them at 4. Then the opponent landed Epicure and cast Resolute Reinforcements, and I got hit for 7 and died. If I had had five lands, I would have kept the Demon back on defense; if they swung all-out I could have blocked one and killed one, and if they played Epicure and attacked for 3 I could still have used the Merfolk to absorb a hit. But getting two creatures jumped in really was hopeless. Once Warleader’s Call resolves the countdown starts. It’s so strong.
In game two, Path of Peril into Gix’s Command; before the Command I remembered to use Cut Down on the opponent’s Sanguine Evangelist. Win.
In game three, the opponent was stuck on two lands with a Knight-Errant of Eos and two Novice Inspector on the battlefield. Duress saw their Urabrask’s Forge, and they still had four creatures in hand including an Imodane’s Recruiter // Train Troops. I got beaten down to 1 life and cast Aclazotz, Deepest Betrayal, which gained me back up to 5 after attacking, and then I slammed Archfiend of the Dross. The opponent finally hit their third land the following turn and played the Recruiter. I killed the Convoke Knight and used the Demon to block and kill the three-mana Knight, leaving me at 1. The next turn I drew Cut Down and swung all-out plus removal to take out the last 12 life and win.
Winning this game against Convoke truly took all my strength!!!
R4 Temur Fireball 1-1
In game one I had no interference and was burned to death by the third Worldsoul’s Rage. Before that, the first one killed Kellan to ramp 4 lands, and the second killed the Demon to ramp 5-6 lands.
After sideboarding I don’t quite remember. I think I hit several times with a Glissa Sunslayer before she was removed, then swapped in several creatures plus creature lands to beat down the opponent.
In game three the opponent was great at flipping lands, and an Aftermath Analyst once ramped six lands… After that we played until time was called and went into five extra turns, and I was at 19 life. On the opponent’s turn four they first landed Virtue of Strength // Garenbrig Growth, and with 9 untapped lands on the battlefield could produce 27 mana, but they went into combat first. Kellan, Inquisitive Prodigy // Tail the Suspect and Borborygmos and Fblthp attacked while removing the only creature that could block, and then I suddenly had a flash of inspiration:
Worldsoul’s Rage is a sorcery → mana not spent after the combat phase disappears → I have Otawara, Soaring City in hand
So I used Otawara to bounce their Virtue of Strength, and then I didn’t get burned to death by Rage XD Draw obtained.
R5 Esper Legends 1-2
I faced Kappa, a friend from Guildmage’s Forum. Nothing much to say; a real, serious match!
In game one, all I remember is that two Duress couldn’t see anything, which was super pathetic, and I got buried in card advantage by Bat plus Gix. After I removed the Virtue of Persistence that the Bat was holding down, I then removed Gix, and then the opponent landed the second Gix they were holding… Eventually my Glissa Sunslayer was removed as soon as it landed, and I followed up with Preacher of the Schism to keep trading life and held the ground with Archfiend of the Dross, but the opponent had two Plaza of Heroes and wasn’t afraid to just crash in and trade, and in the end the Demon was removed and I conceded.
In game two I think I played Mosswood Dreadknight // Dread Whispers on curve on turn two to start taking life, then followed up with a Saddled Bronco to blast a wave through and crush the opponent; whatever blocker the opponent played, I just killed it.
In the decisive game three I think I took one mulligan and kept a passive hand with three removal spells; the opponent went Skrelv, Defector Mite on turn one, flashed in Faerie Mastermind on turn two, and followed with Gix on turn three while I used two Cut Down to remove the first two creatures; but the opponent played Sheoldred on turn four, and on turn five slammed Raffine, Scheming Seer for a combo that killed me outright. I remember knocking on the table when they landed Raffine. That’s too much! How can you draw that well! But there’s nothing to be done. That’s Magic.
Don’t mind it, Kappa. In a serious match, one person wins and one person loses.
R6 Esper Midrange 1-1 (Thanks to My Opponent for Conceding)
I faced 小蘇 of CM. Game one was a very long game. 小蘇 played carefully and I couldn’t find many openings, but his board was always weaker, and he even had to cast a lone Deep-Cavern Bat to pull his life total back. I kept attacking with Preacher of the Schism to draw cards, but I drew almost nothing but lands. When I finally landed Sheoldred, 小蘇 also landed Sheoldred to stand off against me, and played two Faerie Mastermind to keep drawing cards. I had no choice but to keep attacking with the Preacher, and both sides piled up cards in hand, but I was losing out on it. After who knows how many turns of drawing lands, with 12 lands on the battlefield and 3 in hand, I drew removal and killed 小蘇’s Sheoldred, but when I drew cards to regain life, my Sheoldred got Merfolk’d. By this point the game had gone 40 minutes, and my card-drawing Preacher had been traded off a few turns earlier, so I could only attack with the 6 creatures on my board (a vanilla Sheoldred, three Mosswood Dreadknight, one 1 / 1 lifelink Vampire token, and one Merfolk) all at once to try to take 小蘇’s last 6 life. 小蘇 had two Merfolk, one Preacher of the Schism, and one Raffine; in the end he blocked Sheoldred with the Preacher, a Merfolk with a Merfolk, a Knight with the other Merfolk, and a Knight with Raffine, and 小蘇 was left at 1. After the trades, 小蘇 started using Bat together with Raffine’s connive ability, and attacked with everything for the win: Dennick, Pious Apprentice recovered from the graveyard, two white-blue creature lands Restless Anchorage, Raffine, and the Bat. I have to admit I played a bit recklessly here, but I felt that with him ahead on board and the game already at 40 minutes, I had to settle it this turn.
After sideboarding, things went smoothly for me. I resolved Archfiend of the Dross and won in two hits.
By this point time was up and there was no way to finish a third game. I told 小蘇 how strongly I wanted to go to Amsterdam, and I am very grateful that he was willing to give me this opportunity. Truly, thank you so much.
R7 Boros Convoke 1-2
In this round I was seated at table five. The top three tables all intentionally drew, and this table was Win & In for Top 8. The moment I lost the die roll I felt like something was slowly leaving me, and then mulliganing twice confirmed it.
In game one I had no sweeper and no chance at all. In game two the opponent took a mulligan, but my opening hand had Duress, which saw their Gleeful Demolition, settling the game, and afterwards I finished with Glissa plus the Demon. Thank you for being so supportive of me this game.
In game three I mulliganed twice again: no lands in the opening hand, five lands on the second mulligan with Glissa and Command, which couldn’t survive five turns so I mulliganed again, and took a two-land hand with three removal spells, dropping Sheoldred and the Demon. After that I couldn’t stop anything at all. They went turn two into turn three Convoke into Sanguine Evangelist, then slammed another Recruiter, and I lost.
My final record was 4 wins, 2 losses, and 1 draw, for 17th overall, just missing the Top 16 prize payout. Falling this far probably has to do with how many draws there were today.
The Top 8 had four Boros Convoke, one Azorius Control, one Bant Toxic, one Esper Midrange, and one Temur Fireball. In the end Azorius Control took the championship, with Boros Convoke as runner-up.
Conclusion
The format of MIT#6 was Standard, which I personally am stronger at, and it was the most solid amount of practice I’ve put in over these three seasons. Although I went through the struggle and iteration of changing decks, I believe that readers who have made it this far can understand my chain of decisions. I’m not satisfied with the result, but I did everything I could, and at least I managed to win at least one game in every match.
I’m very grateful to my friends at Guildmage’s Forum and the friends who accompanied me in practice and testing along the way. I’m quite sure that if I had prepared alone, I wouldn’t have had enough practice or confidence in my deck choice, nor the performance at the venue. In Magic: the Gathering, besides winning, continuing to climb to higher levels, and struggling painfully, what is equally fun is the concept of “the gathering”. This game is so much fun because a group of people play together, practice together, and grow together, and that is what makes you and me unable to quit.
- Title
- cephille's MIT#6 Preparation and Tournament Report: Sultai Midrange in Taichung
- Author
- cephille
- Created at
- May 29, 2024
- License
- This work is licensed under CC BY-NC-SA 4.0 .