Pioneer Lotus Field Guide

Note: This article was translated from Chinese by AI and may contain errors. Read the original Chinese version.

Before We Start
Hello, readers, I’m zhi-mao. First, a quick self-introduction: I used the Lotus Field combo deck to take second place at the fourth-cycle Magic in Taiwan championship (Magic in Taiwan, MIT), which earned me a spot at PT Chicago, so I figure I can share some thoughts. A heads-up: the thoughts and introductions below draw on many different people’s guides, but I read quite a lot of them, so I’m not sure which part came from whom. Basically, treat this as a synthesis of everyone’s guides, plus my own little tricks and thoughts. Alright, on to the main text, which is divided into several parts:
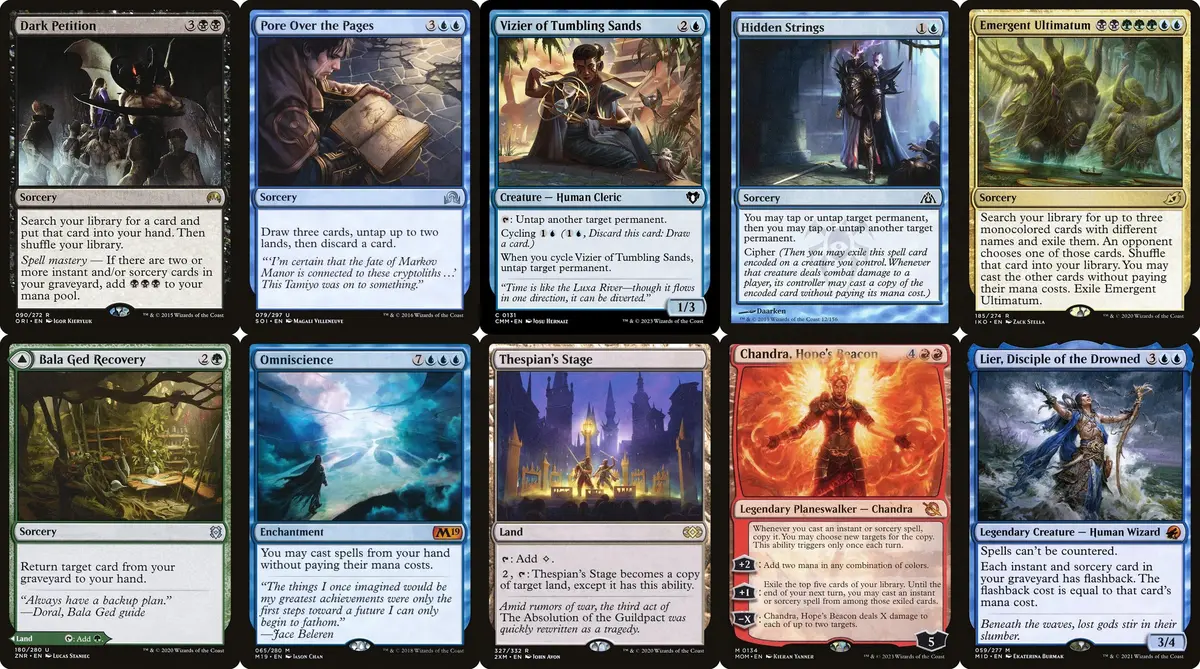
First, a brief introduction to how this deck works. Basically it relies on getting Lotus Field onto the battlefield as early as possible, copying Thespian’s Stage into a Lotus Field, and using Hidden Strings, Pore Over the Pages, and Vizier of Tumbling Sands to reset the Lotus Fields, producing a huge amount of mana, then casting tutor spells to find and cast Omniscience. After that comes the finish, and currently there are roughly three ways to finish:
- First, the Chandra build, using Chandra, Hope’s Beacon and three Bala Ged Recovery to deal infinite damage to any target;
- Second, the Sun build, using Mastermind’s Acquisition to find Approach of the Second Sun from the sideboard and casting it twice for a special win;
- Third, the Ugly Face build, using Peer into the Abyss to make the target opponent draw half their library and lose half their life, then using three Bala Ged Recovery and Lier, Disciple of the Drowned to cast Peer into the Abyss multiple times, so the opponent’s life drops to 0 through the rounding.
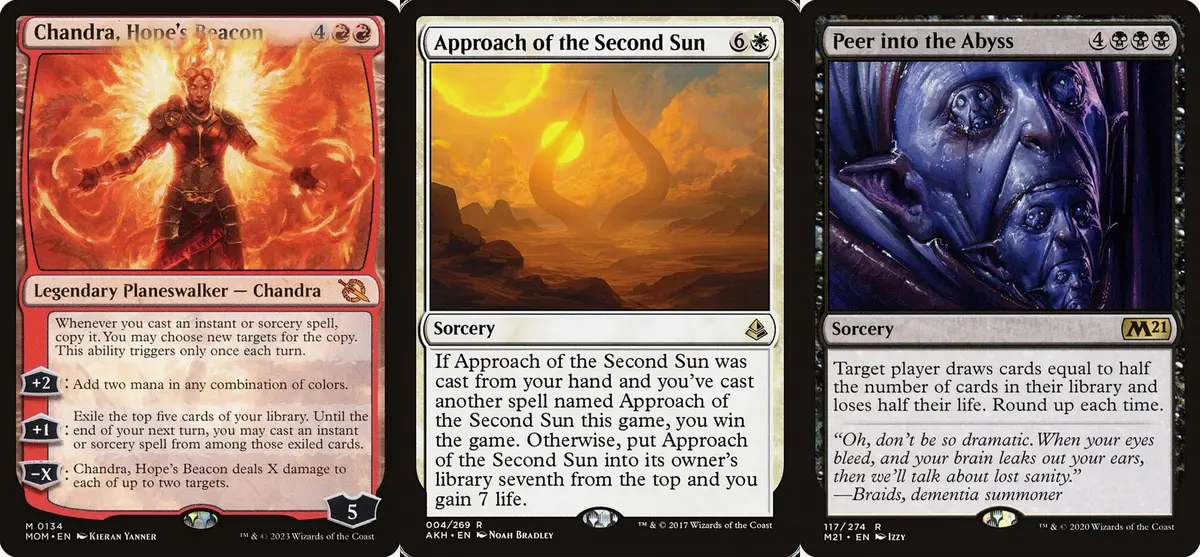
Each approach has its own strengths and weaknesses, but since the Chandra build appeared, the Ugly Face build has gradually been replaced, and now it seems almost only the Chandra and Sun builds remain.
Alright, now that you know how it works, let’s introduce the deck first. Below is the decklist I built for the tournament:
MIT#4_Final_Lotus Field Combo by Zhi Mou, Ho
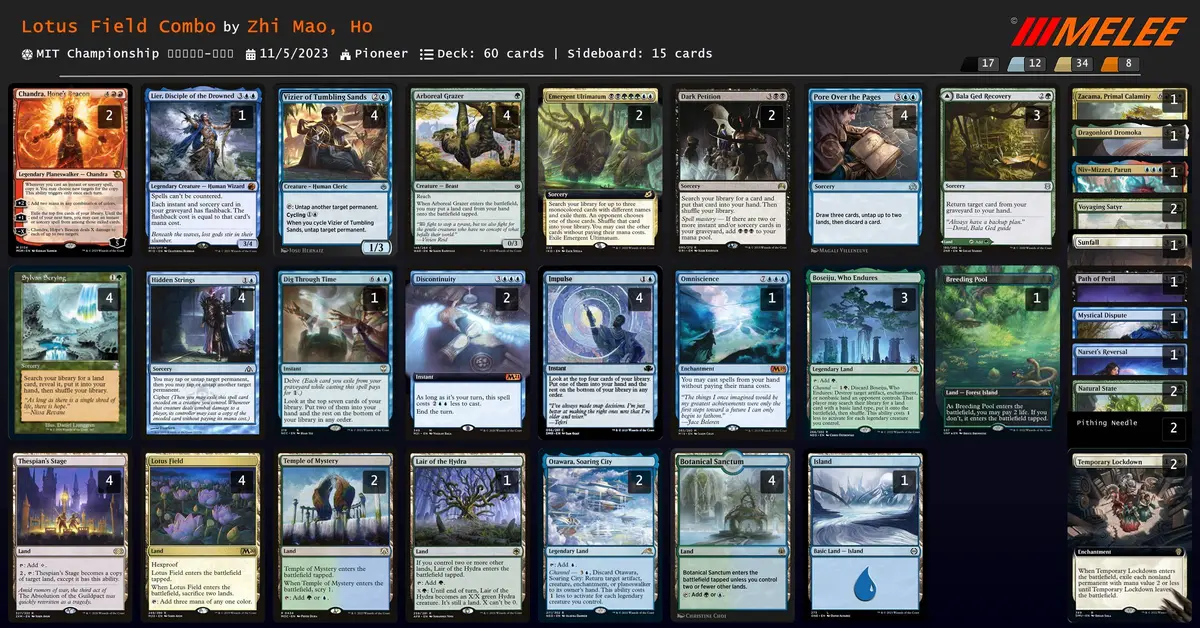
As for the deck construction and why I chose these configurations at the time, I’ll cover that in the deck composition section. All the play descriptions that follow basically revolve around my build, so please keep it in mind for now!
Basic Plays
A Little Reminder Before We Begin
Having briefly covered the general plays, now let’s go through the basics. Nearly 50% of the time you will be operating in this situation:
With two Lotus Fields already on the battlefield, the following actions give you the extra mana shown below. Also note that this mana must be used before the end of the phase or it disappears.
- Casting Hidden Strings = + 4 mana (1 blue + 3 of any one same color, or 2 blue + 2 of any one same color)
- Cycling Vizier of Tumbling Sands = + 1 mana (1 blue, or 2 blue + 2 of any one same color but with only one Lotus Field untapped. Remember you can use this to cast Emergent Ultimatum)
- Casting Pore Over the Pages = + 1 mana (1 of any color)
Also, we’ll be using these cards a lot later, so please note the abbreviations:
- DP: Dark Petition
- Pore: Pore Over the Pages
- Hidden: Hidden Strings
- Vizier: Vizier of Tumbling Sands
- Ult: Emergent Ultimatum
- Bala: Bala Ged Recovery
- Omni: Omniscience
- Stage: Thespian’s Stage
- Chandra: Chandra, Hope’s Beacon
- Lier: Lier, Disciple of the Drowned
Most Solutions Start Here!
Premise: all of the opponent’s lands are tapped out, and they cannot interact.
Under this premise, the goal is to use these spells to add mana and cast Ult, choosing Pore, DP, and Omni. The opponent then has only two choices:
- Shuffle DP back into the library, betting that you have nothing in hand and that Pore draws three lands;
- Shuffle Omni back and let you keep going
First, option 1, which should be fairly simple: if Pore draws gas you win. Mainly you draw the two tutors DP and Ult, and then find the Chandra build’s win condition.1
[Win condition]:
With enough mana or Omniscience on the battlefield, you have Chandra + Bala in hand (or Chandra on the battlefield but her passive ability not yet triggered), and 2 Bala in the graveyard, or 1 Chandra + 1 Bala in the graveyard (if Bala or Chandra is still in the library, DP in the graveyard can count as Bala or Chandra)
Now option 2: the opponent shuffles Omni back. After the opponent chooses, cast DP and then Pore, resolving Pore first to draw three cards and see what you get. There are four cases to handle, A through D:
Note here that on the first Ult, check whether the graveyard already has 1 instant/sorcery to trigger DP’s spell mastery to make 3 black mana. If not but you have a spare instant/sorcery in hand, discard it to the Pore that resolves first so as to satisfy DP’s spell mastery. (Pore + discard that card)
A. If you draw one of Bala, a second DP, or Ult, and you have in hand any spell that produces an extra 1 mana (Hidden, Pore, Vizier), or you already have a spare mana, then the first DP fetches Omni. Since the first DP made 3 black mana + Pore with two Lotus Fields untapped for a total of 9, adding any card that produces 1 extra mana lets you cast Omni. With Omni on the battlefield, the responses are as follows:
[Drew Bala] Cast Bala to return DP from the graveyard; DP fetches Ult from the library, cast Ult to get DP, Chandra, and Bala;
a. If they give you DP + Chandra, DP returns Bala, then with Chandra on the battlefield, Bala copied once returns DP and Bala, DP fetches the last Bala from the library, completing the loop;
b. If they give you Bala + Chandra, Bala returns Bala, then with Chandra on the battlefield, Bala copied once returns DP and Bala, DP fetches the last Bala from the library, completing the loop;
c. If they give you Bala + DP, Bala returns DP, DP gets Chandra, DP gets Bala, cast Chandra, and Bala copied once returns the two Bala in the graveyard, completing the loop;
[Drew the second DP] DP fetches Ult from the library, cast Ult to get Lier (since there is no DP left in the library), Chandra, and Bala;
a. If they give you Chandra + Bala, Bala returns DP, then with Chandra on the battlefield, DP copied once gets Bala and Bala (or a second Chandra), and then you can do the infinite loop;
b. If they give you Lier + Bala, Bala returns DP, cast DP to find Chandra, use the 6 black mana from two DPs to flash back the DP in the graveyard, get Bala, cast Chandra, cast Bala and copy it, get Bala and DP from the graveyard, cast DP to find Bala, completing the loop;
c. If they give you Lier + Chandra, use Chandra’s [+2] to make 2 blue + the 3 black from DP, flash back Pore from the graveyard and copy it, producing 6 black while keeping the two Fields untapped, flash back DP from the graveyard to get Bala, leaving 4 black + two Fields; cast Bala, return DP, cast DP to get Bala, cast Bala, return DP, cast DP to get Bala, leaving 10 black + two Fields; flash back DP from the graveyard to get Otawara, Soaring City (or a second Chandra), leaving 8 black + two Fields; use Otawara to bounce Chandra (or call the second Chandra), cast Bala and copy it, get the two Bala in the graveyard, completing the loop;
[Drew Ult] Cast Ult, cast Ult to get Bala, Chandra, and DP;
a. If they give you Chandra + DP, DP gets Bala, then Chandra to the battlefield, cast Bala and copy it, return the two DP in the graveyard, both DPs get Bala, and then you can do the infinite loop;
b. If they give you Bala + DP, DP gets Bala, Bala returns DP; you will have 1 Bala + 1 DP in hand, and repeat this process once; DP gets Bala, Bala returns DP, leaving 1 Bala + 1 DP in hand and at least two Bala in the graveyard; then DP gets Chandra, cast Chandra, cast Bala and copy it, return two Bala, completing the loop;
c. If they give you Bala + Chandra, Bala returns DP, Chandra to the battlefield, cast DP and copy it, get two Bala, completing the loop;
B. If you draw Omni plus any spell that produces 1 mana, then DP fetches Ult. DP makes 3 black + Pore with two Lotus Fields untapped for a total of 9, and adding any card that produces one mana (Hidden, Pore, Vizier) lets you cast Omni. With Omni on the battlefield, cast Ult, and you’re back to the three cases in A;
C. If you draw Lier, then DP fetches Hidden. 3 black + two Fields, cast Hidden to become 2 black 5 blue + two Fields, cast Lier and flash back DP to get Ult, leaving 3 black + one Field; flash back Hidden to become 2 black 2 blue + two Fields, cast Ult leaving one Field, and get Pore, Omni, and DP,
- If they give you Pore and Omni, you will have 3 blue + two Fields, with two Pore in the graveyard. With 9 cards drawn you keep playing for free whenever you hit gas, and the mana is enough to flash back all the Pore in the graveyard, and once you find Chandra, DP, and Bala to assemble the pieces you win (Chandra can also use [+1] to speed up finding pieces, and you should have much more mana. Remember to use Sylvan Scrying to find Otawara before [+1], to avoid Chandra exiling two Otawara)1
- If they give you Pore and DP, again draw with Pore first and then resolve DP, leaving 3 blue 3 black + two Fields,
a. If you draw gas, DP gets Omni, cast Omni, and loot until you finish;
b. If you draw Omni, DP gets Bala, cast Omni, cast Bala to return DP, DP gets Bala, Bala returns DP, DP gets Bala; three DPs make 9 black, flash back DP from the graveyard to get Chandra, cast Chandra, cast Bala and copy it, return the two Bala in the graveyard, completing the loop;
c. If you draw nothing, super sad: flash back DP to get Pore, 1 blue 3 black + two Fields, and start going wild with Pore, drawing up to 12 cards, then see what you draw and find a way to cast Omni with the resources, then loot and loop.1
D. If none of the above applies, super sad. Then DP keeps fetching Ult, using DP’s 3 black + the two Fields untapped by Pore, leaving 1 black + 1 blue this time. As with the first choice you return to point A, but this time you can’t draw DP or Ult, so you can only loot with Pore and try to draw Lier and Omni to loop.1
The above examples completely ignore the opponent and assume the worst draws, including low-probability events like no Hidden in the graveyard at all and Pore drawing all lands. In practice, if the opponent is tapped out, finding Lier should be the way to get the most resources; but in most cases the opponent will not be tapped out, so I don’t recommend finding Lier unless necessary. All of the above are just examples, and in actual play you need to adjust slightly based on the opponent’s deck and the board.
Emergent Ultimatum (Ult) Tips
Next I’ll introduce a few tips about Ult. The following ideas will help us think about which spells to take when Ult is successfully cast in a given situation:
- Ult exiles itself after being cast. Please don’t cast it, leave it in the graveyard, and flash it back with Lier. That’s cheating!
- Ult costs 2 blue 2 black 3 green, and apart from Lotus Field our lands can only produce blue and green, which means black mostly has to come from the Fields. So when you can float 2 mana, try to float black; when floating 1 mana, float blue. A common sequence is with two Fields on the battlefield, cast Pore, floating 1 blue + two Fields, cast Pore again, floating 2 black + two Fields, so that after casting Ult you keep 1 blue. That 1 blue together with the 3 black from DP can feed Hidden when you need to find Lier through Ult and Hidden is in the graveyard. If you foolishly float 2 blue, you’ll have only 1 black after casting Ult, and only 4 black after DP resolves, unable to cast Hidden from the graveyard, so you can’t choose this combination with Ult;
- With two Fields on the battlefield and only Vizier left in hand, remember you can first produce 3 blue + 3 black and use 1 blue 1 black to cycle Vizier, leaving 2 blue + 2 black + one Field, which gives you a chance to draw Ult after cycling and cast it.
- Because of priority passing, if you choose permanents with Ult (Lier, Chandra, Omni), remember to cast the permanent first and then the spell, that is, resolve the permanent last, so that after the permanent enters the battlefield, priority is still yours and it can’t be killed in response.
- If your version plays Behold the Beyond, remember when finding it with Ult to cast Behold the Beyond last. If you get the order wrong, you’ll discard your whole hand.
- Remember Ult can only find single-color spells, so Ugin, the Spirit Dragon and Dragonlord Dromoka in the sideboard can’t be found with Ult.
- I don’t know if this is worth mentioning, but cards found with Ult must be cast immediately. In a past tournament I saw someone do something else first and then want to go back and play what Ult had found, and that’s not allowed (though responding with instants is fine)!
- Ult finishes resolving after you cast the two spells or choose not to cast them. The opponent cannot respond with Silence while you find three cards and put one back; they can only respond when you cast Ult, and then you just need to find three useless cards and exile the two the opponent asks you to exile.
- If you look carefully at the example in the previous section, I try not to find two permanents directly, usually doing so only when DP is completely gone. First, permanents are easier for the opponent to remove. Second, when two permanents are cast, there is a window after the first enters and before the second enters for the opponent to deal with the first. Since the vast majority of the deck is sorcery-speed, you can’t enjoy the permanents’ effects (Lier, Chandra, Omni). So I don’t recommend finding two or more permanents directly while the opponent still has mana and cards in hand and DP remains in your library.
- When two Fields are on the battlefield, pay attention to when you cast DP:
- With DP and Ult in hand, you can cast Ult as long as the graveyard has 2 instants/sorceries;
- With Hidden and DP in hand, you need one instant/sorcery;
- With Hidden and Ult in hand, you don’t need any instant/sorcery in the graveyard.
- When thinking about what to take with the first Ult, there are a few tips:
A. If you have no mana now, take two kinds of cards that can produce blue mana (Omni, Hidden, Pore, Chandra), to avoid the opponent putting back your blue mana sources;
B. If you have mana, try to take cards with more resources (Pore, DP (to find a second Ult), Lier);
C. Think about how the opponent can interfere and try to route around the interference (Boseiju, Who Endures, instant-speed removal, counterspells, etc.) (this is the hardest part) - The most important point: in this whole deck, Ult serves to lubricate and add cards and mana, and you don’t depend on this card to win. Opponents cutting off this card doesn’t accomplish much; it makes no real difference. When practicing, don’t feel you must rely on Ult to start things off. More than half the time you won’t necessarily cast Ult; it’s just the one with the most options.
Deck Composition
Choosing the Second Chandra Instead of the Third Ult
Basically a combo deck has little flexibility and few free slots. For my own choice this time, I mainly guessed that Phoenix would be the majority (it wasn’t, but I did face two in the Top 8, haha) and that decks with counterspells would be the minority, so I chose to stuff the free slots with 2 Discontinuity and 1 Dig Through Time. I also think the meta isn’t good at dealing with planeswalkers, so I swapped the third Ult for a second Chandra. In some midrange matchups I even called out Chandra and used [-4] to kill two of the opponent’s creatures, and leaving a Chandra at 1 loyalty on the battlefield puts a lot of pressure on the opponent too. The infinite damage part can also be done with two Chandra and two Bala, so it doesn’t have to be tied to three Bala, and so I prefer the second Chandra over the third Ult.
Why DP Instead of Behold the Beyond
As for Behold the Beyond, which many people play, I originally had it, but later after discussing with 日本田王, whose version has no DP and one Behold the Beyond, he felt DP wasn’t needed, since without a Field in the deck you can’t cast it, which makes it relatively clunky. But if Behold the Beyond is in hand, casting Ult gets a little awkward: with no tutor to find, you need to burst out mana and rely on Lier to flash back from the graveyard, and this part is easily stopped by the opponent’s instant-speed removal, so I personally don’t like that. So later I changed to two DP and no Behold the Beyond. It’s relatively less clunky, has a tutor to find cards, and the 3 black mana from spell mastery is also key.
Sideboard Strategy
For the sideboard, I brought two Temporary Lockdown and one Path of Peril against convoke and Heroic, and Sunfall, Mystical Dispute, and Narset’s Reversal against Phoenix. Since I thought there would be less control, I swapped one of the original two Dragonlord Dromoka in the sideboard for Niv-Mizzet, Parun, so that against aggro or Rakdos matchups I wouldn’t run into the problem of drawing two copies of the same legendary creature and being unable to put pressure on the board. Pithing Needle is aimed at Karn decks and Rona, Herald of Invasion. Voyaging Satyr is for decks you need to race, such as the mirror match, aggro, or Rona, Herald of Invasion. Natural State is for taking out the annoying Damping Sphere, and considering Karn, I didn’t bring Tear Asunder, which relatively lowers my win rate against Greasefang (but I guessed Phoenix would be common so nobody would play Greasefang).
Deck Notes
- Stage can copy the opponent’s lands. Here’s a trick: against decks with Field of Ruin or Boseiju, Who Endures, you can first use Stage to copy a basic land (yours or the opponent’s), making a basic land with Stage’s ability, and next turn copy Lotus Field, so it won’t get blown up by Field of Ruin or Boseiju.
- Stage can copy the opponent’s lands, and at the right time you may need to copy the opponent’s manlands to defend/attack, and you can also copy your own Lair of the Hydra. Although the Hydra land played this turn will have summoning sickness after animating, a Hydra land copied by a Stage from a previous turn won’t have summoning sickness, so after casting Omni, you can use Pore, Hidden, and Vizier to produce mana to make a huge Hydra land and kill.
- In sideboard games, you can use Stage to copy the opponent’s white land and adjust colors with Hidden to cast Temporary Lockdown.
- In most cases you’ll use Stage to copy Lotus Field so that there are two Lotus Fields on the battlefield, but you don’t necessarily need to. You can slowly play lands up to two Fields, or rely on the Grazer to get the second Field onto the battlefield as soon as possible.
- With only one Field and one blue land, you need at least 1 Hidden and 1 Vizier to cast Ult. With only one Field and one green land, you need at least 2 Hidden to cast Ult.
- In main-deck games you usually float one blue and two black; in sideboard games you may need to consider floating white or red.
- Hidden can reset permanents, so a Vizier or Satyr on the battlefield without summoning sickness can each count as a Field, speeding up casting Ult.
- Hidden can tap permanents. Use it more on the opponent’s lands and on the opponent’s graveyard removal or creatures, such as Unlicensed Hearse and Tormod’s Crypt.
- Remember Hidden has the cypher ability. Many people overlook it, but attaching it to a creature is much more useful than you’d think, especially in sideboard games. A common situation is you have a creature on the battlefield (Vizier, Lier, Dragonlord Dromoka) and the opponent has a creature standing to defend. You can use Hidden to tap the opponent’s creature and untap your Field, and cypher it onto your creature on the battlefield, so you’ll have extra mana for mana growth or looting, and after combat use cypher to untap the creature/land again to defend, grow mana, loot, or even complete the combo.
- Basically this deck is always thinking about the situation from the next turn to three turns ahead, so it takes quite a lot of practice time. Not knowing the opponent’s deck well will also make you miscalculate the opponent’s kill turn, and you might miscalculate whether you need to start going for the combo this turn.
- In most cases you need to put pressure on the opponent, so if I already have Lotus Field, Stage, and Vizier in hand, I’ll usually play Stage and cast Vizier on turn three. If the opponent doesn’t remove it, next turn I can play Lotus Field and use Hidden to reset Vizier and the Fields to cast Ult. If the opponent removes Vizier, next turn I still play a land and copy the Field with Stage. This reduces the opponent’s early pressure of constantly deploying the board and betting that you can’t finish with your hand.
Mulligans
Basically I keep to one principle: keep hands that can play a Field on time, and the rest you can only learn from playing more, to know how much each card weighs in each matchup (but it still has to fit the requirement of being able to play a Field on time). Although I say on time, it doesn’t strictly have to be on time; the hand just has to be able to support you playing a Field. Basically that means two lands plus 1 Field in hand, or two lands including green with Sylvan Scrying, or two lands including blue and green with Impulse in hand. I won’t keep a hand of five or more cards that isn’t one of these situations. Only from the third mulligan (down to four cards) do I consider keeping hands with no Field or with one Field and one land.
Matchup Tips
1. Big Green
A slightly unfavorable matchup, slightly favorable after sideboarding. The opponent will go all out to find Karn, the Great Creator, use Karn to find Pithing Needle naming Boseiju, and find Damping Sphere to try to lock us down. This matchup is dangerous, and nowadays Karn can also find The Stone Brain to exile our Lotus Field. Being hit by Pithing Needle or Damping Sphere you can still fight, but if the Lotus Field is cut you can basically concede. So the goal becomes putting permanents on the battlefield as early as possible (Vizier, Pithing Needle, Voyaging Satyr) to attack Karn, to avoid Karn generating infinite resources, or to finish the combo before the opponent sets up interference.
Karn got banned, so pretend I didn’t say anything.
2. UW Control
A relatively favorable matchup (the more Get Lost, the worse it gets). Two directions. First, when you have many cards in hand, trade counterspells every turn, giving the opponent no chance to draw cards, and once the counterspells are traded you’ve basically won. Second, grow mana until you can cast two or more spells in one turn, putting the opponent in a mana bottleneck. An early-game trick: on the play, if you have a basic land on the battlefield, play Stage first and copy the basic land for protection; if not, play a Field first, to make sure the Field + Stage can lock down 2 of the opponent’s mana + Field of Ruin. On the draw, always play the Field first, unless there are no basic lands left in the library, and be careful of the opponent betting that a basic is in hand and responding with Lotus Field’s sacrifice ability. If a basic is in your hand, Lotus Field’s sacrifice will blow up your own land (nearly losing the game), which must be avoided at all costs.
3. Greasefang
A relatively unfavorable matchup. It has high explosiveness plus discard and enchantment-removal disruption, often requiring me to hold back the Boseiju or Otawara in my hand, so I can’t always force a land drop and end up with no mana on the opponent’s turn. But the main deck can barely deal with creatures (except Skysovereign, Consul Flagship). Try to cast Vizier early to complete the combo sooner. As for the sideboard, I’ve seen both routes online: some think you should abandon the combo to play big creatures and interference, and some think completing the combo as early as possible is better. I personally lean toward the combo, so I don’t bring in Zacama, Primal Calamity, Niv-Mizzet, or Dromoka.
4. Gruul Vehicles
An extremely unfavorable matchup. The opponent has Boseiju to interfere, and is fast enough. The main-deck Reckless Stormseeker puts on a lot of pressure. Since you might pass with nothing early and let the Werewolf transform, after seeing the opponent play a Werewolf you may need to save Impulse for your main phase rather than cast it at the end of the opponent’s turn, to avoid it becoming night.
The situation is like this: I’m on the play, I have two lands untapped and pass, the opponent has 1 Elf on the battlefield and casts a Werewolf with 2 lands, hitting us for 3. If at this point you have a Field and Impulse in hand and no other two-mana play, you must pass and use Impulse during your own main phase, and play a Field sacrificing two lands, to prevent the Werewolf from transforming and dealing two more damage each turn and giving creatures trample.
5. Spirits
A relatively unfavorable matchup in the main deck, slightly unfavorable after sideboarding. The opponent has a lot of soft counters, but the sideboard Dromoka, which they can barely remove, puts a lot of pressure on them. Be careful of the opponent’s Aether Gust and Otawara. Whether it’s Azorius or mono-blue Spirits, I choose to put all the combo pieces in for sideboarding, bringing in all the sweepers and creatures. When Dromoka is on the battlefield, you can attack with Dromoka, and when defending, respond at instant speed by cycling Vizier to reset Dromoka to block.
6. Rona Combo
With the 80-card main deck that plays Unmoored Ego it’s more unfavorable, slightly favorable if it only brings Karn, 50/50 after sideboarding. Be careful of your Field getting cut. They use the same tricks as Big Green to lock down our Field, and the solutions are the same. Artifact removal and Boseiju might need to be used to deal with Mox Amber, and Pithing Needle can also name Rona, Herald of Invasion.
7. Rakdos Midrange
Favorable in the main deck, slightly unfavorable after sideboarding. The opponent has many dead cards in the main deck, so basically it comes down to who is smoother and whether the opponent’s discard keeps up. For my sideboard I choose to bring in all the Arboreal Grazer, three big creatures, and Sunfall.
8. Rakdos Sacrifice
Favorable in the main deck, slightly unfavorable after sideboarding. Guard carefully against Damping Sphere. Overall it’s about the same as playing against Rakdos Midrange, but you need to bring in artifact removal.
9. Humans
Unfavorable in the main deck, 50/50 after sideboarding. The more Thalia, Guardian of Thraben, Archon of Emeria, and Reidane, God of the Worthy they have, the worse it gets. Basically bring in all the sweepers and big creatures and take out the combo pieces.
10. Convoke
Unfavorable in the main deck, slightly unfavorable after sideboarding. Like Humans, Convoke’s sideboard also has Thalia, the 2/3 Archon, and the 2/3 God. The more the opponent plays, the worse it gets. Since the opponent mulligans aggressively, but getting swept once or twice basically leaves them unable to recover, bring in all the sweepers and big creatures and take out the combo pieces here too.
11. Bring to Light, 60-card Fires, 80-card Fires
Extremely favorable, you basically won’t lose, just play lying down. Just watch out for Leyline Binding and Vanishing Verse, as well as sideboard counterspells and name-and-exile effects. Since there are many versions and everything gets played, you can only adapt as needed, but it’s still very favorable.
12. Phoenix
Relatively favorable. Remember the opponent’s counterspells. Basically if they don’t have enough counters or aren’t smooth, you just trade counters until you win. The main deck usually has two Spell Pierce and a small number of Izzet Charm. Either way you have to reserve two mana. Note the sideboard has Mystical Dispute and Narset’s Reversal, and a small number of Narset, Parter of Veils and Ashiok, Dream Render. Since the opponent usually holds up counterspells, and the main-deck counters are usually 1-2 mana, in the main deck you can easily use Hidden to tap the opponent’s lands and finish.
Afterword
Back when I played, Amalia Combo didn’t exist yet. After this deck appeared, Lotus Field is extremely unfavorable against it, and there are no really good options even in the sideboard, so I now lean toward playing a Bant version, replacing the Arboreal Grazer with Strict Proctor to slow down Amalia Benavides Aguirre by countering its enter-the-battlefield trigger. I’m also testing the new cards Archdruid’s Charm and Reenact the Crime. Barring surprises, I plan to ambush the field with new cards at the PT, so the overall colors should lean a bit more toward white and green, and the new surveil lands are also a boost for Lotus Field. Let’s see how far I can get at the PT!
Footnotes
These scenarios mean you successfully cast the first Ult and have two instants/sorceries in the graveyard, but there is a chance you can’t finish. As long as the graveyard has resources (Impulse, Hidden, Pore), Ult can find Lier, or drawing Hidden makes your mana grow faster and the play simpler. But remember to keep at least two mana and at least one blue, to flash back Hidden. ↩ ↩2 ↩3 ↩4
- Title
- Pioneer Lotus Field Guide
- Author
- zhi-mao
- Created at
- March 2, 2024
- License
- This work is licensed under CC BY-NC-SA 4.0 .