Zur Domain: Once Zur Shows Up, Blood Will Be Shed!!!

Note: This article was translated from Chinese by AI and may contain errors. Read the original Chinese version.
Introduction
Hello everyone~ I’m Clark Shih, aka Wild Knight. I originally meant to start writing this two or three months ago, but I held off because I didn’t want to reveal my strategy before the tournament, and a new set was coming out soon too. But now the tournament is over, and my Taiwanese teammate has qualified for the Pro Tour, so there’s no reason not to write it, right?
Deck Introduction
Deck Composition
Decklist link: Once Zur Shows Up, Blood Will Be Shed!!!
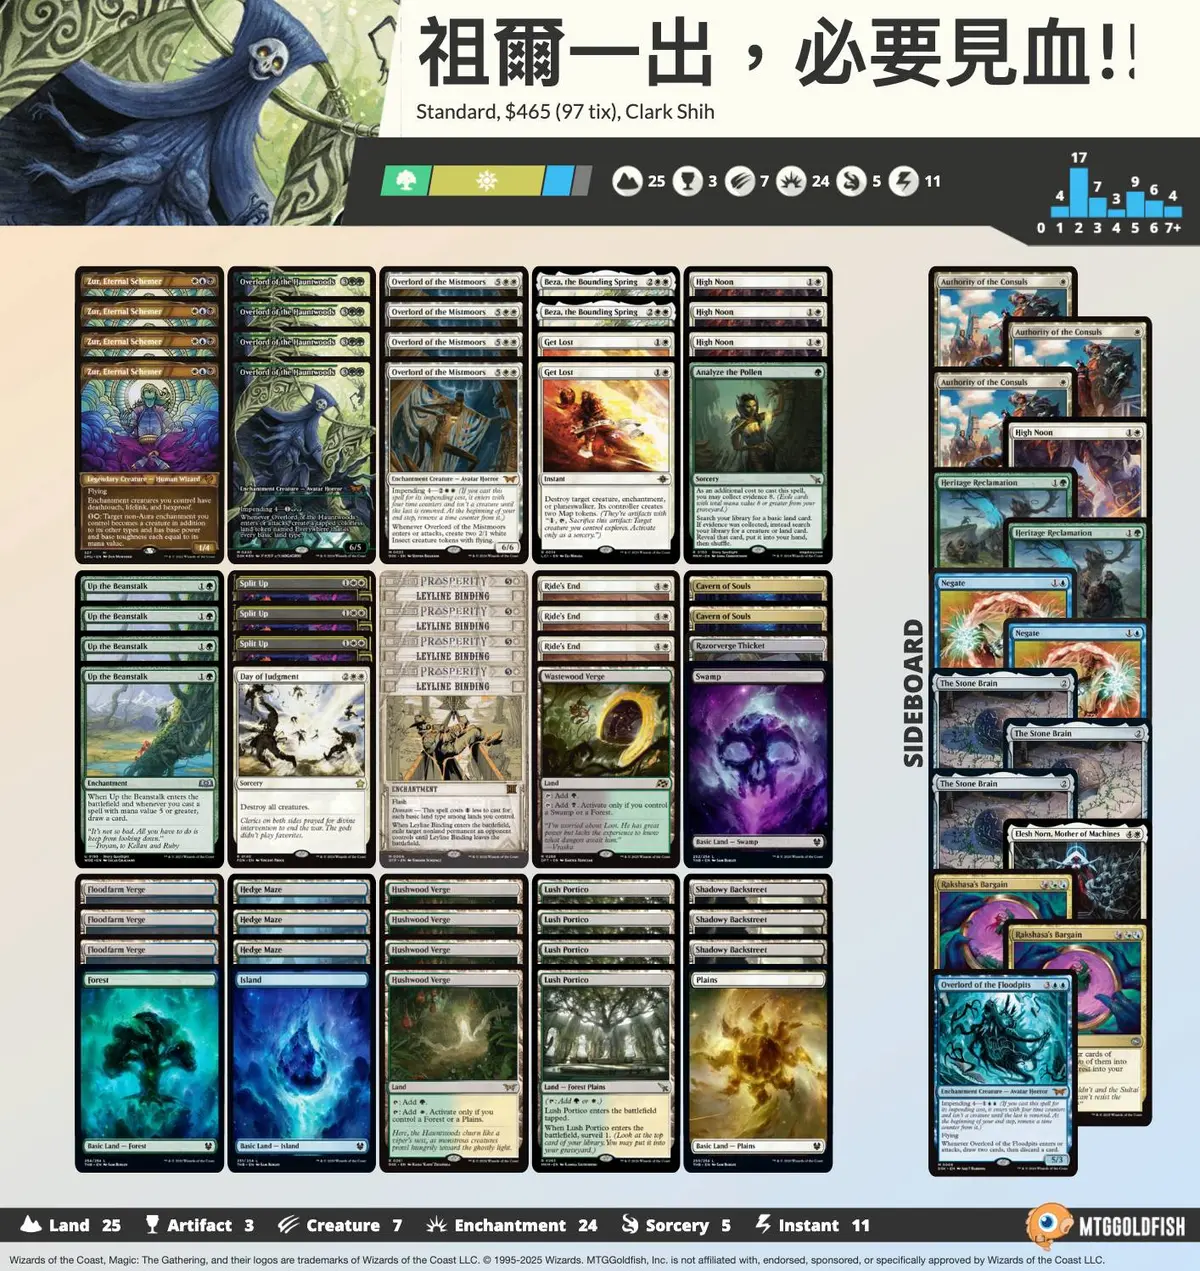
The list above is the one my American teammates and I prepared for Pro Tour FINAL FANTASY.
Fixed Slots
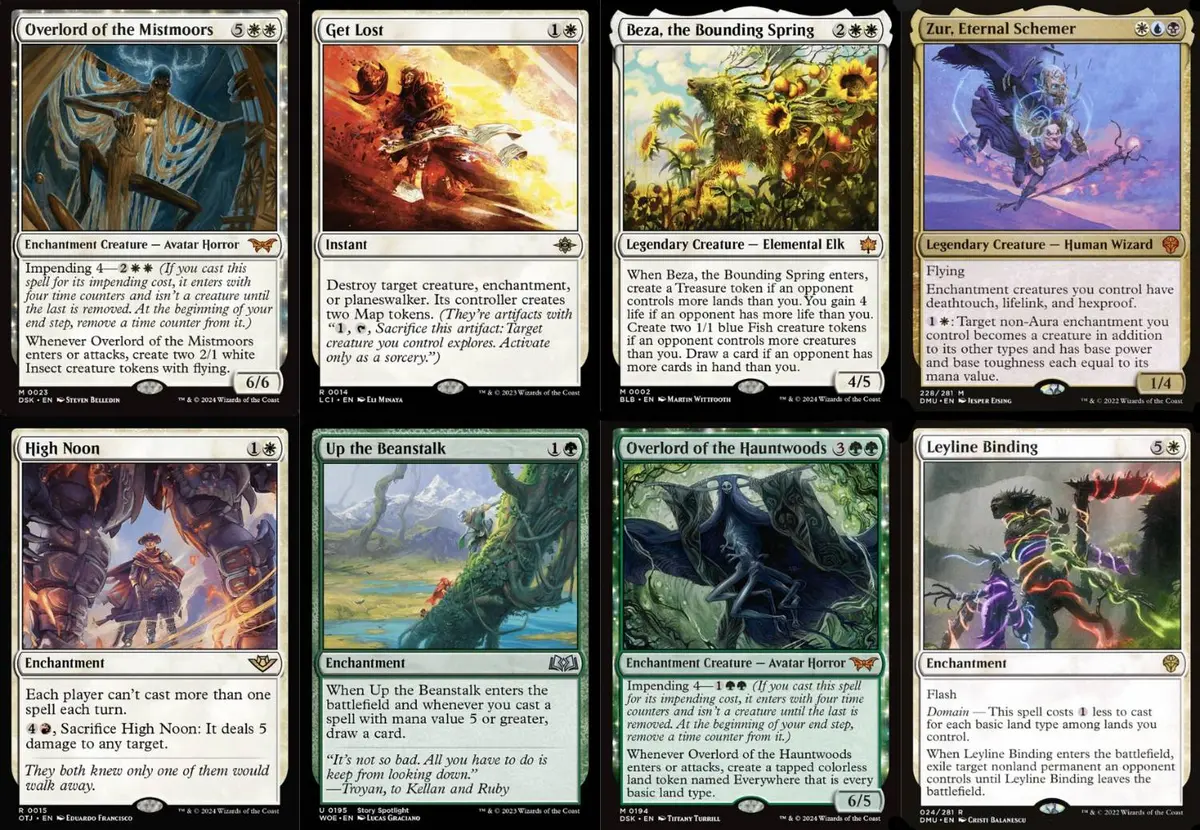
- 4 Zur, Eternal Schemer
- 4 Overlord of the Hauntwoods
- 4 Overlord of the Mistmoors
- 1 Get Lost
- 4 Up the Beanstalk
- 4 Leyline Binding
- 2 Beza, the Bounding Spring
- 2 High Noon
Zur, Eternal Schemer, Overlord of the Hauntwoods, Overlord of the Mistmoors, Up the Beanstalk, and Leyline Binding are the absolute core of this deck. The cards that need more introduction are the following; some are included as lubricant, and the rest perform excellently against the Tier 1 decks in the environment.
- Beza, the Bounding Spring: The environment is still dominated by aggro, and Beza is a 4/5 for just 4 mana that also gains 4 life and makes two 1/1 creatures, a big help for our defense. And Beza isn’t a dead card in non-aggro matchups either: on the play you may draw an extra card, on the draw you can make a Treasure, and its other abilities are all of some small help.
- Get Lost: The best two-mana removal in the environment, with a very wide range of targets. Since there are still some powerful enchantments and planeswalkers to deal with, I recommend including at least 1.
- High Noon: In the current environment, the two most popular decks are Izzet Prowess and the Omniscience combo. High Noon limits players to casting one spell per turn, a highly targeted disruption against both decks that not only effectively slows down their offense or combo tempo, but can even be called one of the best answers to those two decks.
Flex Slots
Excluding the fixed slots above, there are only 10 flex slots, which players can adjust according to preference or the matchups they want to strengthen. My choices are: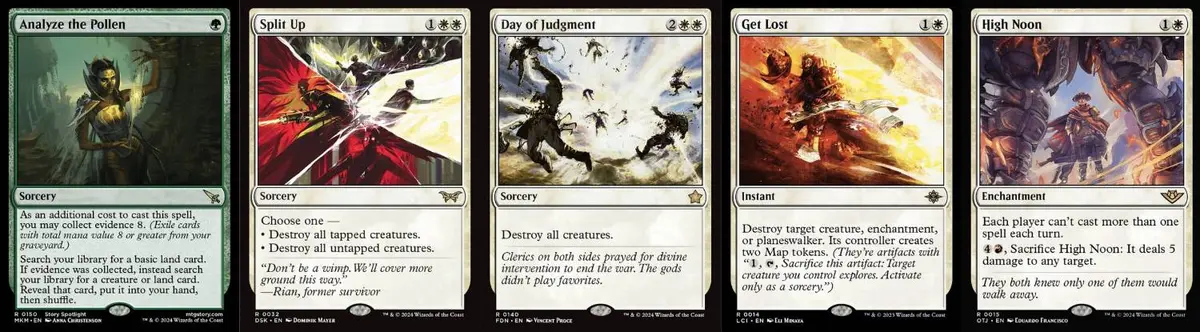
- 1 Analyze the Pollen: Early on it helps us fix colors and hit land drops, and later it can help us find key creatures. Note, however, that if High Noon is already on the battlefield, casting this spell restricts our other actions that turn, so when you want to find a creature with it in the mid to late game, you often have to wait one more turn before smoothly following up with a threat; use it with care.
- 3 Split Up: With aggro dominating the environment, I want enough three-mana sweepers. The reason I chose Split Up over Temporary Lockdown is that we have 3 Authority of the Consuls in the sideboard, and Lockdown conflicts with it; by comparison, Split Up not only doesn’t interfere but pairs well with Authority.
- 1 Day of Judgment: Although I already run quite a few three-mana sweepers, they are ultimately soft sweeps, and I still want one insurance answer in the deck that completely clears the board regardless of targets. It also fills the gap where the current three-mana sweepers lack clearing power, especially providing a stable reset button against midrange and the mirror.
- The 2nd Get Lost: This is the single-card removal closest to Leyline Binding. I prefer running 2, as a supplement to stable answers against slower decks.
- The 3rd High Noon: Mainly to raise the odds of drawing it in specific matchups, especially when you need to rely heavily on this card to suppress the opponent’s tempo. Although a single High Noon can already apply pressure, drawing an extra one also means worrying less about it being removed, and stacking the effect can actually form a stronger lock in some situations.
You don’t necessarily have to copy my configuration; adjusting based on your own experience and matchup needs is far more important. Here are some suggested directions for alternative configurations:
- To better target Izzet Prowess and red aggro, you can include a 4th Split Up, Temporary Lockdown, or even Beza.
- If you’re worried about early mana screw, you can include a 2nd Analyze the Pollen.
- To ensure an edge in midrange matchups, you can include more removal such as Get Lost, Day of Judgment, or Ride’s End.
- If you feel Analyze the Pollen often leaves you stuck in hand because of High Noon in actual play, you can also consider replacing it with a land.
Land Choices
As a four-color deck, the mana base is extremely important in this deck. The mana base I use is a slight modification of the list by PT DFT champion Matt Nass. Here is Matt Nass’s mana base: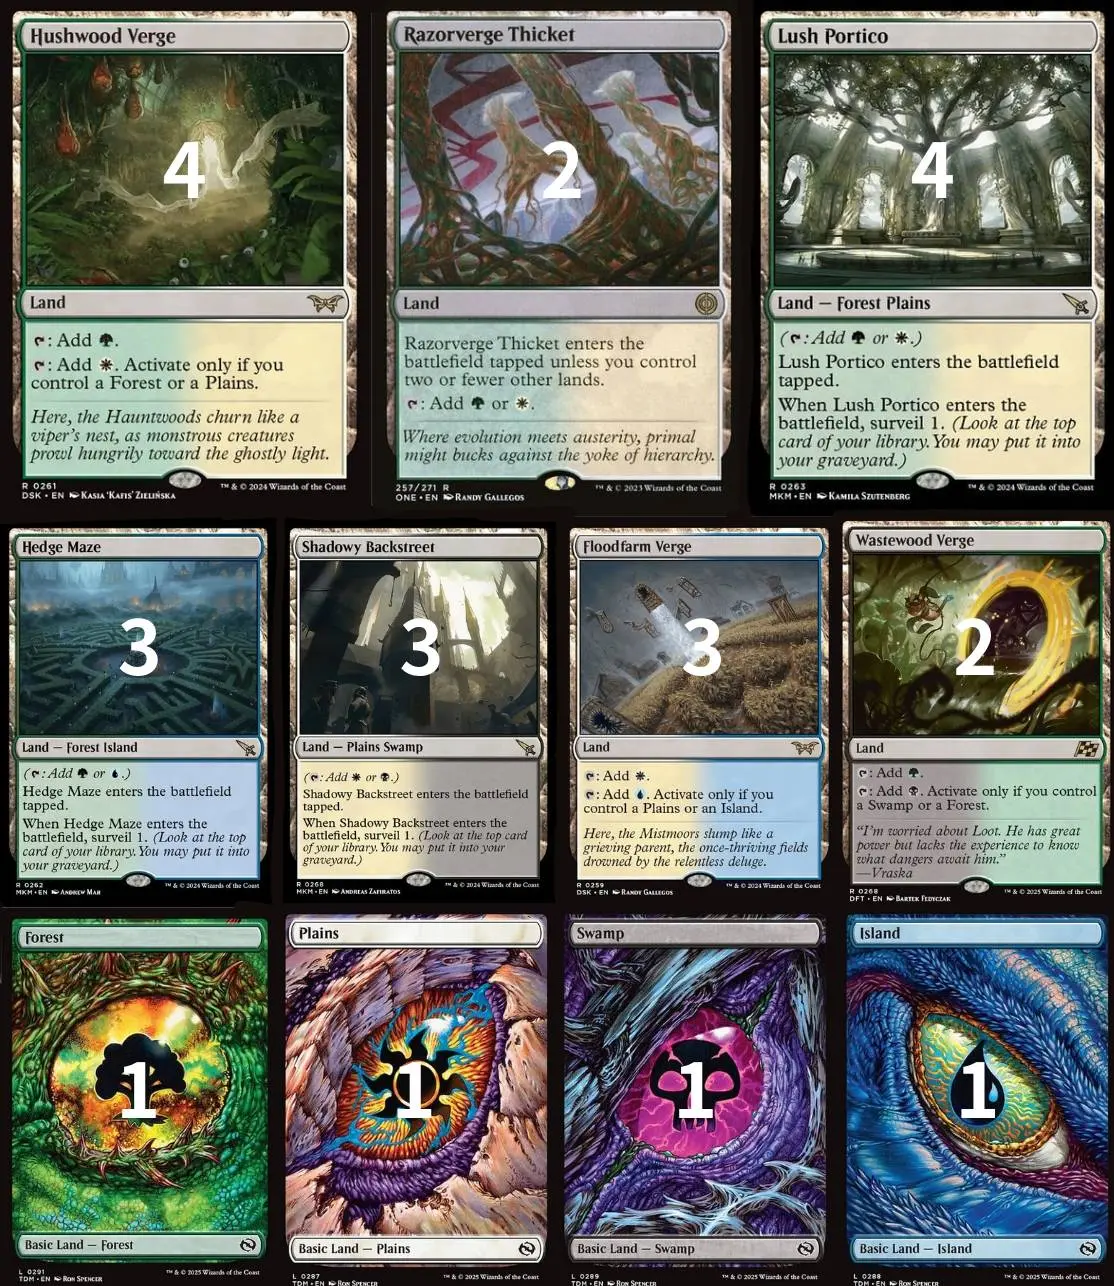
- 4 Hushwood Verge (green-white Verge)
- 4 Lush Portico (green-white surveil land)
- 3 Floodfarm Verge (white-blue Verge)
- 2 Wastewood Verge (black-green Verge)
- 3 Shadowy Backstreet (white-black surveil land)
- 3 Hedge Maze (blue-green surveil land)
- 2 Razorverge Thicket (green-white fastland)
- 1 Forest
- 1 Island
- 1 Plains
- 1 Swamp
If you’re a player who doesn’t know Zur Domain, you may not see the cleverness of this configuration, but I never forgot how amazed I was when I understood this mana base. Let me analyze it carefully now:
- Green and white are the core of this deck. If you set Zur aside, you’ll notice the main deck has no cards outside green and white at all. This explains why Hushwood Verge and Lush Portico are maxed out, and why there are even 2 Razorverge Thicket: to support the deck’s demand for green and white.
- Because green and white are so important, this also directly affects the choice of other dual lands, and every land can definitely produce white or green. The Verges chosen are Floodfarm Verge and Wastewood Verge (black-green Verge) because their primary colors are white and green, so even without the matching basic land type, these two lands can help us cast the low-cost spells in the deck. (The primary color of the blue-green Verge is blue, and the black-white Verge’s is black.)
- And the Verges affect the choice of surveil lands other than green-white. Hedge Maze and Shadowy Backstreet, whichever one it is, let all Verges produce both colors of mana, and having both on the battlefield provides four different basic land types, letting Leyline Binding be cast for two mana. (If you chose the black-green and white-blue surveil lands, then with certain Verges on the battlefield you couldn’t make the Verge produce two colors.)
That is why this mana base is so perfect. So how does my mana base differ from Matt Nass’s list? I replaced two lands in the deck with Cavern of Souls. The main reason is that with the end of PT DFT and the release of the new set TDM, counterspell usage has risen sharply, and in testing I also found that Domain often falls short against control decks, and many players, noticing that Domain had stopped using Cavern of Souls, went back to counterspells, so I decided to add Cavern of Souls back. Recently on MO quite a few players have been putting 2 to 3 Overlord of the Floodpits in the sideboard, and to guarantee you can reliably cast it after swapping in, you need to replace the basic Swamp in the deck with Cavern of Souls.
Sideboard Introduction
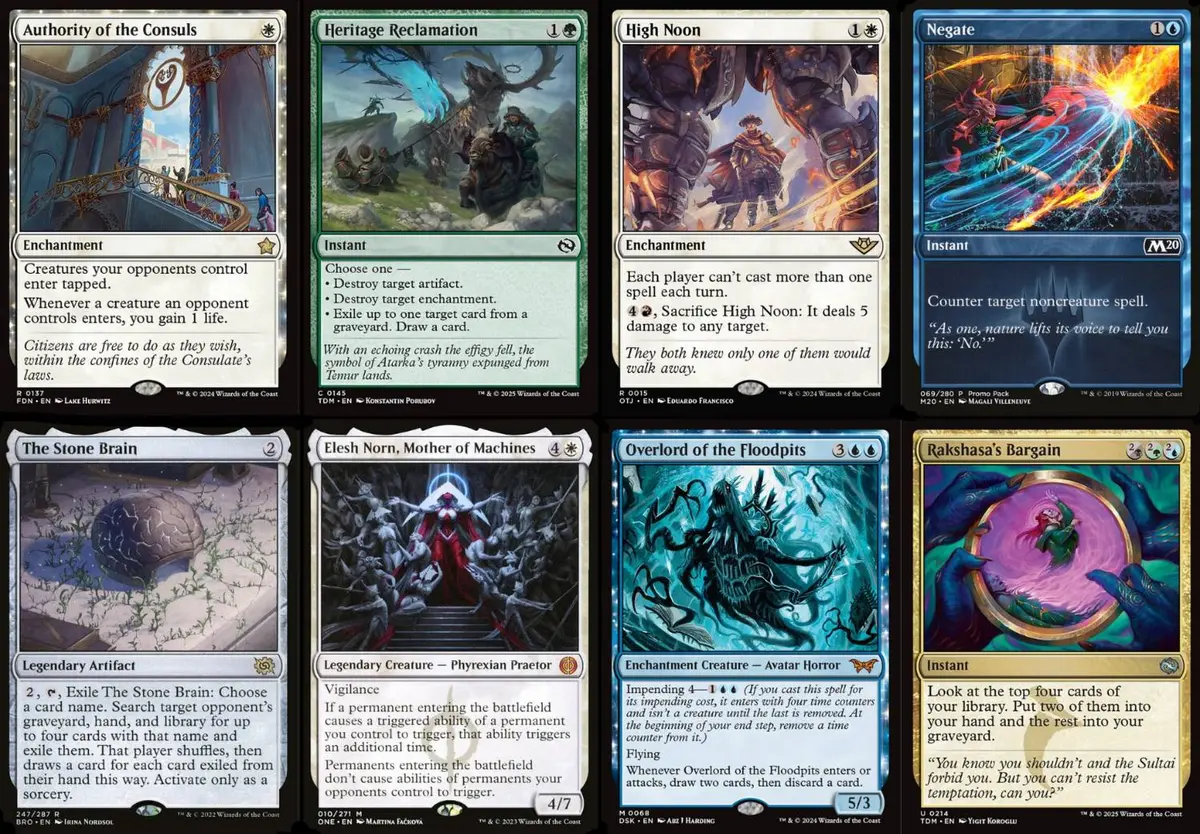
Sideboard choices, like the main deck, depend mostly on which matchups you want to focus on. Below are my sideboard choices and reasons.
- 3 Authority of the Consuls: A great helper against aggro. Haste creatures no longer have haste, and combined with Split Up it can sweep the board completely, and it also lets Ride’s End be cast for 2 mana without waiting for the opponent to attack.
- 2 Heritage Reclamation: This is a highly flexible utility card, performing excellently mainly in the mirror and Omniscience combo matchups. Besides dismantling game-defining permanents like Up the Beanstalk and Overlord of the Mistmoors, it can also replace dead cards in the main deck in specific matchups, provide disruption, deal with graveyards, and even, with no targets, be swapped for another card to keep your resources in use.
- 1 High Noon: Although I already run 3 in the main deck, considering the high usage of Izzet Prowess and the Omniscience combo, I want to further raise the odds of drawing it in sideboarded games. This reflects how much I prioritize these two matchups, and avoids losing the ability to suppress them in key matches for lack of High Noon.
- 2 Negate: Mainly used against various slow or resource-based decks, like control, combo, or midrange decks that rely on high-cost spells. It can stop the opponent from casting key spells and also protect us when we try to resolve our key spells. Compared with other counterspells, Negate has clearer restrictions and is more precise in use, effectively filling the gap in our main deck’s disruption against noncreature spells.
- 3 The Stone Brain: Specifically used against decks that rely on specific single cards to win, such as the Omniscience combo (naming Marang River Regent) and Azorius Control (naming Jace, the Perfected Mind, Elspeth, Storm Slayer, etc.). Running 3 ensures a high chance of drawing it in sideboarded games, and it can be reused, even shutting off the opponent’s backup plans as well.
- 1 Elesh Norn, Mother of Machines: Mainly used against decks that rely on enters-the-battlefield triggered abilities, such as Up the Beanstalk, Overlord of the Mistmoors, and Marang River Regent, effectively suppressing the opponent’s resource engines and burst. It also doubles the enter effects of our own permanents like Overlords and surveil lands, expanding our advantage faster. Although this card isn’t right for every matchup, in slow mirrors or matchups that rely on triggered effects it is a single card that can completely change the course of the game, so I run 1 as a targeted answer.
- 1 Overlord of the Floodpits: Used against midrange or control decks. Early on, it can serve as a simple resource refill through Impending, and a few turns later becomes a threatening flier; if cast directly in the mid to late game, it is immediately an effective threat or blocker.
- 2 Rakshasa’s Bargain: This card’s role is somewhat similar to Overlord of the Floodpits, both being resource cards against slow matchups, though it leans more toward operational flexibility. As a six-mana instant, it not only triggers Up the Beanstalk but is also very suitable in matchups with counterspells. Especially with High Noon on the battlefield, we often deliberately hold our spells and wait for the opponent to act first; if the opponent casts a spell that poses no threat (like a loot), we can safely cast Bargain at their end step, converting resources without exposing weaknesses.
Other Cards You Can Include
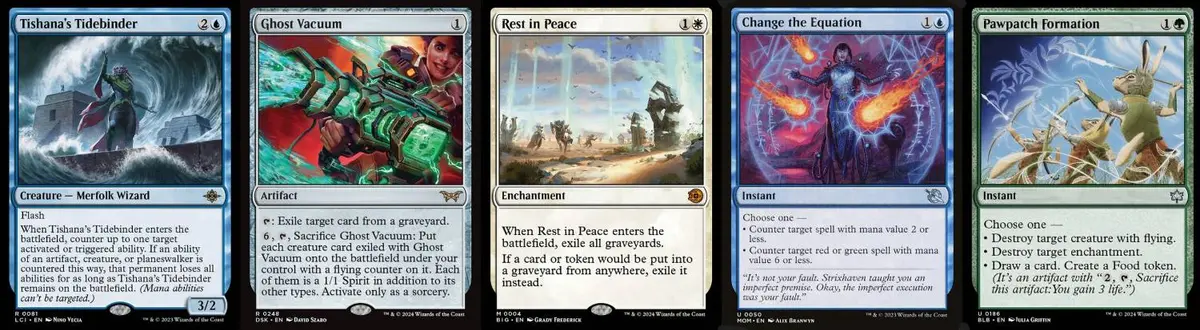
- Tishana’s Tidebinder: A highly targeted disruption card, especially for suppressing strategies that rely on planeswalker abilities. It was originally developed to counter the mill plans common to control decks like Doomsday Excruciator, Jace, the Perfected Mind, and Riverchurn Monument, buying us time by countering key triggered or activated abilities. Its 3/2 body can also turn into offensive pressure, a useful tool for transitioning on the draw or playing tempo. Note, though, that although some decks also have lots of powerful triggered or activated abilities, those threats don’t necessarily require the Tidebinder to answer, and sometimes traditional removal or counters are enough, so this card is a sideboard choice that you adjust to the environment and swap in only for specific matchups.
- Ghost Vacuum: Graveyard hate, used against decks that interact with graveyards, such as the Omniscience combo, Abhorrent Oculus, and Jeskai Control. Personally I prefer Heritage Reclamation, since it can draw cards and, unlike Vacuum, doesn’t enter as a visible card that the opponent can anticipate in advance.
- Rest in Peace: Same as Ghost Vacuum, but exiles graveyards more thoroughly. The problem is that it exiles your own graveyard too, so Analyze the Pollen can’t collect evidence. And against the Omniscience combo, since its cost is the same as High Noon, it gets removed together with it by Blast Zone.
- Change the Equation: One of the targeted cards against aggro matchups, sometimes useful in the mirror too. The problem is that as a counterspell it is somewhat passive.
- Pawpatch Formation: Similar to Heritage Reclamation, but performs better than Heritage Reclamation in the mirror; still, because of the Omniscience combo in the environment, it is still not as useful as Heritage Reclamation.
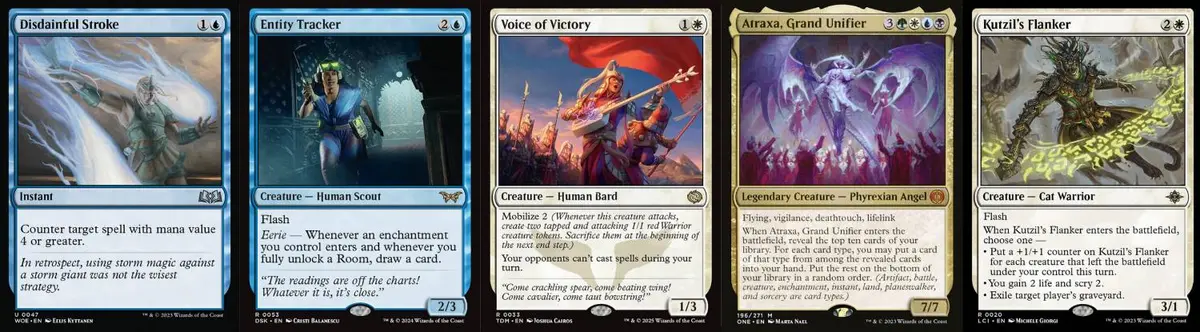
- Disdainful Stroke: Mainly used against slow decks, and works even better with High Noon against the Omniscience combo, directly cutting off the opponent’s entire turn of actions.
- Entity Tracker: Flash gives it great flexibility in matchups with counterspells, and it also carries some beatdown power and card draw that fits the deck’s direction.
- Voice of Victory: Also used against decks with counterspells, especially when the opponent will take out most of their removal in sideboarded games; this card can effectively pressure the opponent, locking down their room to respond while applying pressure on the board.
- Atraxa, Grand Unifier: A strong card against midrange and control. Being a creature, it can be found in the mid to late game with Analyze the Pollen for a wave of resources, and you can name Phyrexian with Cavern of Souls so it can’t be countered.
- Kutzil’s Flanker: Instant-speed graveyard removal makes it shine against the Omniscience combo, Jeskai Control, and Jeskai Oculus; as a 3/1 flash creature it can also provide real board pressure and tempo advantage in slow matchups.
Matchups and Sideboarding Strategy
Mirror
The old saying for the mirror: “Whoever draws better wins,” though player skill and deck composition do matter somewhat.
This matchup will be an extreme war of attrition, so Up the Beanstalk is the key to the whole matchup. Even knowing it’s the mirror, unless my hand is the right lands + green Overlord + white Overlord + Zur or the like, I will try to dig for Up the Beanstalk, or at least Get Lost, to make sure I don’t fall behind. (Even 2 Up the Beanstalk + 5 lands is far better than most ordinary hands.)
Although hand resources matter in this matchup, it isn’t about mindlessly drawing cards. I’ve seen too many Zur Domain players who, knowing it was the mirror, played three Beanstalk in a row and ended up decking themselves, or who kept using spells to trigger draws even when their hand was already over the limit. That only makes you discard lots of cards, which leads to your deck’s threats being discarded. These are all very common mistakes, because you only counted your “hand resources” and forgot to consider the “resources remaining in the deck.” There are of course exceptions, such as when you urgently need to find a sweeper, the opponent has more Beanstalk than you, or you need removal to deal with the opponent’s Zur; then digging down a moderate amount is worth considering.
Finally, in many cases I avoid casting Overlords outright, making good use of Impending’s cost reduction to get Overlords onto the battlefield quickly, and later in the game turning all Overlords into creatures through Zur. This not only lets you draw and develop with Beanstalk early on, but also avoids creature-form Overlords getting swept.
| Side Out | Side In |
|---|---|
| -1 Zur, Eternal Schemer | +2 Heritage Reclamation |
| -2 Beza | +2 Negate |
| -3 Ride’s End | +3 The Stone Brain |
| -2 Split Up | +1 Elesh Norn |
| -3 High Noon | +1 Overlord of the Floodpits |
| +2 Rakshasa’s Bargain |
- If you can bring in more cards suited to the mirror, you can cut Ride’s End.
- Unless the opponent will cast Zur next turn, I usually name Overlord of the Mistmoors with The Stone Brain first.
Izzet Prowess
Although this matchup isn’t particularly difficult, the pressure is considerable. The real threat isn’t the horizontal board development of Cori-Steel Cutter (though it is indeed annoying), but the burst from Monstrous Rage or Slickshot Show-Off. The direction of the whole match often depends on how many Monstrous Rage they can cast.
In such a burst-style aggro matchup, High Noon and Split Up are the key main-deck answers, and limiting how many spells they can cast or sweeping the board effectively slows down their offense. However, they also have answers, including Into the Flood Maw and Spell Pierce. We can use Zur’s ability to protect High Noon by giving it hexproof in response to the opponent casting Into the Flood Maw, or cast green Overlord on turn three so that on turn four we have enough mana to get around Spell Pierce’s restriction.
As long as we can get Zur to enter successfully, our win rate goes up substantially, especially when the opponent has limited resources and can’t keep bursting. However, if we can’t cast Zur for a long time, we can only hold the game by repeatedly clearing the board and trading resources, which is unfavorable for us, because one day the opponent will draw enough Monstrous Rage or Into the Flood Maw to end the game.
With the release of the new set Final Fantasy, Izzet Prowess has gained extra reinforcement in Vivi Ornitier. Since it pings for 1 whenever you cast a spell and gives extra mana, some Izzet Prowess lists have adjusted the deck to be slower than before, even including midrange-leaning singles like Thundertrap Trainer, This Town Ain’t Big Enough, and Roaring Furnace//Steaming Sauna. Built this way, although they can directly lower the opponent’s life total by constantly triggering Vivi, and even quickly grow a huge threat, it also slows the overall tempo. Once we can deal with Vivi in time, their board pressure drops greatly, and the deck’s burst and threat density are not as high as the traditional aggro version, so we also use a different sideboarding strategy in sideboarded games.
In sideboarded games, the opponent will often bring in more resource engines, such as Enduring Curiosity or Ral, Crackling Wit, trying to beat us with a resource advantage. At this point, I pay particular attention to whether the opponent continues the main deck’s aggro burst plan or transforms into a more midrange, resource-based deck with small threats.
Depending on the opponent’s strategy, we also need to adjust our pacing. For example, if the opponent’s start is slow, I will consider holding removal spells to deal with resource engines rather than rushing to deal with early small creatures; or, not leaving mana up for removal and actively casting Overlords, so that when Zur resolves later it further consolidates the board advantage.
| Side Out | Side In |
|---|---|
| -1 Overlord of the Mistmoors | +1 High Noon |
| -3 Up the Beanstalk | +3 Authority of the Consuls |
- If the opponent has 2 or 3 or more Sunspine Lynx, you can consider cutting 1 Up the Beanstalk and bringing in Elesh Norn instead.
- If the opponent is the midrange version (with This Town Ain’t Big Enough and Roaring Furnace//Steaming Sauna), don’t bring in Authority of the Consuls, and keep all the Up the Beanstalk.
Omniscience Combo
This matchup is very hard. The only thing we can do in game 1 is to cast High Noon to keep the opponent from assembling the combo, and kill the opponent before they remove it.
When High Noon is on the battlefield, I first judge whether the opponent has cheap removal in hand such as Get Lost or Temporary Lockdown:
- If they choose to cast removal on their own turn, it is relatively easy to handle. We can use response spells or enter-the-battlefield abilities to counter or disrupt, and since they have already cast a spell, it means they can’t go for the combo this turn, nor counter our protection.
- If they remove High Noon at instant speed during our turn, things get much more complicated. We can only rely on Zur’s ability or counterspells to protect it, so if I judge the opponent may be holding removal, I usually choose not to proactively cast spells on my turn, to avoid letting the opponent take advantage.
Conversely, if I see the opponent frequently looting or drawing on their turn and judge they likely have no removal in hand, I will actively try to resolve Zur, building pressure and gaining one more way to protect High Noon, making what follows safer.
Sideboarded games are very different. In the past, it was enough to put in more cards that stop the opponent from completing the combo; as long as they couldn’t make the combo, the scales of victory would always tip our way. But that thinking no longer works.
Now, many Omniscience combo players completely abandon the combo package in sideboarded games and transform into a midrange creature deck built around Scrollshift, white Overlord, blue Overlord, and Marang River Regent, winning directly through wave after wave of board pressure.
My original sideboard strategy was focused entirely on the combo route, bringing in cards like High Noon, The Stone Brain, and Negate that are highly targeted at the traditional combo. But against the Creature Midrange plan, these cards almost all become dead: High Noon limits the number of spells but can’t disrupt the board; Stone Brain has no clear target to name; and Negate can hardly counter any real threat.
So we have landed in an awkward spot: if we stick with the traditional sideboard thinking, we can’t handle their new sideboard plan at all; and if we predict the transformation and bring in more removal and sweepers, then once they keep the combo, we are exposed to the risk of an instant kill.
My suggestion is: adopt a compromise strategy right away, keeping a small number of sweepers to handle the midgame board while maintaining a basic anti-combo defense. By observing the opponent’s actual game plan in game 2, then in game 3 adjust the whole sideboard strategy specifically, choosing to go all-in on the combo or all-in on defending against midrange. Although this can’t fully cover everything the opponent might do, under opaque information it is currently the most stable and flexible approach.
In summary, this is a matchup that depends heavily on judgment and experience. You need to adjust your strategy flexibly based on the opponent’s patterns of action, and stabilizing with High Noon in game 1 is the key; in sideboarded games, you must carefully handle their possible transformation. Choosing a sideboard strategy that covers both routes, and adjusting in game 3 based on what you observed, is how you maximize your win rate.
| Side Out | Side In |
|---|---|
| -1 Zur, Eternal Schemer | +2 Heritage Reclamation |
| -2 Beza | +3 The Stone Brain |
| -3 Ride’s End | +1 Elesh Norn |
| -2 Split Up | +2 Rakshasa’s Bargain |
- Game 2 The Stone Brain targets: Marang River Regent>Overlord of the Mistmoors=Omniscience (depending on what the opponent kept)
- If the opponent ends up choosing the midrange plan, then in game 3 cut the 3 High Noon and bring in 1 Overlord of the Floodpits + 2 Split Up. (The Stone Brain targets: Overlord of the Mistmoors>Marang River Regent)
- If the opponent ends up choosing the combo plan, then in game 3 cut 1 Overlord of the Mistmoors + 1 Day of Judgment + 1 Split Up, and bring in 1 High Noon + 2 Negate. (The Stone Brain targets: Marang River Regent>Omniscience)
Mono-Red Aggro
This matchup is a bit worse than Izzet Prowess, because High Noon can’t solve every problem. High Noon performs mediocrely in this matchup, because they don’t need to cast multiple spells in the same turn; with just Rockface Village they can deal respectable damage.
Sideboarded games are even worse for us, since every Sunspine Lynx is a big blow to us, so I pay special attention to the number of nonbasic lands on my side of the battlefield, and even bring in Elesh Norn to reduce the threat Sunspine Lynx poses to us.
| Side Out | Side In |
|---|---|
| -3 High Noon | +3 Authority of the Consuls |
| -1 Up the Beanstalk | +1 Elesh Norn |
Orzhov Discard
This is an annoying but winnable matchup. Although they wreck our hand, they can’t affect the top of our library, and for a Domain deck full of high-quality cards, as long as we hit our lands reliably, the moment we draw any good card is the time to fight back. And we also have Up the Beanstalk, a powerful card-advantage engine, and with it this matchup becomes very easy. If we don’t have it, that’s fine too; I usually think early about how to play from here on, and keep the truly important cards when discarding. If we haven’t drawn too badly, the scales of victory will always tip our way.
| Side Out | Side In |
|---|---|
| -3 Ride’s End | +2 Heritage Reclamation |
| -3 High Noon | +1 Elesh Norn |
| +1 Overlord of the Floodpits | |
| +2 Rakshasa’s Bargain |
Dimir Midrange
This is a favorable matchup for us. Just like against Orzhov Discard, the opponent has a hard time fighting our high resource efficiency with medium-quality cards. In particular, Dimir midrange lacking enchantment removal has a hard time dealing with the Overlords awakened by Zur early on. So our basic strategy is also simple: hit lands reliably -> cast threats -> resolve Zur, and victory slowly tilts our way.
Still, there are some details worth noting. The threat we have the hardest time interacting with in this matchup is Kaito, Bane of Nightmares. Many players are used to prioritizing the small creatures the opponent uses to activate ninjutsu, to keep Kaito from entering. But after long practice I found that if I have something like Get Lost, a low-cost-castable Leyline Binding, or even a Zur castable next turn, I actually lean toward letting the opponent’s Kaito land and dealing with it on my turn.
The reason is simple: rather than wasting removal on small creatures that pose no real pressure, save it for real threats, such as Sheoldred, the Apocalypse, Enduring Curiosity, or Preacher of the Schism. Also, the opponent sometimes chooses to just cast four-mana Kaito outright without relying on ninjutsu, which makes the value of “preventive removal” even weaker.
As the saying goes, better a short pain than a long one. If we have a way to deal with Kaito directly next turn, then let it hit once and draw a card; that’s fine, and better than wasting our precious removal.
| Side Out | Side In |
|---|---|
| -3 High Noon | +1 Overlord of the Floodpits |
| +2 Rakshasa’s Bargain |
Azorius Control
I’m not particularly fond of this matchup, especially against the version that has Jace in the main deck, and because we put too many cards in the deck that are useless against them in order to fight the creature decks in the environment, sometimes this matchup feels very powerless to play. But this matchup can also go well: if we can resolve Up the Beanstalk to gain lots of resources, and use Cavern of Souls to protect our spells’ resolution, the snowball will leave them unable to cope.
However, in most cases things won’t go so smoothly. The opponent also has enough removal and counters to deal with our Up the Beanstalk, and may even use their own sweepers to clear the creatures we awakened with Zur, collapsing our tempo entirely. This means that even if we successfully launch an offense, it is often hard to maintain lasting pressure.
| Side Out | Side In |
|---|---|
| -1 Zur, Eternal Schemer | +1 Heritage Reclamation |
| -2 Split Up | +2 Negate |
| -1 Day of Judgment | +3 The Stone Brain |
| -3 Ride’s End | +1 Elesh Norn |
| -3 High Noon | +1 Overlord of the Floodpits |
| +2 Rakshasa’s Bargain |
- The Stone Brain targets: Jace, the Perfected Mind>Marang River Regent>Elspeth, Storm Slayer.
- If the opponent has Faerie Mastermind, you can consider not bringing in Heritage Reclamation and keeping 1 extra sweeper (Day of Judgment or Split Up both work).
Extra Tips and Details
- In slow matchups, always make sure you have 2 green mana in the first 3 turns; in aggro matchups, make sure you have 2 white mana.
- If the opponent has spare mana, you don’t have to activate Zur right away; you can wait until next turn when you can activate it several times, to make sure the target isn’t removed in response.
- Even with no targets on the battlefield, you can consider casting Leyline Binding onto an empty board, paired with casting Zur next turn to deal extra damage.
- If your hand has only tapped lands, and you have Up the Beanstalk on the battlefield or in hand, you don’t need to rush to play a land; maybe after casting spells and drawing, you’ll draw a surveil land.
- Sometimes Ride’s End is better used on your own turn, especially when the opponent is already out of mana.
About PT FINAL FANTASY
Several members of ChannelFireball, the world’s most competitive team (Edgar Magalhaes, Reid Duke, Seth Manfield, and Gabriel Nassif), also played Zur Domain at PT FINAL FANTASY.
Here is their decklist: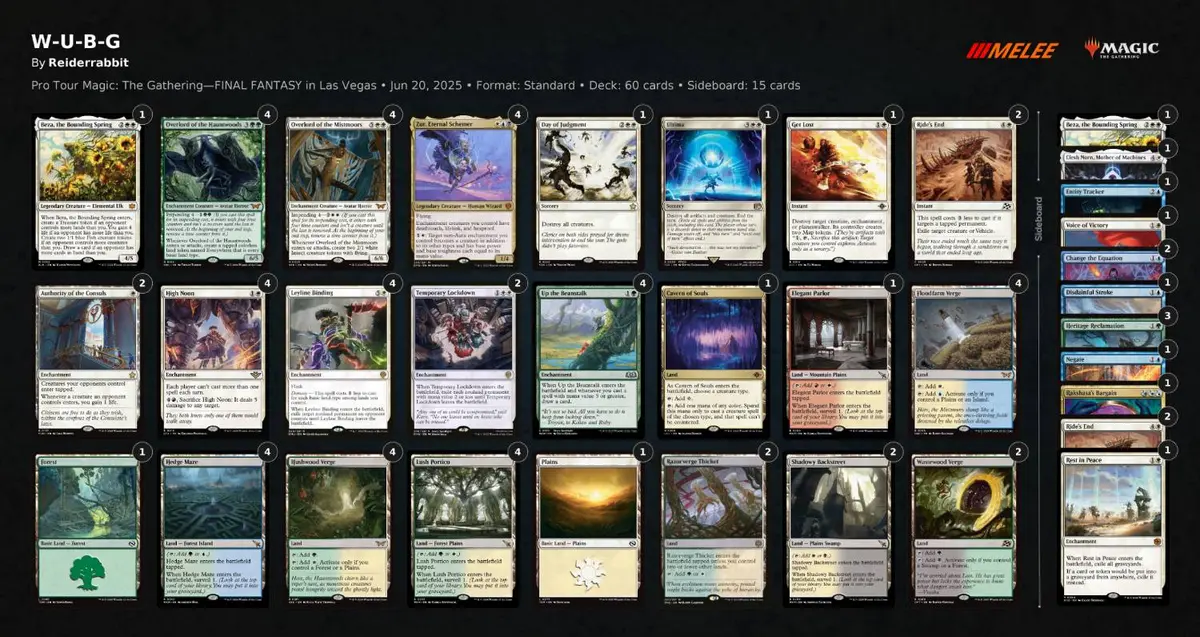
Looking closely, you’ll notice their list differs from mine in many ways:
- 4 High Noon in the main deck: A choice made to target Izzet Prowess and the Omniscience combo; given that they made up a combined 62.2% of the field, it is a rather reasonable response.
- 2 Authority of the Consuls in the main deck: An aggressive choice made to handle aggro decks, and with red aggro and Izzet Prowess combined at 53.2% of the field, that judgment was reasonable. However, I personally think it may not be so ideal in events with closed decklists; if you can’t predict the opponent’s plan, I might choose more Beza or sweepers.
- Temporary Lockdown: They chose Temporary Lockdown instead of Split Up, but as I mentioned earlier, this card also exiles your own High Noon or Authority of the Consuls, which really hurts against aggro. Perhaps they felt that against Izzet Prowess it was necessary to clear key single cards like Cori-Steel Cutter and Stormchaser’s Talent all at once, so they chose a more thorough way of clearing the board.
- Ultima: They may have chosen Ultima to also wipe out Cori-Steel Cutter, or to avoid Enduring Curiosity’s death trigger. But in my view, a five-mana sweeper is still too clunky for the current fast-paced environment, and it also makes you miss the Impending trigger at the end step, so the overall risk and cost are on the high side.
- 26th land: As I mentioned earlier, having both Analyze the Pollen and High Noon is awkward, so with 4 High Noon, changing Analyze the Pollen into a land is a reasonable and more stable adjustment.
- Elegant Parlor: Provides an extra source of red mana, mainly so that High Noon can still be activated smoothly without an Everywhere Token. It also fills in more basic land types, helping the early casting of Leyline Binding.
- A very different sideboard: The overall configuration is clearly designed around the two mainstream matchups, aggro and Omniscience, and the card choices favor singles that can be cast at instant speed, which not only pair with High Noon to avoid interference from its casting restriction, but also add flexibility and counter-play in matchups.
Conclusion
This article should have been finished at the beginning of this year, but at the time I figured a new set was about to be released and I could wait and see how the environment changed; then I ran into the RC, and to avoid revealing the strategy I discussed with my teammates early, I had to delay again. I never expected it to drag on until this deck was almost out of the environment before I finally started writing.
This is probably the longest I’ve played, and the most familiar I am with, any Standard deck archetype. Its tempo control, sideboarding strategy, and depth of understanding of the various matchups all made me invest a great deal of time researching and adjusting. I hope this article helps players who want to try this deck find its charm, and also lets you, in the few Standard events remaining, play out your own insights and wins.
If you have different thoughts on certain matchups, or want to discuss sideboarding details, you’re very welcome to reach out. Thank you for taking the time to read this long article, and I wish you great games with this deck in the events ahead!
- Title
- Zur Domain: Once Zur Shows Up, Blood Will Be Shed!!!
- Author
- ClarkShih
- Created at
- June 24, 2025
- License
- This work is licensed under CC BY-NC-SA 4.0 .