From Prowess to Aggro: Izzet Aggro After the August 10, 2026 Bans

Note: This article was translated from Chinese by AI and may contain errors. Read the original Chinese version.
Introduction
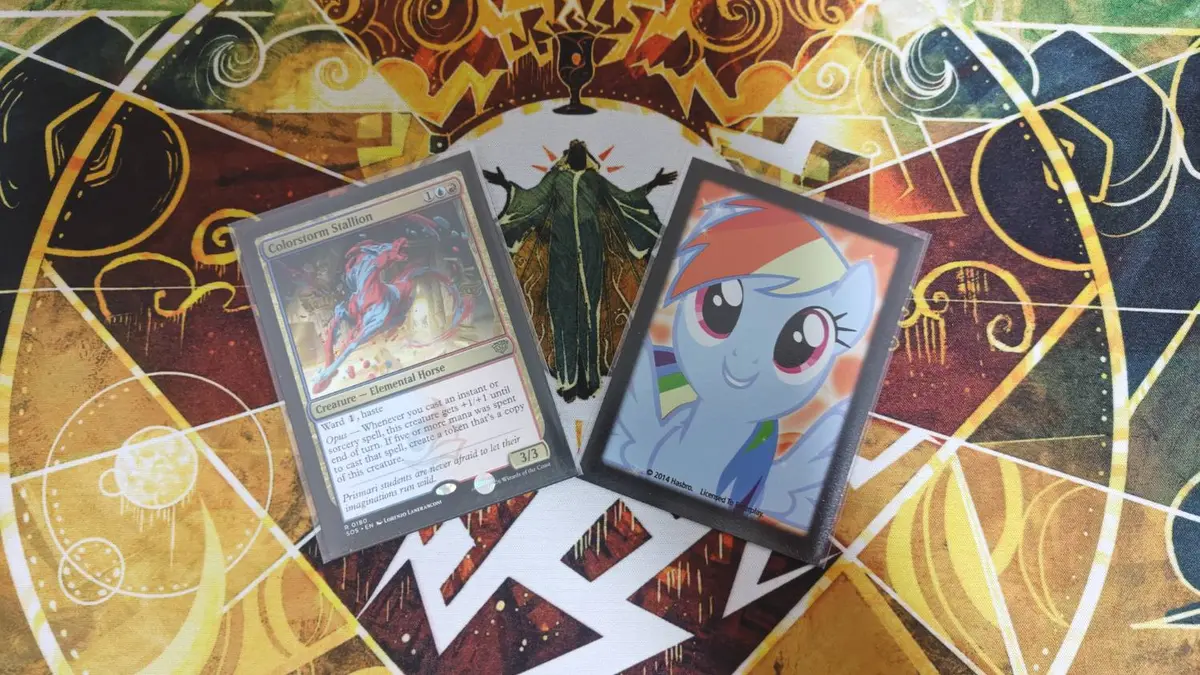
It all started on August 15.
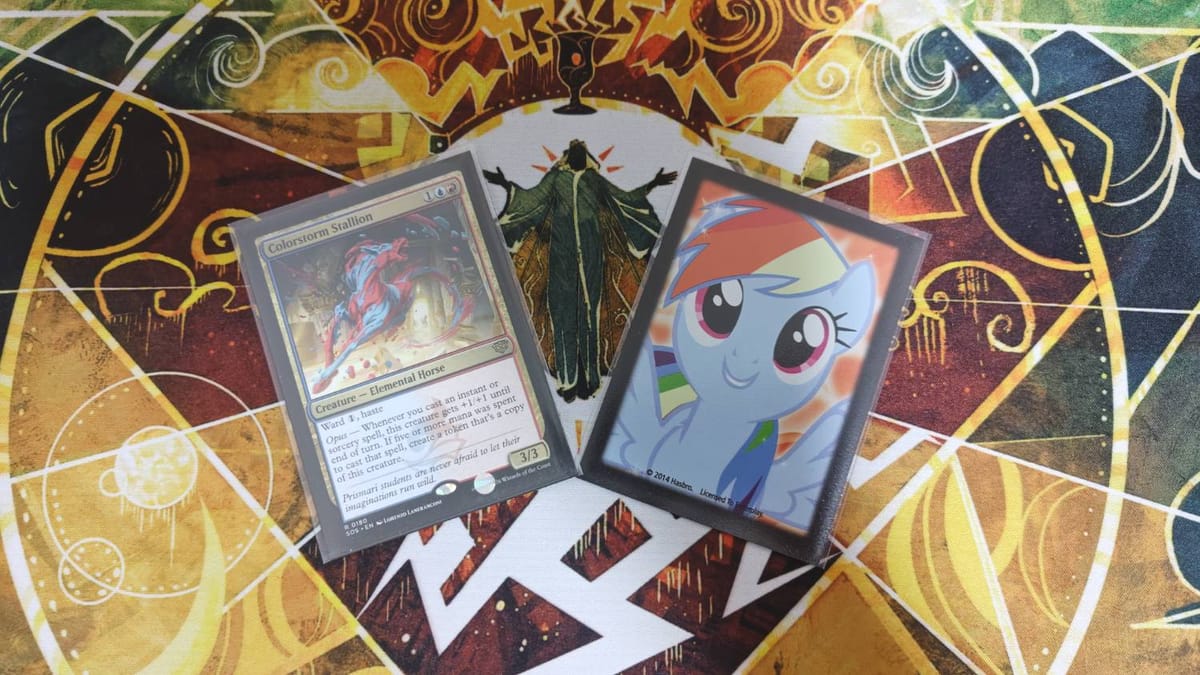
At the MITQ at ALG, I first lost to Momo, then beat three Dimir-based midrange decks in a row, and then died in the deciding game after misplaying against Izzet Spellementals. Afterward I got to talking with cephille about sleeving up a deck in My Little Pony sleeves and running the opponent over with a Colorstorm Stallion, and about whether I would be interested in writing an aggro article if I qualified with Izzet aggro at the MITQ.
I happily agreed, and then the next week I switched to Jeskai Burn (everything but Boros Charm is Izzet anyway, right…). Then I lost the deciding game to Esper Ninjas, figured switching decks had wasted the Bless that came with promising to write the article, and quickly switched back. That is how this article came to be.
Is There Any Reason to Play Aggro in This Environment?
Hold on, let me make one up.
…
Okay, it seems there isn’t.
In the past, Stormchaser’s Talent and Boomerang Basics worked together so well that aggressive Izzet spent a long time in a state of “what’s the point of playing Izzet without this combo?” Then, on August 10, 2026, Wizards finally decided to ban Badgermole Cub, Stormchaser’s Talent, and Gran-Gran outright before this season’s RCQs began, ending a Standard that was dominated by either green or Izzet.
Dimir midrange, which had been squeezed between those decks for a long time, rose again and in turn suppressed the 4-color control and Dimir Spider-ManNote 1 decks that were entirely unaffected by the bans. Aggro happens to be best at beating Dimir midrange, and with mono-green, a big natural predator, having lost the Cub, and few people switching back to Selesnya, everyone’s guard against aggro is at an all-time low. It really is a heaven-sent opportunity.
Advantages of Aggro
1. Simple mana base
It is called Izzet, but it is practically mono-red, and with 12 dual lands in the environment, color-screw accidents are rare.
2. Relatively clear mulligan requirements
The goal is to beat the opponent to death, so the principles for choosing your opening hand are about the same whether you are on the play or draw, or in game 1 or after sideboarding.
3. High win rate on the play
Basically, if you win the die roll, your win rate is around 60%.
Of course, if the opponent knows you are on aggro the moment they sit down, that may not hold (X)
Disadvantages of Aggro
1. If you fall behind, you can’t catch up
Unless you have already beaten the opponent down to near death, once they can survive two or three more hits and take control of the board, it is very hard to win.
2. Some matchups are terrible even on the play
Against decks that gain life, you almost cannot win, and Sheltered by Ghosts is a nightmare. That you rarely run into Beza, the Bounding Spring these days is already the environment being merciful.
3. Wrong decisions are magnified
Since you have little opportunity to replenish resources, even small mistakes, such as using burn on the wrong target or sequencing your creatures backwards, can directly decide the match.
Why Play Izzet Instead of Mono-Red?
Because of the reinforcements.
Since Heartfire Hero, Monstrous Rage, and Screaming Nemesis were banned, mono-red has hardly gotten any strong cards. Meanwhile, Secrets of Strixhaven gave us Vibrant Outburst, which is good enough to replace Lightning Strike, and Colorstorm Stallion, which fills the gap at three mana. On top of that, splashing blue lets the sideboard use a cheap and effective counterspell like Spell Pierce. There is really no reason not to splash blue.
Slot Allocation
Lands: 22 to 23
Considering the top end reaches 5 mana, 22 lands is basically a must, and 23 is the most stable. Which is best? By my longstanding doctrine, 22 gets you mana-screwed and 23 gets you flooded (X)
Okay, let’s do some math. In practice, the land growth looks roughly like this:
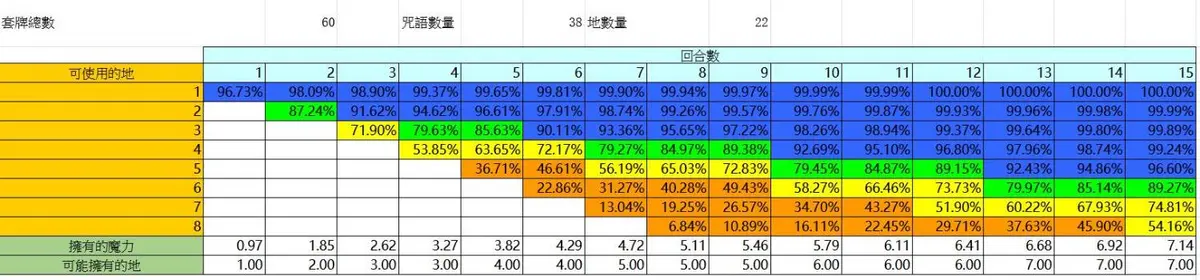
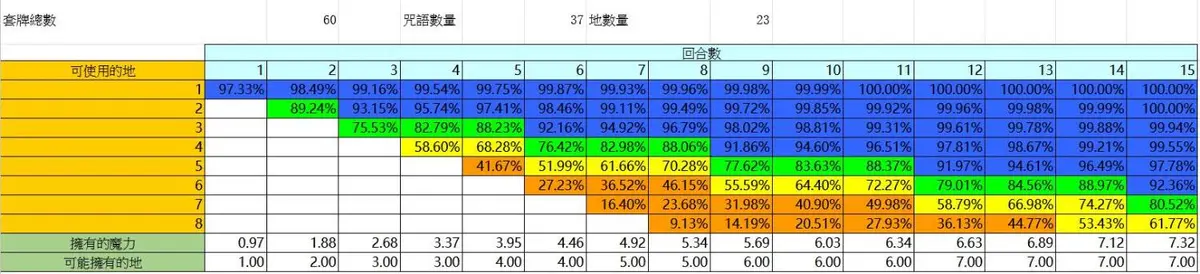
I still recommend 23. You would rather flood than face the situation where you need that land and can’t draw it.
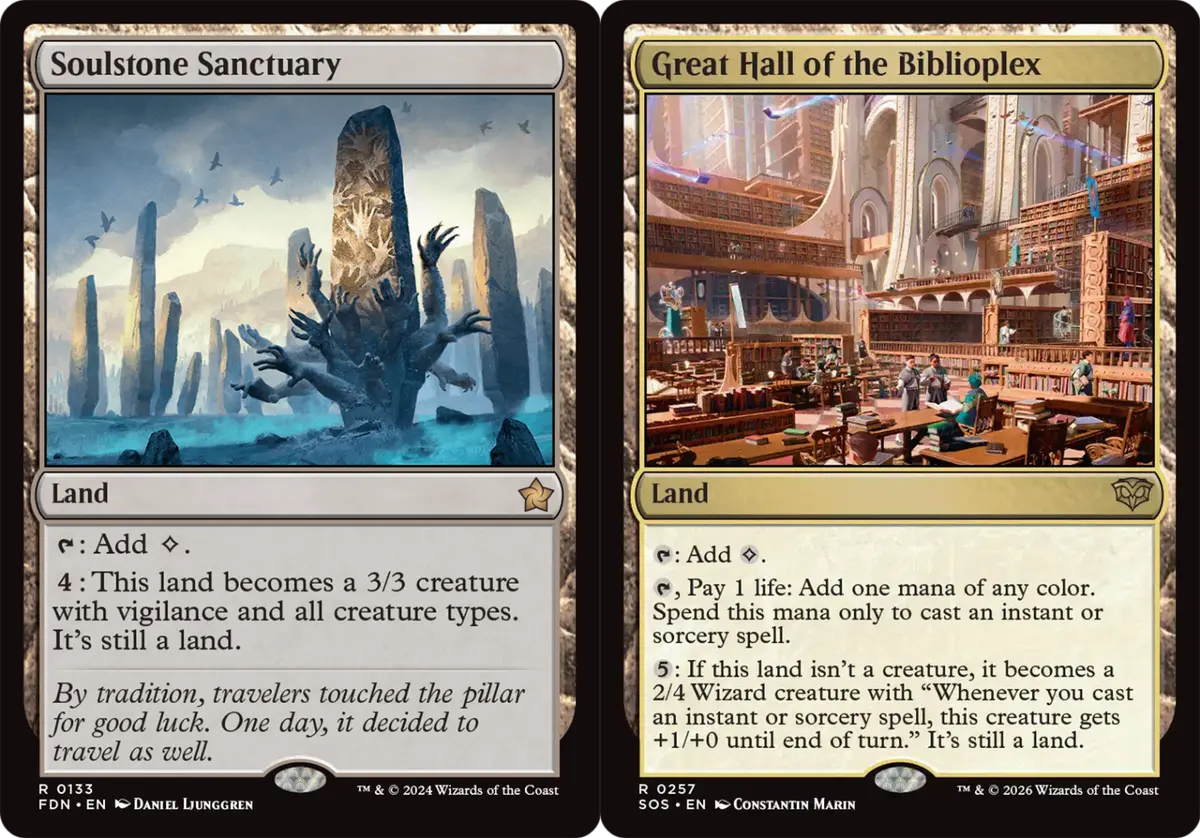
12 Izzet dual lands and 8 to 9 Mountains. There is room for up to 3 creature lands. Aggro cannot tolerate tapped lands, so the only choices are Great Hall of the Biblioplex or Soulstone Sanctuary. Each has its merits. I prefer Sanctuary, but it can get stuck with two-color cards in hand.
Noncreature Spells: 9 to 11
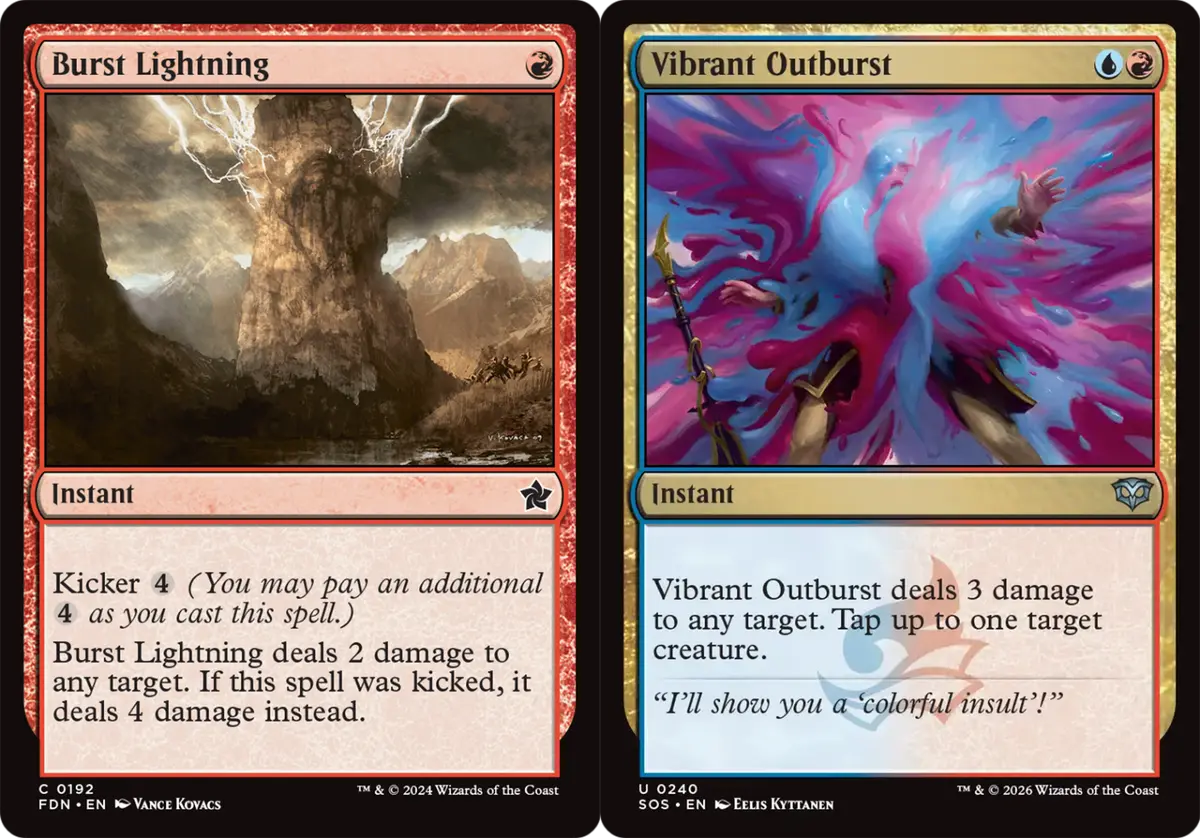
You always want to play Burst Lightning and Vibrant Outburst, especially Vibrant Outburst; otherwise there is no point in playing Izzet.
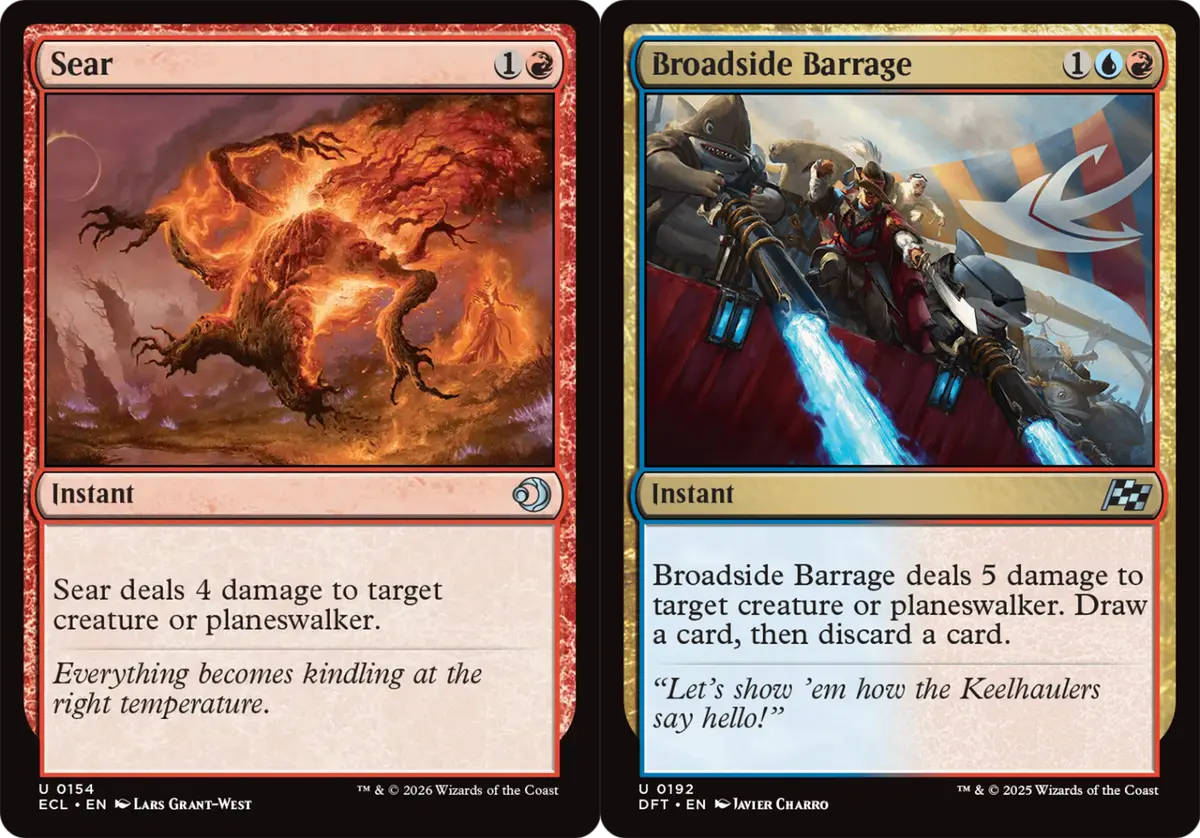
You usually play a full four, or cut at most one Burst Lightning for something else. For the remaining slots you will usually play 1 to 2 Channeled Dragonfire, and depending on how many you play, you will have 1 to 2 open slots for other spells. Broadside Barrage or Sear are both fine here.
Creature Spells: 26
This is divided into 4 parts.
One-Drops: 8
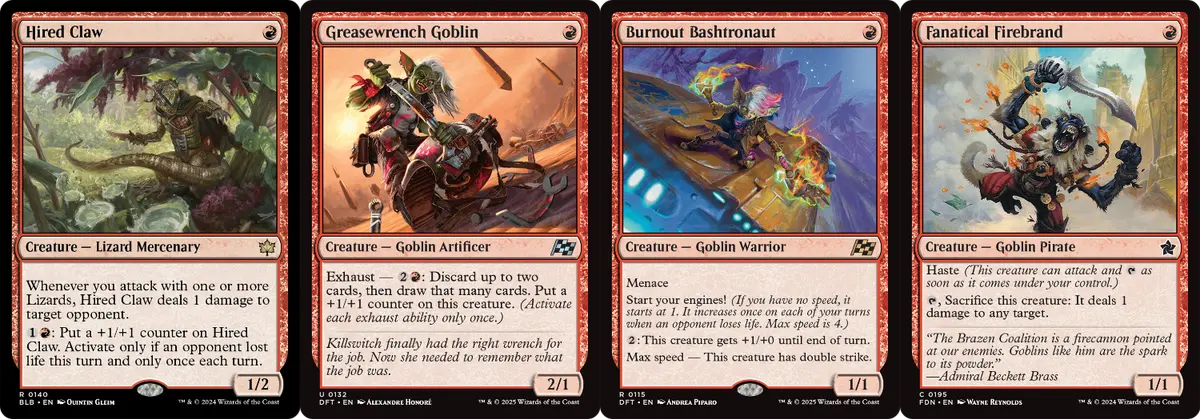
First, Hired Claw is a must. After losing Monastery Swiftspear and Heartfire Hero, nothing is stronger than a lizard that reliably deals damage and slowly grows on its own.
And the lizard is a Mercenary too, so Shoot the Sheriff is sad.

After all, it shoots the "Sheriff"
Another option, more popular lately, is Greasewrench Goblin. Being able to spend spare lands in the midgame for fresh cards is indeed nice.
The one that used to be seen more often is Burnout Bashtronaut. Its innate menace is a headache for opponents who want to block, and with max speed it gains double strike and grows by itself, so it was favored for a while. But since it needs to build up speed before it does anything, it is very awkward if you draw it in the mid to late game.
Fanatical Firebrand is also a good choice. It has haste so it can deal damage right away, and even after the opponent has built up their creature defenses, you can sacrifice it as a one-mana “deal 1 damage” effect. It is also quite good against mono-green for dealing with mana creatures.
The combination I currently recommend is Hired Claw + Greasewrench Goblin; if something stronger comes along in the future, we’ll talk then.
Don’t consider Elusive Otter. There aren’t enough spells to make it big, and it is nearly useless on the green side as well.
Two-Drops: 10 to 12
The key range.
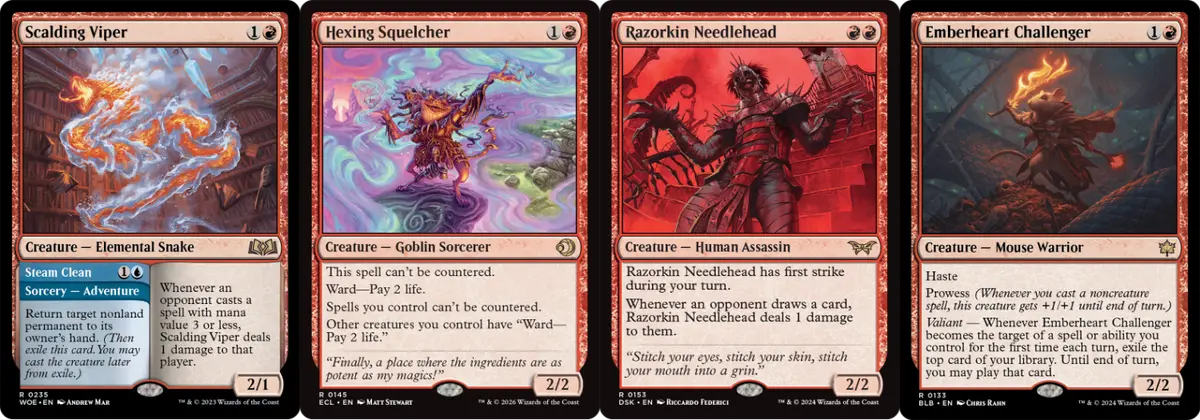
First, Scalding Viper is a must. Its adventure can bounce a nonland permanent for 2 mana. Since Standard currently lacks aggro, other decks feel free to slow down, so when a 3- or 4-mana permanent gets bounced, it is equivalent to the opponent doing nothing for a turn.
Hexing Squelcher is probably the best representative of the serious power creep of recent years: a two-mana creature with 4 beneficial abilities? Its important protection means the opponent must pay at least two life to remove your creatures, and it perfectly counters Spell Snare. Its only natural predator is Nowhere to Run, but hardly anyone plays that now.
Then there is the question of whether to play Razorkin Needlehead or Emberheart Challenger. In the current environment I recommend Needlehead. Although Emberheart Challenger deals damage immediately and has prowess to grow, it has the same problem as Elusive Otter: there are very few chances to trigger prowess with noncreature spells, and the last card-flipping effect almost never gets a chance to trigger. Back in the Monstrous Rage era, a single red mana was enough to trigger both prowess and the flip effect easily, and back then of course Mouse > Needlehead, but sadly that era is over. Needlehead has another advantage: it is an A☆ssa☆ssin (Assassin), so it can also dodge Shoot the Sheriff.
Three-Drops: 4

My Little Pony~
It comes with prowess and ward 1, and if you cast a noncreature spell using 5 or more mana, it copies that spell, which is also the reason to play Channeled Dragonfire.
There is actually another three-drop, Tersa Lightshatter. After losing Screaming Nemesis, it has almost always been the one filling the three-drop slot, though its downside is that it is legendary, so drawing two is awkward. There is also Gastal Thrillroller, which looks quite strong but really isn’t, and Ball Lightning is even worse. What we need is sustained damage, okay?
Creatures Costing Three or More
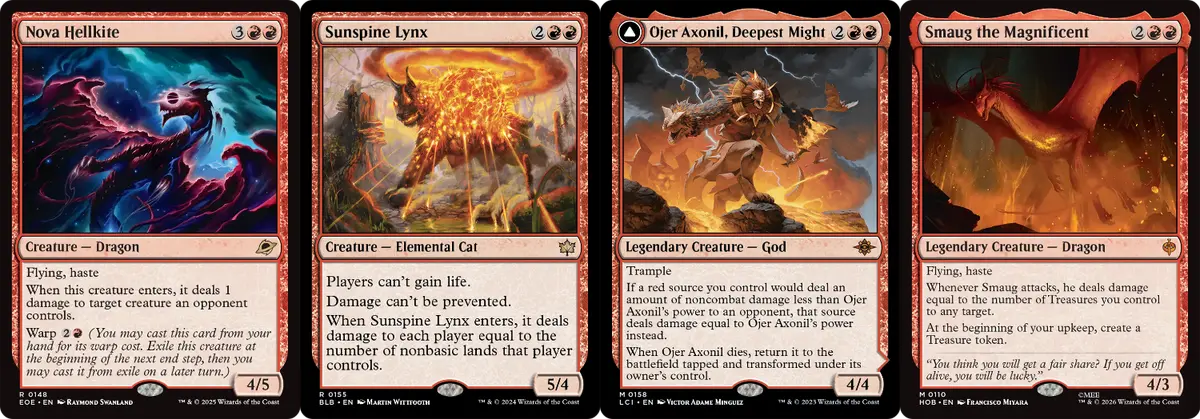
Nova Hellkite is uncontroversial. It is even treated as a three-drop. A 4/5 flying haste that also deals with a creature with 1 toughness; as a five-mana card that can come down on three mana, I can’t think of any reason to give up on the Dragon for another creature.
Sunspine Lynx has always been a good option. Apart from being a bit weak against mono-green, it is good against everything else, especially three- and four-color control decks, where it often deals massive damage on its own. It is more commonly seen in the sideboard, though.
Ojer Axonil, Deepest Might is a rather subtle creature. It doesn’t have much combat ability itself; what matters is that it makes all noncreature damage 4, which works well with Scalding Viper, Razorkin Needlehead, Hired Claw, and Fanatical Firebrand. The downside is also in that synergy: it means you must set things up in advance for the god to be at its best.
Smaug the Magnificent is a new option from the new set The Hobbit, but considering how well it fits, it is better suited to a Boros Dragons deck.
Usually you play 3 to 4 Nova Hellkite plus 2 Sunspine Lynx; playing no Lynx at all and only Dragons is also viable.
Additional Creatures
The deck has roughly 2 to 3 open slots for other creatures. Besides the bigger creatures just mentioned, there aren’t many options, since red-based one- and two-drops that were strong enough are already in use. The two that have been commonly played recently are:
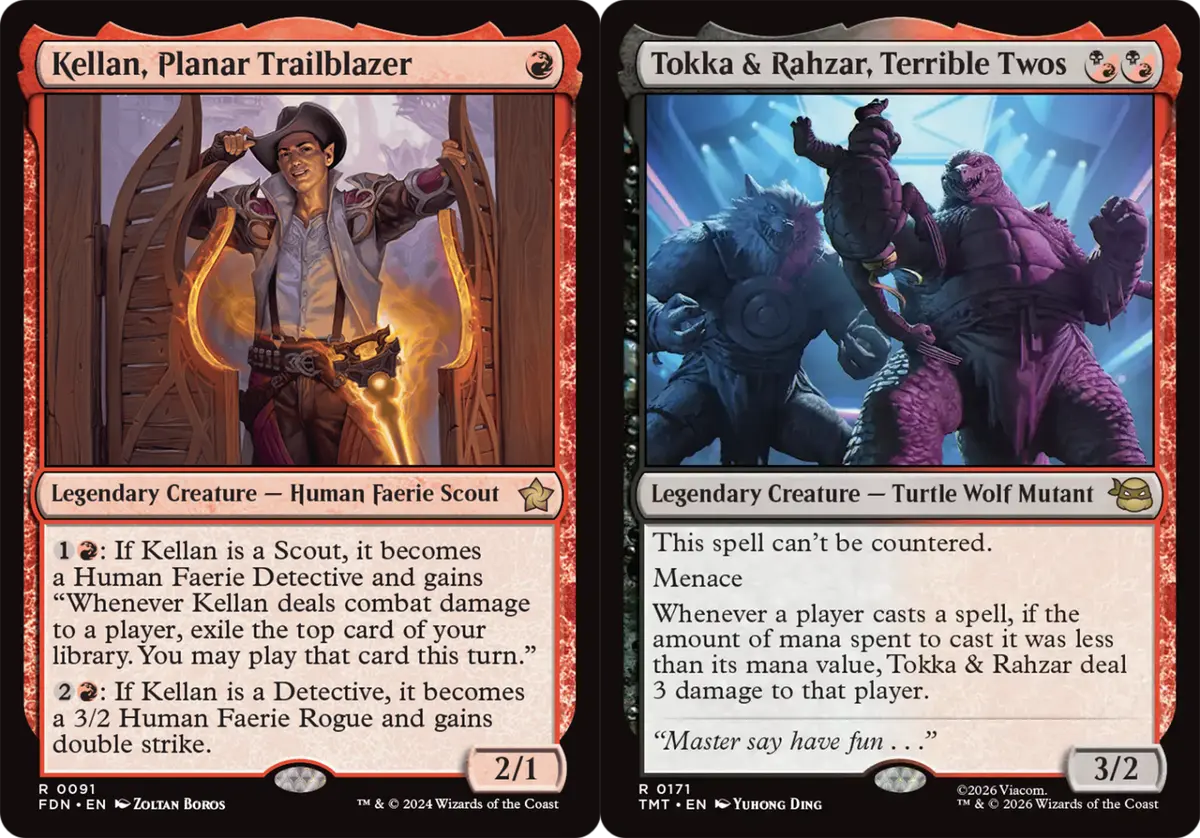
Kellan, Planar Trailblazer is actually very strong and can use up your spare mana, but the problem is that it is legendary: a one-drop that can’t be played in multiples to pressure the opponent is a bit awkward for red aggro.
Tokka & Rahzar, Terrible Twos is a great tool against Evoke elementals and decks that cast spells at reduced cost, but it is likewise legendary, so it doesn’t stack.
The Winning Formula
1. Creature pressure + combat damage + direct damage = 20 damage
Make the opponent’s 20 life disappear as fast as possible. That is the essence of aggro.
2. Throw the problem to the opponent
How they survive is the opponent’s problem. What aggro does is apply enough pressure that the opponent’s life total steadily drops every turn, forcing them to abandon their own game plan to accommodate you, or to make wrong decisions.
Opening Hand Evaluation: What Hands Are Worth Keeping
When you pick up your opening hand, here are the three key principles for deciding whether to keep:
1. Reasonable mana and tempo
Although the mana requirements are simpler than in a multicolor deck, you still can’t underestimate the importance of lands. Generally, the ideal opening hand has at least two lands, rather than an otherwise decent hand with only one land that prays to draw lands later.
Conversely, a hand with four lands is also not okay, since it means too few effective spells. What aggro fears most is not mana screw but wasting the first few turns entirely, giving the opponent time to run their plan undisturbed. Of course, a four-lander with creatures on turns one, two, and three is not unacceptable.
2. Early threats
An aggro opening hand should ideally start applying pressure on turns one and two. If you have no low-cost creatures at all, then even with reasonable mana the hand is not okay. Aggro has no ability to smooth draws, so you can’t count on drawing into low-cost creatures.
3. Have a midgame plan
The ideal hand is not only “strong on turn one” but one where “you know what to do on turns one, two, and three.”
For example: one-drop, two-drop, three-drop, burn, burn, land, land
This is the ideal hand. It provides a very clear path to victory: you can build a board, and also use burn to clear blockers or finish off damage. Even if you don’t draw lands, burn is still useful.
What Hands Merely “Look Playable”?
One of the easiest mistakes in playing aggro is seeing lands, creatures, and burn in your hand and instinctively thinking “this hand is playable.” But for aggro, “playable” and “winning” are two different things.
For example, on the play, you have these seven cards:
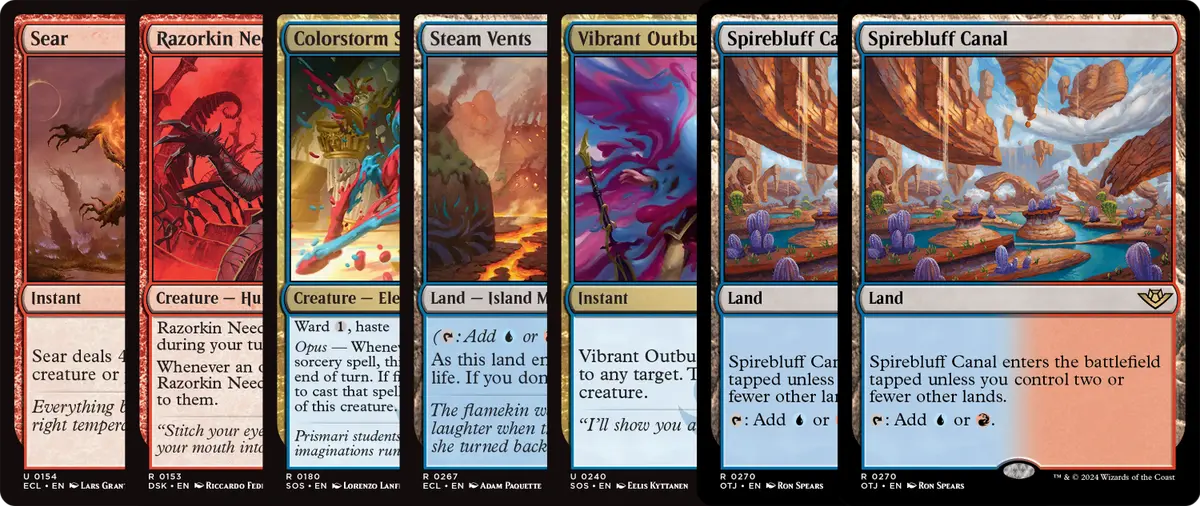
At first glance, this hand looks very stable. There are enough lands, creature removal, and two- and three-drop threats.
But there is a problem: you have nothing to do on turn one.
This leads to a few scenarios:
- The opponent also has nothing to do -> that’s fine
- The opponent has something to do but it doesn’t involve you, e.g. looting or casting a creature -> that’s also fine
- The opponent has something to do and it involves you, e.g. discard -> if they take a noncreature spell it’s okay. If they take a creature, congratulations, you also do nothing on turn two
Let’s assume the opponent happens to have nothing to do as well. You play a creature on turn two and it gets killed, you play the pony on turn three, hit once, and it gets killed too. Then congratulations: you had better pray that none of your draws are lands, or you’re dead.
This is a classic opening hand trap for aggro on the play: because you have nothing to do on turn one, the opponent gets a comparatively easy early game. It’s not that a two-drop is bad; it’s that this hand has too few creatures, and it is best to have at least 3 threats. Of course, if you’ve mulliganed, that’s a different problem.
Another common trap is:
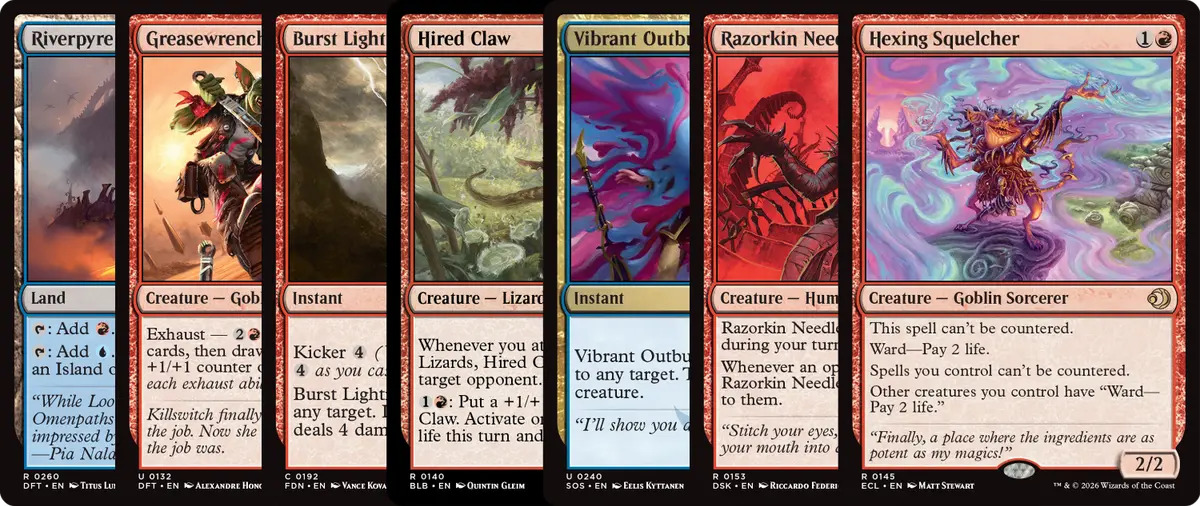
This hand looks wonderful, and the problem is also obvious: you need to draw a land.
Aggro of course wants to deploy quickly, but the prerequisite is a mana curve that grows normally. A hand like this means you are betting that after playing two one-drops, you draw a land; otherwise you do nothing from then on.
And there is a fatal problem: this opening hand has a Verge, which can only produce red at this stage. Even if you do draw a land, what if it’s a creature land?
There is also a subtle kind:
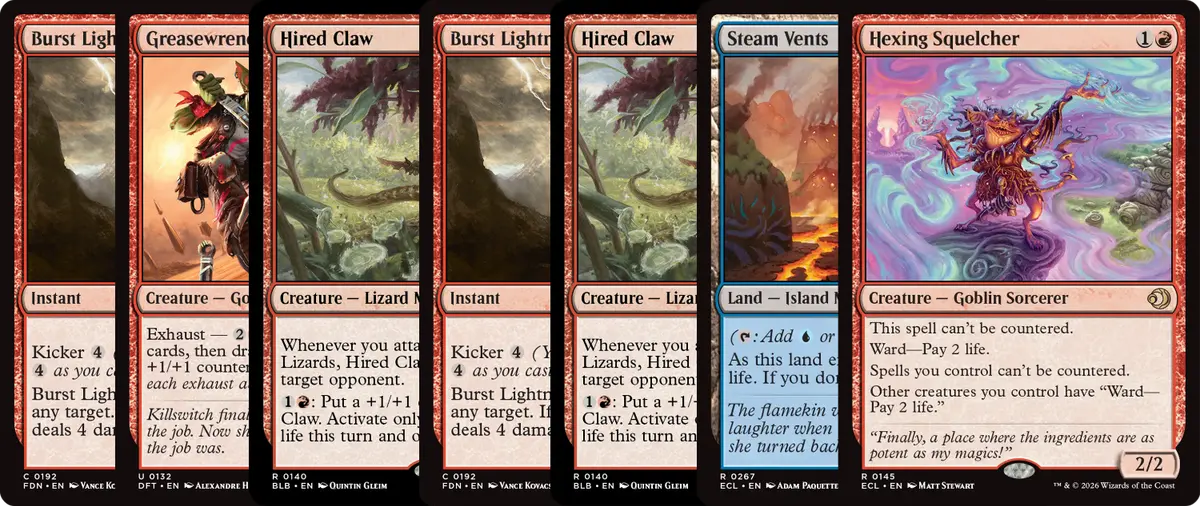
This is a hand you can gamble on.
First, the land’s color is right and the creature is very strong. Even without a second land, Burst Lightning can still be useful.
On the play, you can gamble if you’ve mulliganed; on the draw you will be even more willing to gamble, since you get an extra card’s worth of chances.
In short, when you look at your opening hand, you can ask yourself the following three questions:
1. What do I do on turn one?
2. How do I add damage on turn two?
3. If the opponent deals with the first threat, what can I do next?
If all three questions have reasonable answers, this is a hand worth keeping.
But if your first reaction after picking up seven cards is: “I just need to draw one more land,” or “I just need to draw one more creature,” then you need to think very carefully.
Aggro’s wins and losses cannot be built on “the next card happens to be what I need.” Instead, use a reasonable opening hand to force the opponent to keep answering questions from turn one.
So How Do You Play It?
Turns 1-2: The Opening
There are two key points here:
1. Which Threat to Build First
If your hand has only one one-drop or two identical creatures, there is naturally no question of which to play first. But if you have two creatures at the same cost that are different, deciding the order becomes important.
For example, this situation:
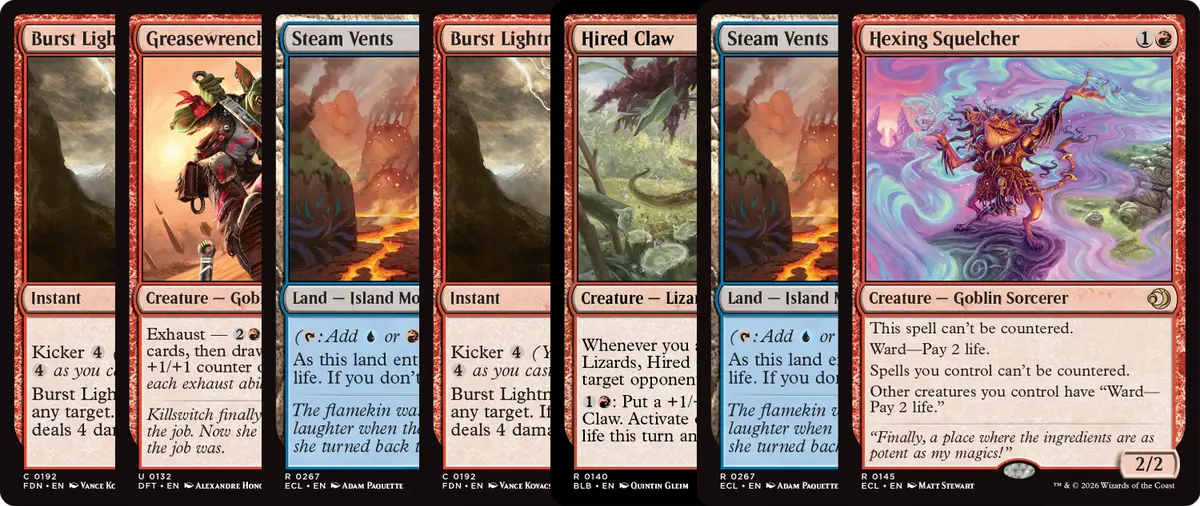
On the play, with both Hired Claw and Greasewrench Goblin in your opening hand, which should you play first?
The answer is the lizard. Not only because the lizard is strong, but because the Goblin has later value: it is one of the few precious creatures in the deck that lets you manage your hand resources. So unless it is the only one-drop in your opening hand, the lizard always takes priority over the Goblin.
It is the same at two mana. With Scalding Viper, Hexing Squelcher, and Razorkin Needlehead, which should you play first?
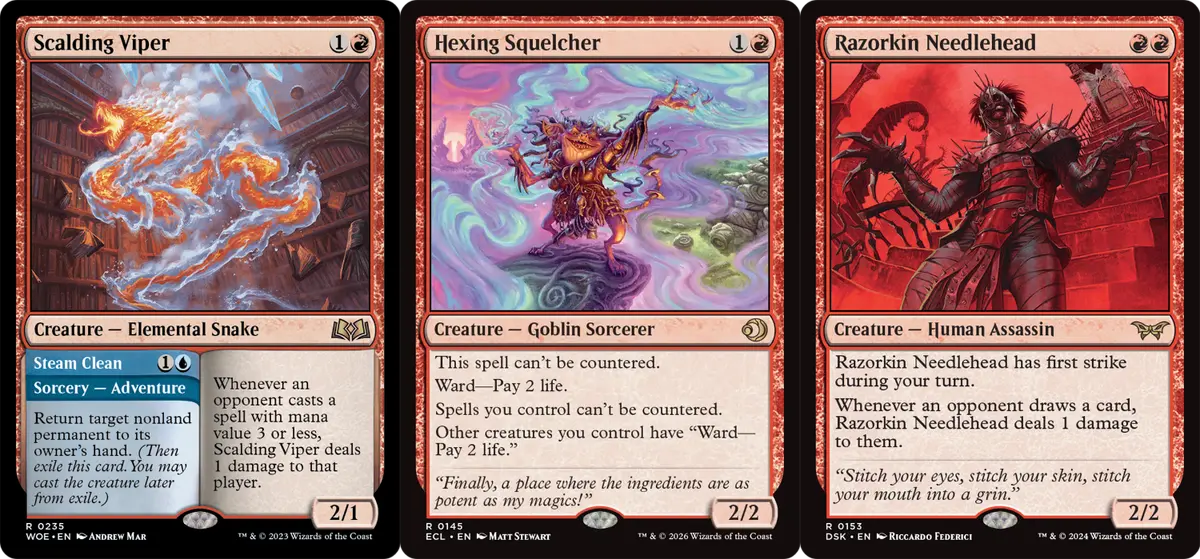
First, the Viper always goes last. It is one of the few ways your main deck can deal with nonland permanents, and from the midgame on you will even need its bounce to buy more time. Unless you have no other creatures or there is a special circumstance, you should never prioritize playing the Viper.
Then, Squelcher takes priority over Needlehead. The reason is that if the Squelcher isn’t dealt with, all your later creatures become harder to remove, and dealing with the Squelcher costs at least two life. Besides the effect of dealing damage when the opponent draws, Needlehead also has first strike on your own turn, making it very hard for the opponent to deal with it by blocking.
Of course, there are cases where Needlehead takes priority over Squelcher. This usually happens when you want other spells to resolve smoothly later, in which case you can hold the Squelcher and cast it together once you have enough mana.
2. Whether to Account for the Opponent’s Interaction
This is something of a once-in-a-century dilemma.
The opponent is on the play, plays a red or black land on turn one and passes, and you have a one-drop in hand. Do you play it?
The answer: yes.
Although doing nothing wastes a turn for both sides, suppose the opponent holds a one-mana removal spell. If you don’t let them use it now, that removal is still there, so you might as well let them kill it. Besides, the opponent might just be bluffing.
Another situation: when the opponent passes like this and you have both the lizard and the Goblin in hand, which do you play first? Here you can play the Goblin and let the opponent kill it, since the lizard surviving clearly brings higher strategic value.
Of course, there is also the option of holding both until turn two and playing them together to see whether the opponent passes again. Against slower opponents you can consider this, but there is also a chance of running straight into a sweeper, so think carefully about whether to use this strategy.
Turns 3-4: The Decisive MomentNote 2
The turns that decide the direction of the game.
Here there is usually a two-sided question: go all out, or hold back resources.
Of course, if going all in this turn lets you finish with burn next turn, there is no reason not to go all in. The problem is in all other situations.
1. When you face a situation where the opponent only dies if you go all in this turn and again next turn, should you play one more creature to guard against damage falling short if one creature gets removed?
The answer: it depends on what the opponent is playing.
Against control, or opponents with black, it is best not to, since you could be blown out by Day of Black Sun or Deadly Cover-Up. Holding back a creature doesn’t necessarily mean you will win, but at least you won’t be left out of resources.
Also, white may bring Settle the Wreckage. If the opponent has two white sources and passes with four mana up, it is best to think about whether to go all in.
2. At three mana, with the Stallion and a two-drop in hand, should you just play the Stallion and hit for three?
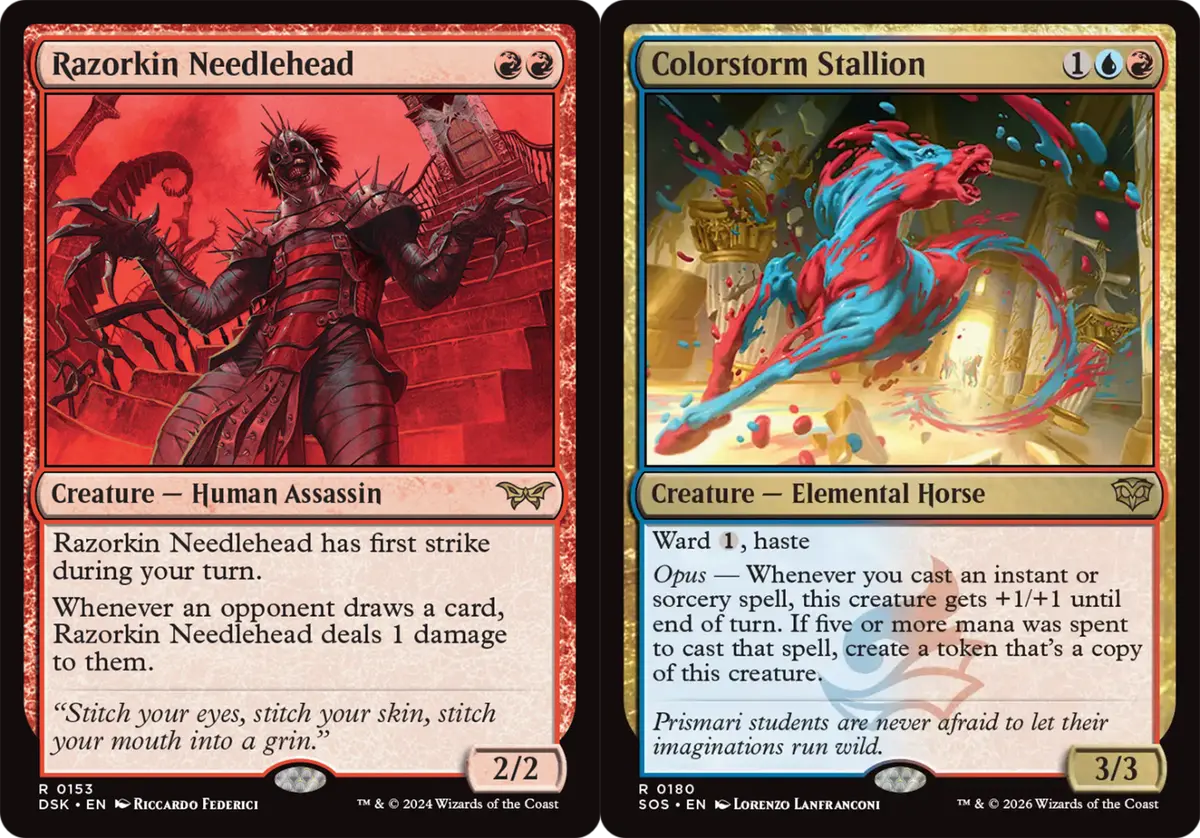
The answer is no.
The Stallion has haste, so it can deal three damage whenever it comes down, but the two-drop has no haste, meaning at least a turn must pass between coming down and dealing damage. Although each turn the Stallion survives it deals another three damage, that is just a bet that the opponent has no way to deal with the Stallion.
Casting it the other way around has another benefit: the opponent may prioritize dealing with the other creature and lose the ability to answer the Stallion.
3. At three mana, with the Stallion and the Dragon, which should you play first?
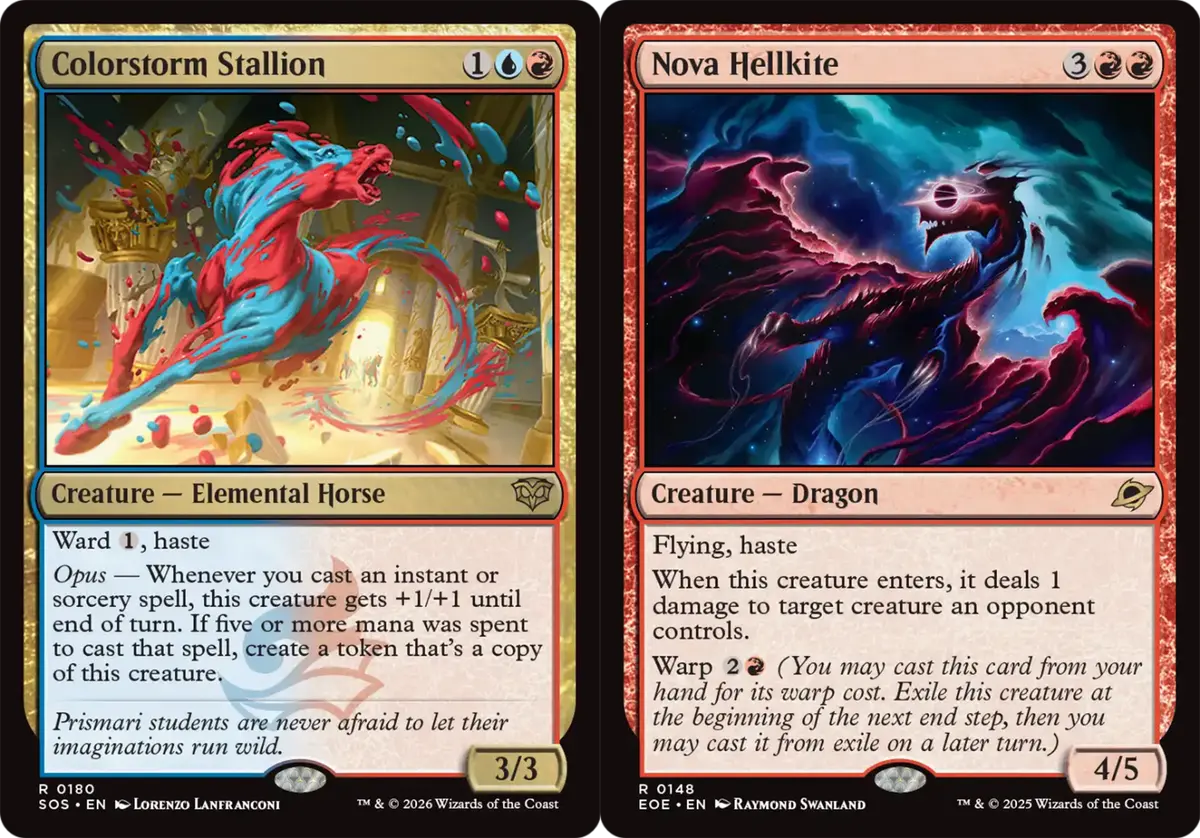
The answer is the Stallion first, because the Dragon flies, has later value, and deals more damage, while the Stallion comes with ward, which drains the opponent’s mana and buys you some more time.
However, when you know the opponent will make you discard, I recommend playing the Dragon first. The reason is again that the Dragon’s later value is higher, and once it goes to the Warp zone it can also dodge the danger of discard.
Mid to Late Game: Closing Out
Q: What do I do after the opponent takes control of the board?
A: Concede!
I’m not joking. If the opponent still has ten or more life at this point, I suggest you consider conceding to save time for the next match. But if the opponent has only seven life left, you can keep going.
When both sides have completely run out of resources and the opponent’s life is low, you enter a scary state: topdecking. Sometimes you are just a little short on life and it is very hard to push it through with creatures.
At this point there is no need to rush, because the opponent is the one who should be worried. They need to worry about whether you will end the game by drawing a burn spell next turn, and also guard against taking the last of their life from a creature.
Aggro’s advantage is low cost with high power, so the best way to handle this stage is to draw and pass, accumulating more resources before casting them all at once, to exceed the number of answers the opponent might draw.
The life total gap between you and the opponent becomes the time you have to fight for resources, since Standard is still mostly a format decided by combat damage. Don’t think of this as a pure luck contest for both sides.
Burn as a Finisher
When, after turns three or four, you start to realize that creature combat can’t break through, you can begin holding burn instead of forcing it to clear the way. Use your creatures to race for life as much as possible, and it doesn’t matter if they get traded, since by then you have already decided to finish with burn.
Vibrant Outburst is especially valuable in such situations, since it can hit the face and clear the way at the same time.
Avoid Running Out of Resources Entirely
This is exactly why I stressed holding back the Greasewrench Goblin earlier: with a Goblin you at least have a chance to draw cards, and being able to draw is moving forward.
If you already have 6 to 7 lands on the battlefield, extra lands you draw can be held back and kept for when you draw the Goblin to cycle through them, unless they are creature lands.
Common Mistakes: Why Do You Lose Games You Could Have Won?
1. Sending All Your Burn to the Face
This topic is actually quite deep. I once tried to write an article on how “Lightning Bolt has different values when the opponent is at 20 life versus 3 life.” I found that the content to discuss went far beyond my knowledge, wrote only a few lines, and gave up, and now I can quote all of it:
“A card’s effect is fixed, but a card’s value keeps changing with the board. Lightning Bolt is always just a card that deals three damage, but its value is completely different when the opponent has 20 life versus when they have 3.”
When to go face and when to clear obstacles is the biggest factor separating good aggro players from the rest.
Here is a simple rule of thumb: anything with lifelink, mana creatures, and anything that affects your attack between turns 1 and 3 should always be dealt with. You can ignore the rest for now.
2. Overextending
Playing too many creatures to get in a few more points of damage and getting swept.
This usually happens in sideboarded games or in game 1 against control, and after a brutal sweep it is easy to never recover. Also, if possible, don’t play too many duplicate creatures, or you’ll get hit by Maelstrom Pulse.
3. Being Too Conservative
Aggro’s capital is tempo. Holding resources without using them wastes turns. As mentioned before, if a creature is going to get killed, let it get killed; tempo matters more.
4. Not Counting Lethal Damage
Focusing too much on the board, thinking about using burn to clear the opponent’s creatures to build an advantage, without realizing you can already end the game.
Carefully calculating whether the opponent dies every turn avoids this mistake.
5. Ignoring What the Opponent Can Do Next Turn
The opponent does nothing on turns one and two, so you think “great, their hand must be terrible, quickly develop the board,” and then get blown out by a three-mana Fire Magic or Day of Black Sun.
If you are lucky enough, you will still have follow-ups; if not…
So when the opponent’s actions look strange, it is best to consider whether they are preparing something.
6. Copying Decklists
The same deck can have a completely different optimal build in a different metagame. For example, if there is more mono-green, you can skip Needlehead. If there are more Spellementals, you should consider bringing a bit more graveyard hate in the main deck and sideboard.When there are lots of Momo, it’s best not to play aggro
Deckbuilding is alive. Don’t just follow a list because a 5-0 list on MO looked like that.
Sideboard Principles
Fifteen precious cards.
Basically, most slots have a consensus, usually as follows:
- 3 to 4 Sunspine Lynx
- 2 to 3 Spell Pierce
- 2 to 3 Magebane Lizard
- 2 graveyard hate cards, usually Soul-Guide Lantern or Ghost Vacuum
- 2 Slagstorm
- 1 to 2 single-target removal, Broadside Barrage or Sear
- There will be 2 to 3 open slots to choose freely based on your local environment. For example, I think I might meet a lot of Izzet or control, so I put in 2 Disdainful Stroke.
But the question is never what to bring in, but what to take out. There are two principles here:
1. Which cards lose value in a given matchup
Needlehead against mono-green, one-damage burn against elementals, Viper against control. That is the rule for taking cards out: cards that don’t help much may still seem somewhat useful, but should make room for cards that are more useful.
2. Don’t over-swap sideboard cards to counter the opponent
For a while, whenever I met Izzet Spellementals I would bring in the Lynx, thinking the cat is an elemental that can’t be bounced and so is super strong. Later I realized that what I need to handle isn’t the bounce bird but the crab that taps you down.
And when you think about it, both sides use exactly the same lands, so the Lynx is just a rather useless 5/4.
Even in sideboarded games, you should keep the deck’s core strategy intact. The sideboard is for disrupting the opponent’s tempo and protecting your own.
Matchup Analysis
1. Mono-Green Landfall
Much easier to play without Badgermole Cub. The trick is to finish off the opponent, or get them into burn range, before their Sapling Nursery arrives.
Dealing with mana creatures slows the opponent down.
IN: Broadside Barrage or Sear
OUT: Channeled Dragonfire, Razorkin Needlehead
2. Selesnya Landfall
A slightly unfavorable matchup. The problem is Sheltered by Ghosts, which may show up in their sideboard, and you really can’t bring in the Lynx for this situation.
Keep more instant-speed burn to deal with creatures.
IN: Broadside Barrage or Sear
OUT: Channeled Dragonfire, Razorkin Needlehead
3. Dimir Midrange
A favorable matchup.
Because the opponent’s creatures are all smaller than ours, it is hard to lose the creature fight. When the opponent looks like they are about to flip into Kaito, if you have two or more creatures you can let them ninjutsu freely, since they can’t do anything other than the [-2] anyway. The thing to fear most is getting a one-for-one trade while your big creature gets locked down by Kaito.
The only thing to guard against is Floodpits Drowner ninjutsu-ing into Kaito, which will stun you for a long time.
IN: Broadside Barrage or Sear, Sunspine Lynx
OUT: Channeled Dragonfire, Burst Lightning
4. Esper Midrange
Occasionally encountered. Basically a Dimir-based build, but with a different creature composition.
The annoying part is that the opponent may have Cecil, Dark Knight, which Dimir no longer plays. Once it flips and you take a hit, it is as if all the earlier work was for nothing, so remove it the first chance you get.
Another annoying card is Dark Leo & Shredder, which gives them an extra blocker when it connects; I also recommend dealing with it right away.
The Warp Dragon is very useful in this matchup, since the Ninjas the opponent sneaks out are all 1/1. But because they are Ninjas, compared with Dimir you need to be careful about Kaito; once it gets a [+1] you are in danger.
Other than that, it is like playing against Dimir.
IN: Broadside Barrage or Sear, Sunspine Lynx
OUT: Channeled Dragonfire, Burst Lightning
5. Azorius Momo
A terrible matchup.
Sage of the Skies and Haliya, Guided by Light let the opponent gain more life than you can deal, plus Quantum Riddler, which has a chance to sit on the board from turn two. Then, depending on the player, Sheltered by Ghosts may also show up.
There is no particularly good way. Remember to bring sweepers in the sideboard, and pray the opponent doesn’t play Sphinx on turn two.
IN: Sunspine Lynx, Slagstorm
OUT: Razorkin Needlehead
6. Orzhov Lifegain
A terrible matchup.
The opponent will keep gaining life, so all you can do is pray they stumble; in sideboarded games, pray Slagstorm shows up on time.
IN: Sunspine Lynx, Slagstorm
OUT: Razorkin Needlehead
7. Mardu Discard
An unfavorable matchup.
You need to deal with the two one-drops quickly; otherwise they grow so fast they soon exceed what you can remove. You also need to race and play defense at the same time, which takes a very precisely fitting hand to manage.
This is also a matchup where they may have Sheltered by Ghosts.
IN: Broadside Barrage or Sear, Sunspine Lynx
OUT: Razorkin Needlehead
8. Izzet Spellementals
An unfavorable matchup.
The opponent has single-target removal early, and from the midgame on Eddymurk Crab suppresses your creature attacks and Sunderflock bounces the whole board, so in game 1 you can only race. After sideboarding, graveyard hate makes things a bit more comfortable, but it is still quite likely the opponent will grow enough to cast elemental creatures straight away.
To deal with this matchup, I suggest adjusting your sideboard to bring a Disdainful Stroke, though I didn’t run into it the day I brought one.
IN: Magebane Lizard, Soul-Guide Lantern or Ghost Vacuum
OUT: Channeled Dragonfire, Burst Lightning
9. Boros Tokens
A new archetype thanks to the Hobbits. It mostly keeps producing tokens and then pumps creatures to beat the opponent to death.
Deal promptly with Belladonna Took, which gains life. In terms of creature quality we have the advantage, and before the opponent’s Warleader’s Call shows up, the Warp Dragon can pick off quite a few creatures.
Bring sweepers in the sideboard to handle the opponent building up their creature line.
IN: Slagstorm
OUT: Razorkin Needlehead
10. Boros Equipment (Dwarves)
A new archetype thanks to the Hobbits.
Just watch out for creatures, especially Dwarven Mauler, which reduces equip costs. Without creatures, the opponent is just a deck with a lot of equipment.
In sideboarded games, be careful of Sheltered by Ghosts.
IN: Broadside Barrage or Sear
OUT: Razorkin Needlehead
11. 4c Control
Slightly unfavorable.
This is a deck that only starts to take over after turn four. The annoying part is that it ramps with Tablet of Discovery, reaching seven mana faster than you’d think, and then Jeskai Revelation slowly widens the gap between the two sides. The sideboard gives you more room to maneuver: Spell Pierce can counter the opponent’s Tablet to slow their ramp, and the Lynx punishes multicolor decks.
IN: Sunspine Lynx, Spell Pierce, Magebane Lizard
OUT: Channeled Dragonfire, Scalding Viper
12. Sultai Control
An unfavorable matchup in game 1.
A new-style control deck: black has both spot removal and sweepers, and Professor Dellian Fel gains life, so game 1 without counters is hard.
In sideboarded games, it depends on whether you draw your counters.
IN: Sunspine Lynx, Spell Pierce, Magebane Lizard
OUT: Channeled Dragonfire, Scalding Viper
13. Dimir Excruciator
Don’t overthink it: just deal enough damage. Ideally, get their life total into the danger zone before Superior Spider-Man arrives, so that even after Spider-Man comes out they can’t move. In the sideboard, graveyard hate and Spell Pierce can buy time, especially against looting: if the opponent can’t discard, Spider-Man becomes very hard to turn into a live card.
In sideboarded games, beware of Oildeep Gearhulk or M.O.D.O.K.
IN: Spell Pierce, Soul-Guide Lantern or Ghost Vacuum
OUT: Channeled Dragonfire, Burst Lightning
14. The Mirror
If you really do run into it…
Many people assume an aggro mirror means playing defense against the opponent, but it doesn’t. The key to the mirror is a game of chicken in a race: whoever gets scared first and starts protecting their life total loses.
IN: Broadside Barrage or Sear
OUT: Scalding Viper
Conclusion
As I said at the start, aggro is currently a dark horse during this period of upheaval in the environment, and there is no reason so powerful that you must play it.
But that is also what is most charming about aggro. It may not be the most popular or the most stable choice, but it is always there, and gives players the most direct way to win, which is exactly the most fun part.
The environment and card pool will change, but the spirit never will.
Note 1:Dimir Spider-Man is also commonly called Dimir Excruciator. Basically, any deck built around Deceit + Superior Spider-Man counts as the same category, including the Sultai (green splash) variant.
Note 2:In the worlds of shogi and Go, the key move or key game that decides the direction of a match is called the “Tennozan” (the Mount Tennō). The allusion comes from 1582, after the Honnō-ji Incident in Japan’s Sengoku period, when Hashiba Hideyoshi (later renamed Toyotomi Hideyoshi) and Akechi Mitsuhide fought the decisive battle in the Yamazaki area beside Mount Tennō. Whoever could take Mount Tennō would control the whole campaign and the hegemony of the realm, so the place was called the key point of the “battle that decides the realm.”
- Title
- From Prowess to Aggro: Izzet Aggro After the August 10, 2026 Bans
- Author
- CIXS
- Created at
- September 4, 2026
- Updated at
- September 4, 2026
- License
- This work is licensed under CC BY-NC-SA 4.0 .