Stack Frenzy: Standard Izzet Discard Control

Note: This article was translated from Chinese by AI and may contain errors. Read the original Chinese version.
Introduction
Discard is one of the signature features of DFT, and Monument to Endurance is a very intuitive, super powerful discard payoff. As long as you can reliably supply discard sources, it refills your resources and wins the game at the same time, which is why your author liked it so much back in the preview stage. That said, the design philosophy of this set’s discard archetype leans overall toward encouraging players to play aggressive decks, with representative cards like Marauding Mako, Scrounging Skyray, and Captain Howler, Sea Scourge. But rather than thinking about how to win quickly myself, I prefer to savor the look on opponents’ faces as they get controlled out of their win conditions, so I rebuilt this discard control deck with Monument to Endurance alone as the core.
Deck Overview
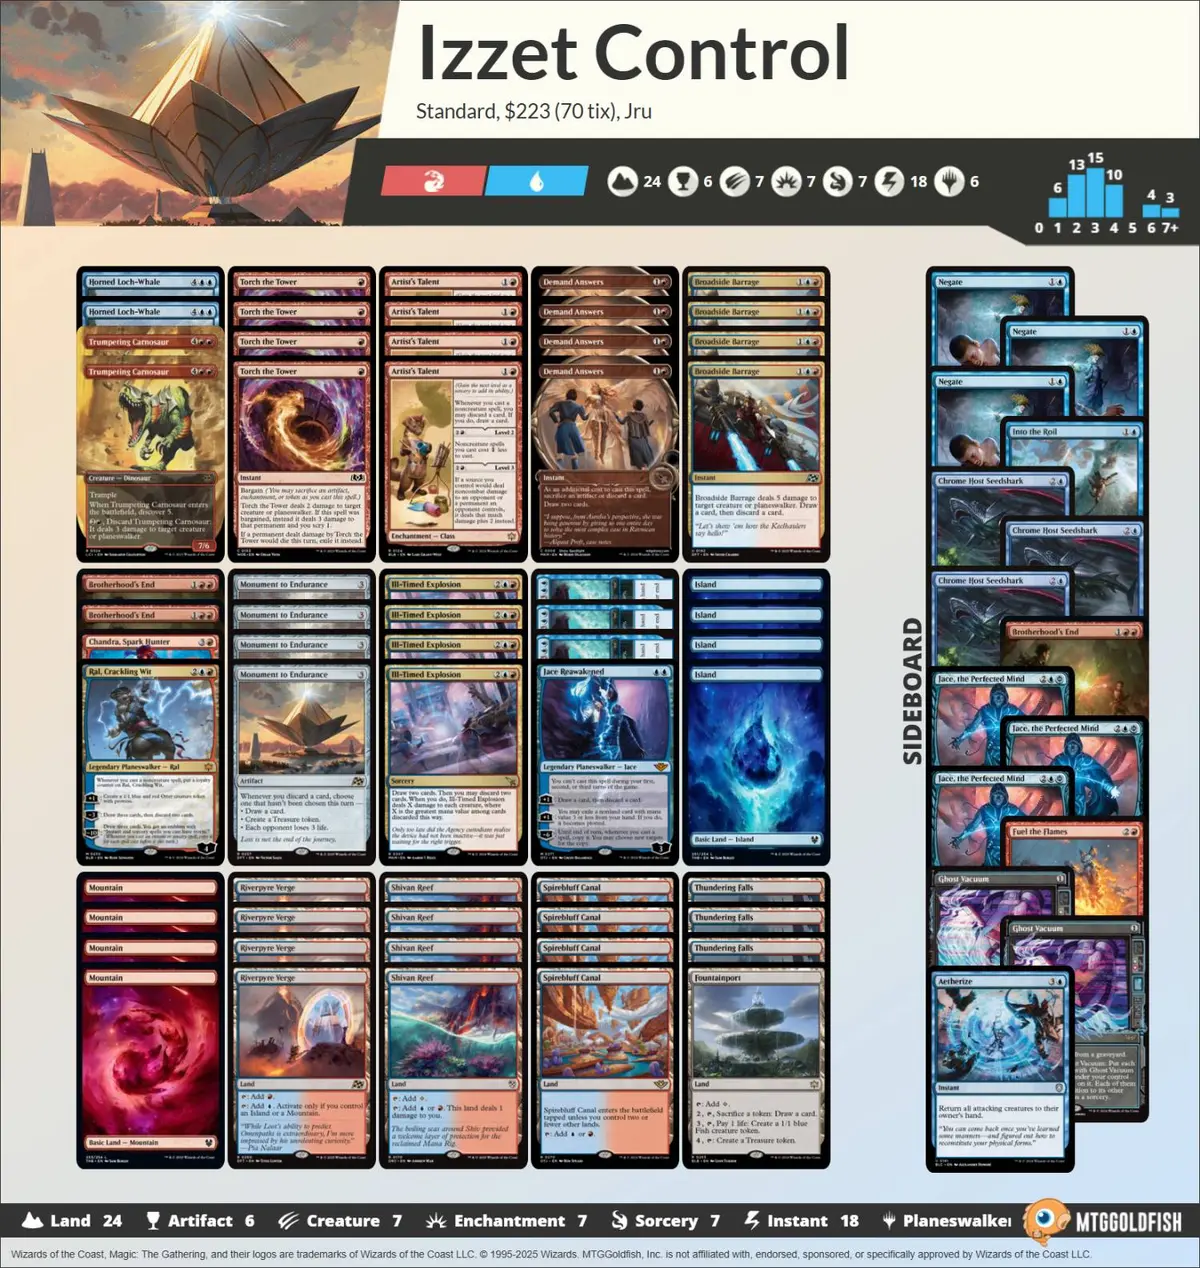
Engine Core
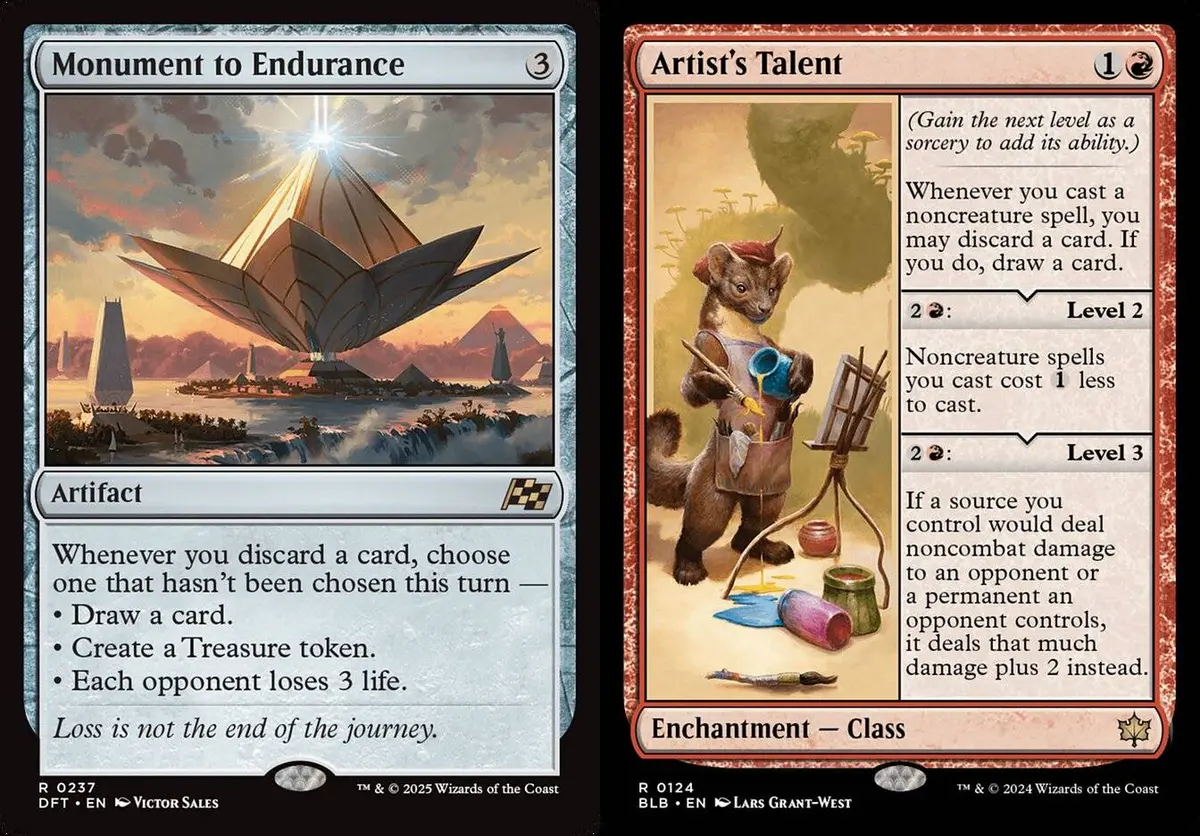
- Monument to Endurance (4) & Artist’s Talent (4):
The core of the deck. Monument to Endurance needs to trigger discard continuously and frequently while running, but there simply aren’t that many cheap cards that discard on their own (for how out of control that gets, see the IKO set), so we need support cards that reliably provide discard triggers. The most efficient in Standard is Artist’s Talent, whose filtering strength was already fully proven by Arclight Phoenix decks in Pioneer. Using Artist’s Talent also establishes that the deck is built around a very large number of noncreature spells. In addition, although Monument to Endurance and Artist’s Talent work very powerfully together, both are cards that do nothing on their own and rely entirely on teammates. Having 8 such cards is a real burden on a constructed deck, so for the remaining slots I put more weight on the extra upside from synergy or flexibility, rather than building purely on a pile of individually strong cards.
Sweepers
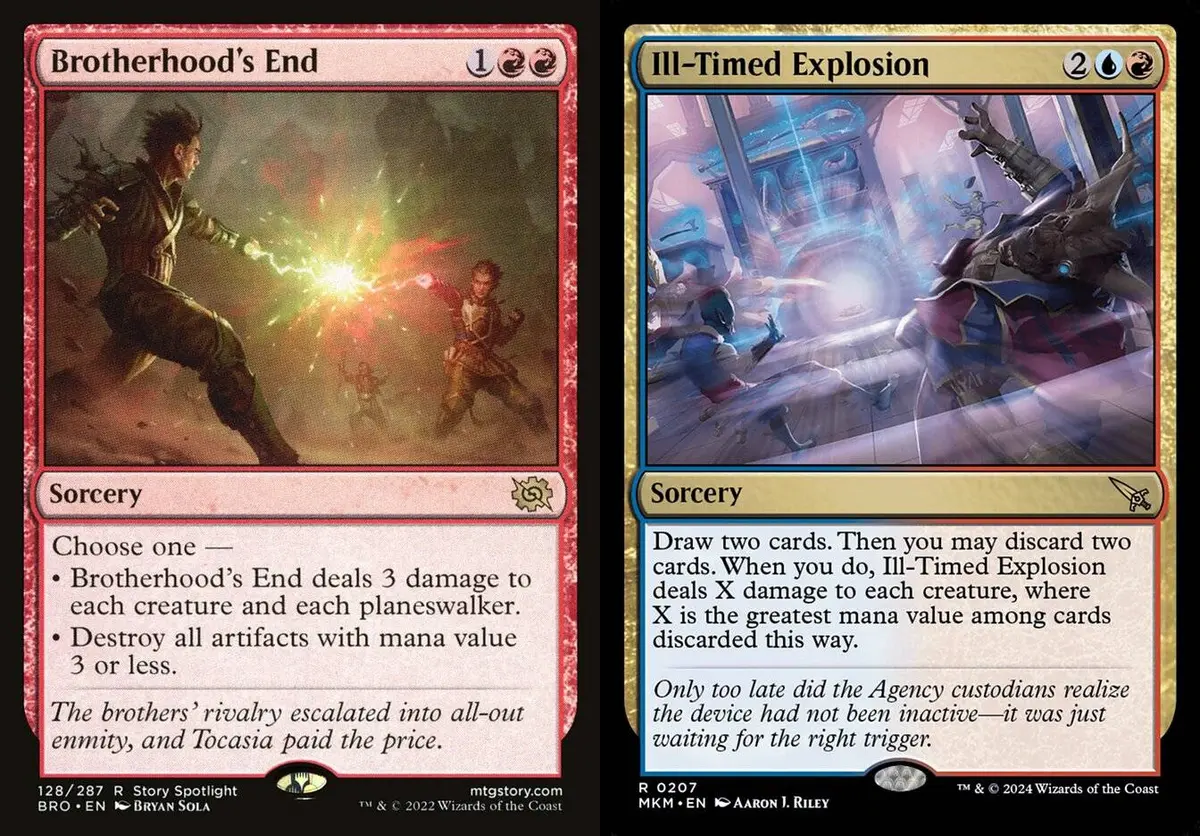
Brotherhood’s End (2):
These days there are simply too many Standard decks that deploy well in the early game. Even though Brotherhood’s End is a short sweeper with a clearly limited range, it’s still useful enough in the main deck, but at the end of the day it’s a short sweeper, so 2 copies in the main deck is enough. If you don’t want to sweep your own planeswalkers, or don’t want to pick up a card that rotates out this year, you could also consider Slagstorm as a replacement. Personally, though, rather than worrying about sweeping my own planeswalkers, being able to sweep the opponent’s Kaito, Bane of Nightmares matters more to me.Ill-Timed Explosion (4):
The main workhorse sweeper of this deck. Triggering discard twice while sweeping makes it more valuable than an ordinary sweeper. Also, red damage-based removal has always had a range problem; even 5-mana sweepers usually top out at 5 damage (such as Temporal Firestorm and Burn Down the House). Ill-Timed Explosion is very rare in clearing that threshold at just 4 mana, and it’s critical against the 6/6 Demons of Overlord of the Mistmoors or Unholy Annex // Ritual Chamber decks. The deck’s mana curve is even specialized somewhat for Ill-Timed Explosion. One thing to note: the sweep after Ill-Timed Explosion’s discard is a triggered ability, so the opponent can counter it with Tishana’s Tidebinder!
Spot Removal
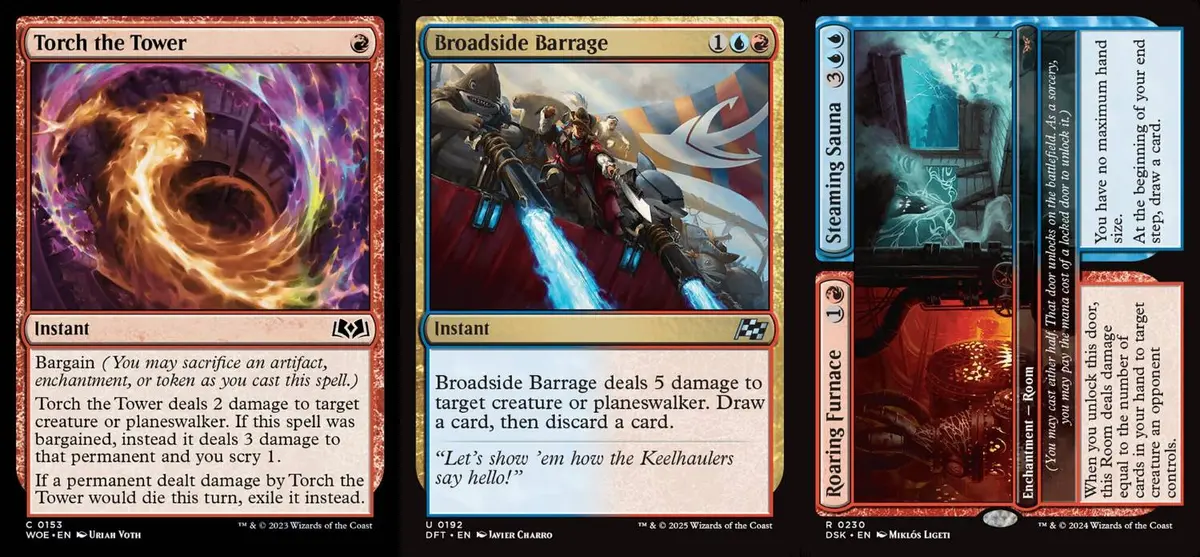
Torch the Tower (4):
The benchmark red 1-mana removal spell. However, this deck has a harder time supplying kicker fodder early in the game; only in the mid-to-late game can it produce Tokens it doesn’t mind sacrificing, and the other artifact and enchantment cards are mostly ones you wouldn’t want to eat. Players who care about this could move one Torch the Tower to the sideboard and use a longer-range 2-mana removal spell in the main-deck slot (such as Fires of Victory, Abrade, or Obliterating Bolt), or among the 2-mana filtering spells mentioned later, swap some cards for artifacts or enchantments that loot on their own.Broadside Barrage (4):
The key spot-removal card in this deck. Its 5 damage to creatures or planeswalkers can handle Overlord of the Hauntwoods, Kaito, Bane of Nightmares, and this deck’s greatest nemesis, Sheoldred, the Apocalypse. It also loots once on its own, which greatly helps the deck run consistently. However, when using it on Sheoldred you still lose 2 life, because Broadside Barrage’s 5 damage plus draw 1 discard 1 is a single complete action. The damaged creature only dies from state-based actions (SBA) after the whole spell finishes resolving, but before Sheoldred dies it sees you draw a card, so the life-loss ability still triggers.Roaring Furnace // Steaming Sauna (3):
The red room on the left is a rare 2-mana red removal spell with high range, and this card is positioned on the 2-mana curve. The blue room on the right provides a later resource engine. Although it’s clunky in cost and harder to get online, once it’s online it’s quite hard for opponents without enchantment removal to deal with. From a card-advantage standpoint, after using the red room’s 2-mana removal, the blue room is a free bonus, and in matchups where the opponent lacks creatures it can also lower your dead-card rate. Honestly, though, on pure 2-mana removal performance, Fires of Victory is strictly better. The reason I ended up choosing the red-blue room is that it’s a 7-mana card, which supplies enough ammunition for Ill-Timed Explosion.
Creatures
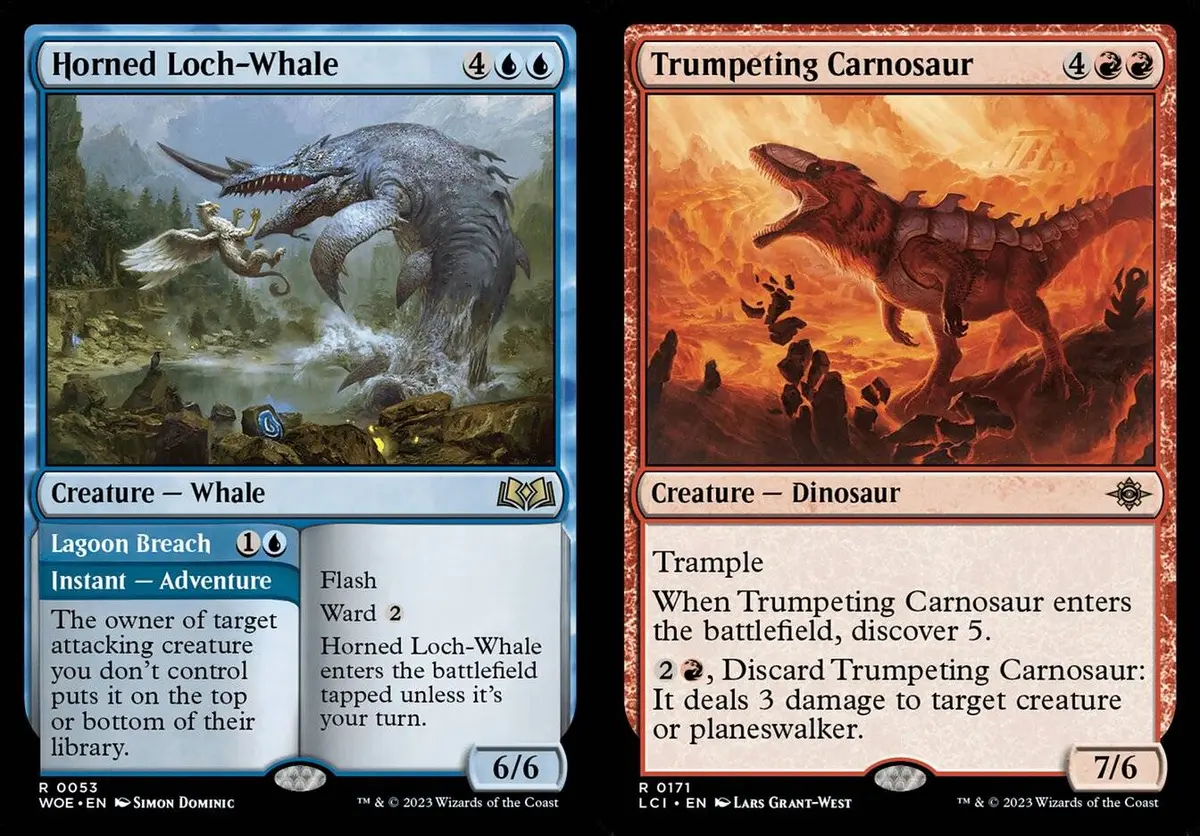
Although Monument to Endurance has powerful win-the-game ability, there are only four in the deck. If something goes wrong or it sinks to the bottom of the library and you can’t draw it, you could end up in the awkward spot of being unable to win and drawing your own library dry. So you still need some Plan B win conditions. Since this deck’s construction is extremely crowded, those Plan Bs need to have a chance of winning on their own while also working well with the deck. And because this deck has very few creatures and the opponent’s removal (at least in main-deck games) is usually in excess, any creatures among these Plan Bs need to be ones you don’t mind losing to removal, and ideally ones that can dodge some of the lower-range removal. After careful selection, I settled on two creatures that fit all these requirements perfectly.
Horned Loch-Whale // Lagoon Breach (2):
The front half is really a 2-mana removal spell, and the 6/6 giant whale afterwards is a freebie. It’s also one of the few non-damage removal spells, which matters a lot against high-toughness creatures or Screaming Nemesis.Trumpeting Carnosaur (2):
As a creature it’s a strong threat on its own, since the ETB draws a card, so even if it eats removal you still come out ahead on cards. The 3-mana, 3-damage pseudo-channel removal isn’t efficient, but it’s a usable range for now, and because it’s discard, it triggers Monument to Endurance; with that added value it’s not so bad.
Both of the creature cards above are also 6-mana cards, which is the key to boosting the firepower of Ill-Timed Explosion. You can also see that although they’re 6-mana cards, in actual play they often serve as low-cost removal on the curve, which ensures I have enough interaction in the early game.
The creature-selection criteria above also explain why you don’t see Fear of Missing Out. With this deck’s structure, no other creatures can share the removal pressure, and Fear of Missing Out can be killed by almost any removal spell, so its expectation of surviving is really too low. The ETB of discard one, draw one isn’t all that tempting. Kiora, the Rising Tide is a similar situation, as you can’t expect her to survive to declare an attack, though her ETB of draw two, discard two is a bit deeper. Steamcore Scholar, on the other hand, fits best among this type of creature: its ETB lets you freely choose between draw two, discard two to trigger Monument to Endurance hard, or draw two, discard one to become a standalone card that nets you cards.
Planeswalkers
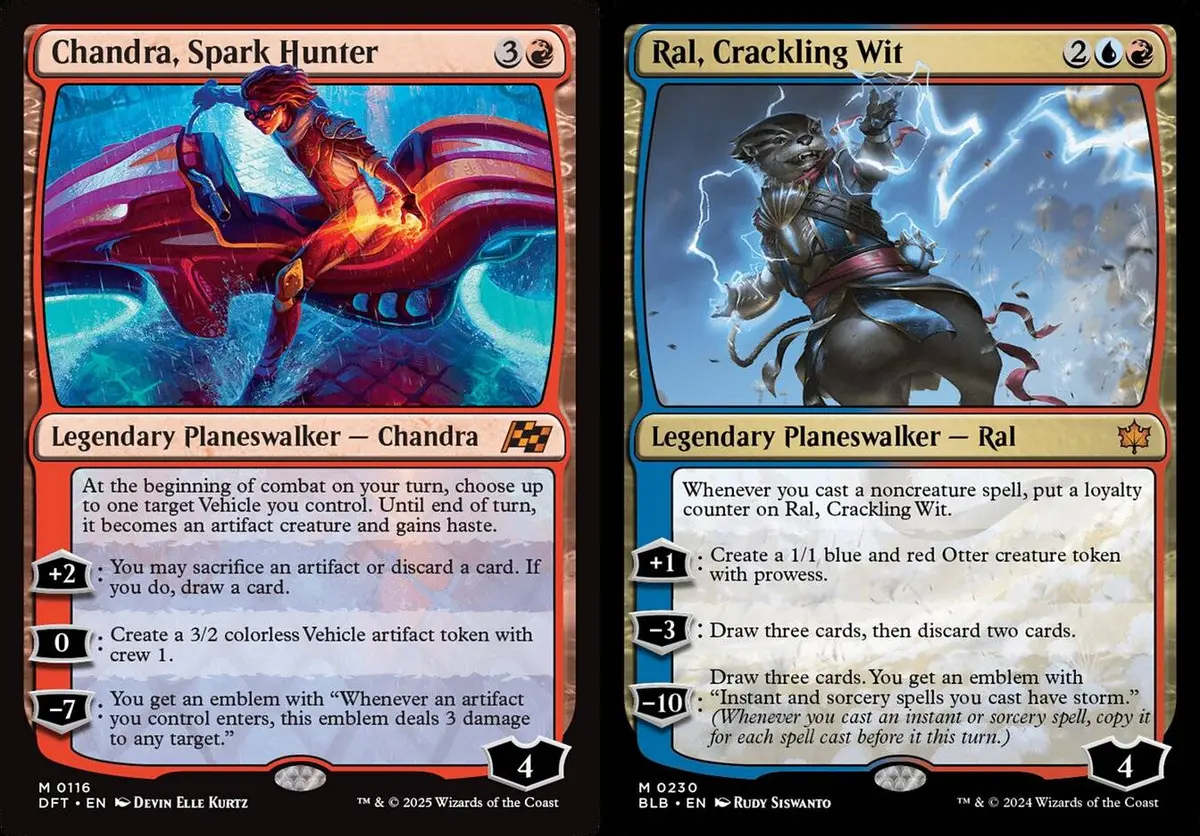
When it comes to win conditions for control, planeswalkers naturally come to mind, and fortunately the planeswalkers in Izzet colors don’t lack cards that provide a win condition while looting on their own.
Chandra, Spark Hunter (1):
Using [+2] to rummage fits the deck’s requirements very well. Because she grows fast, killing her takes real effort, and once the emblem comes online, killing the opponent is quick. Since this deck has a hard time producing crew sources, one Vehicle token on the battlefield is usually enough (a second Vehicle often becomes kicker fodder for Torch the Tower).Ral, Crackling Wit (1):
A very standard planeswalker for Izzet colors. [+1] continuously generates board advantage, and combined with this deck’s ability to frequently cast noncreature spells, it’s hard for opponents to accurately estimate Ral’s loyalty changes and the prowess bonus. The loot is on the [-3], which is harder to use frequently, but it does provide a discard trigger point that nets cards, which we need more than an ordinary deck does.
Since slots are limited, I chose a 1 + 1 split that avoids the legend rule hitting my own cards.
Extra Looting
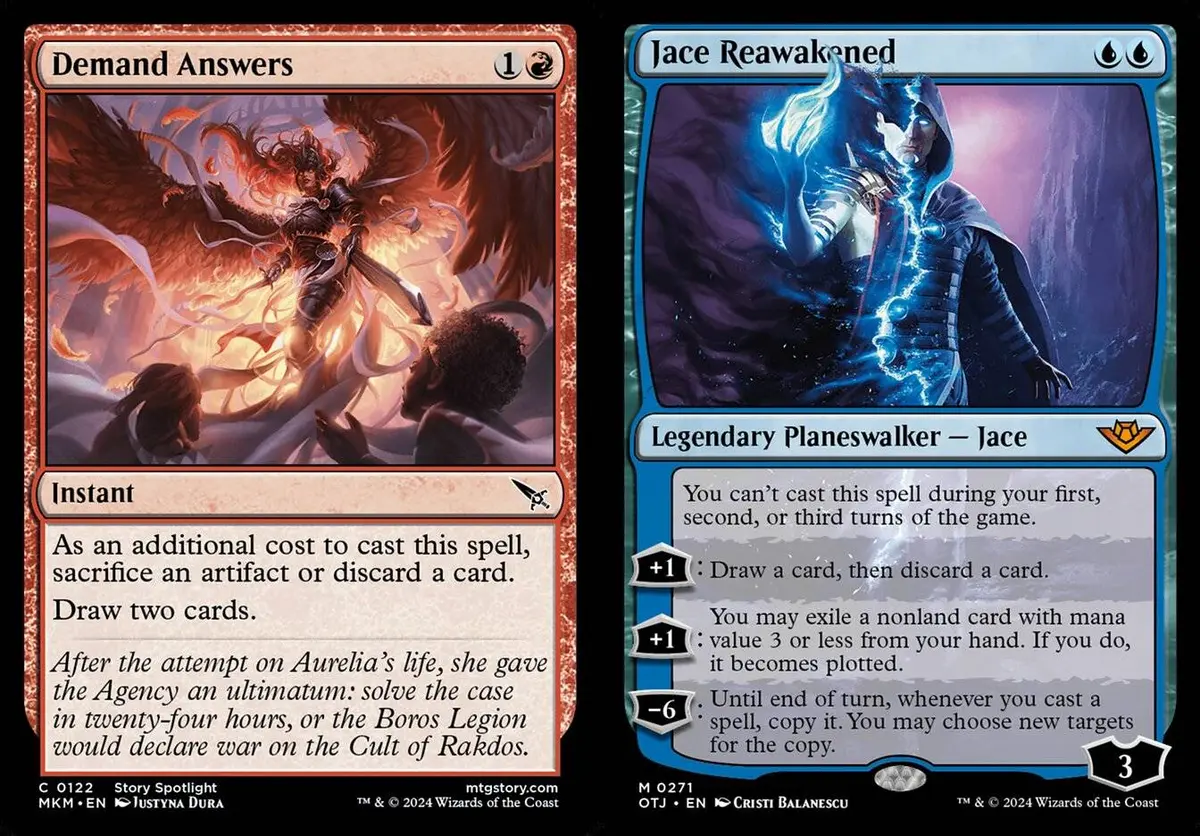
After all, this is a deck that depends on discard, so it still needs a certain number of low-cost proactive loot sources,
Demand Answers (4):
Plain, unadorned instant-speed discard one, draw two, but it’s just good in this deck. If you want to boost Torch the Tower’s kicker, you could swap some for Saheeli’s Lattice // Mastercraft Raptor, which feeds both Torch the Tower and Demand Answers, and since the deck has the big Dinosaur Trumpeting Carnosaur, the ability to “craft with Dinosaur” is actually useful. Or Chart a Course, which draws two first and then discards one, is another usable option. But since the need for instants is still relatively high, I currently stick with Demand Answers.Jace Reawakened (1):
A 2-mana planeswalker that can use [+1] each turn to loot, very well suited to this deck, though again you don’t need many; one copy is enough, so you don’t have to worry about the legend rule. Another option with a similar function is Matzalantli, the Great Door // The Core, which also provides one free loot each turn. Although it costs one more than Jace, considering the cost reduction from Artist’s Talent Level 2, there are actually quite a few chances to cast it for two. This slot can also be swapped directly for the various 2-mana loot spells mentioned above,
Utility Land

- Fountainport (1):
There’s roughly one flexible utility-land slot, and any utility land will do. I chose Fountainport because it’s the most versatile; Mirrex, Demolition Field, and various manlands are also usable options.
Sideboard

- Ghost Vacuum (2):
The standard graveyard-hate card. If you’re short on copies, you can use Soul-Guide Lantern to fill in, and in some situations Soul-Guide Lantern may perform better, but most of the time I still prefer Ghost Vacuum.

- Jace, the Perfected Mind (3):
A Plan C that switches to attacking the library at the drop of a hat, a super-powerful finisher against Domain or control.

- Chrome Host Seedshark (3):
Another sideboard-game win condition backup, used when you catch the opponent boarding in too much anti-creature removal. A card in this role is normally Urabrask’s Forge for red decks, but since it and Monument to Endurance are both 3-mana artifacts, they’re more likely to run into the same kind of artifact answers, so a plain creature is actually better here.

- Negate (3):
A standard blue sideboard card. I still recommend at least 3 copies of Negate, and if you want to mix in Spell Pierce, I suggest finding a way to squeeze out room from other slots.

- Into the Roil (1):
An all-purpose stalling and disruption card. A common similar option is Into the Flood Maw (even the names are alike). Although Into the Roil costs one more, with Level 2 Artist’s Talent it can be reduced to the same cost, and it has the advantages of being able to rebuy your own permanents, being kickable to draw a card, and not giving the opponent a Fish. Being able to save your own Monument to Endurance is the final reason I chose it.

- Aetherize (1):
It looks silly, but it’s a life-saving card that feels surprisingly good to use. Although it’s only bounce-type disruption and doesn’t fully solve the problem, it still buys a great deal of tempo breathing room, and it handles many situations where other damage-based sweepers can’t save you.

- Brotherhood’s End (1):
An extra addition to the main deck’s count, bringing in more low-cost sweepers against opponents with strong board development.

- Fuel the Flames (1):
Positioned close to a 4th Brotherhood’s End, but the two have slightly different advantages. Fuel the Flames is better against decks with many small haste/flash creatures, such as Dimir tempo and Convoke.
Handling the Stack
The deck’s operating logic is very intuitive. The difficulty of playing it mostly comes from having to discard constantly, so you have to be clear about which cards you can discard in which situations. This gives the deck an enormous skill floor-to-ceiling gap. How to discard needs to be judged by combining your current hand, the opponent’s deck, and the board state, and can’t be explained in a few words.
By comparison, the other difficulty of this deck is easier to explain: its spectacular stack. It’s normal for casting a single spell to put 10+ triggered abilities on the stack one after another, and not just simply all going on at once so you can order them yourself; halfway through resolving the stack, new triggered abilities are generated and go on the stack. With too many stack events you can get flustered in handling them, and if you make any plays that violate the rules of the game along the way, it’s still quite troublesome to sort out at competitive-level events.
The big principle: While a spell or ability is resolving, no abilities go on the stack and no player receives priority. After the spell or ability resolves, triggered abilities go on the stack, and then players receive priority.

Monument to Endurance:
Whenever you discard a card, choose one that hasn’t been chosen this turn~
•Draw a card.
•Create a Treasure token.
•Each opponent loses 3 life.
Whenever you discard a card you must choose a mode, and then the mode you chose goes on the stack. For example, if you discard a card today and trigger Monument to Endurance, choosing “Draw a card,” then the ability on the stack is the “Draw a card” mode, rather than choosing which mode to do only when the Monument to Endurance ability resolves.

Artist’s Talent (Level 1): Whenever you cast a noncreature spell, you may discard a card. If you do, draw a card.
When you cast a noncreature spell, a triggered ability pops up called “you may discard a card.” You only choose whether to discard when this ability resolves, and if you choose to discard, you draw immediately, with no window to respond between the discard and the draw.
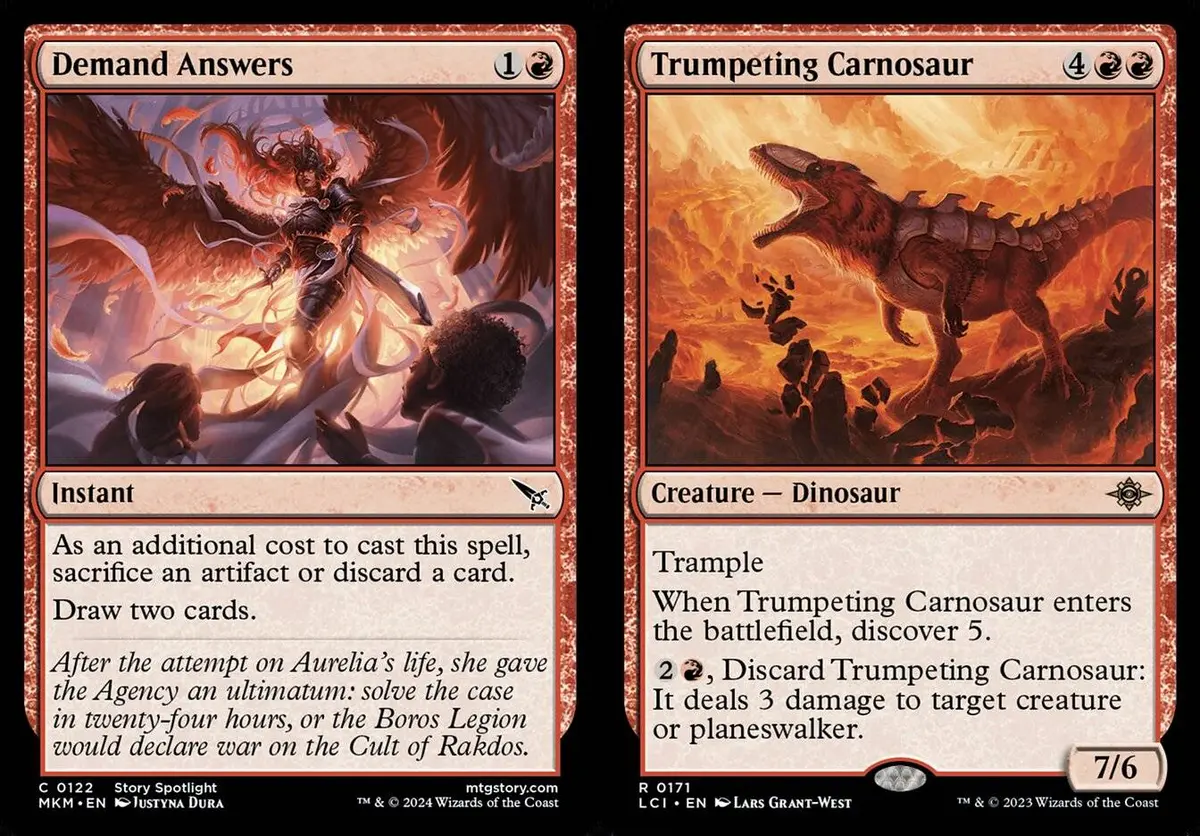
Demand Answers: As an additional cost to cast this spell, sacrifice an artifact or discard a card. Draw two cards.
Trumpeting Carnosaur: {2}{R}, Discard this card: It deals 3 damage to target creature or planeswalker.
Both of them are cast or activated with discard as a cost. Take Demand Answers as an example: when Monument to Endurance is on the battlefield and you cast Demand Answers with discard as the additional cost, Demand Answers goes on the stack first, then the Monument to Endurance ability triggers, and the Monument to Endurance mode you chose goes on the stack right after it, sitting above Demand Answers. So the Monument to Endurance ability resolves first, and only then does Demand Answers’s draw two resolve.
Suppose you have both Monument to Endurance and Artist’s Talent on the battlefield. When you cast Demand Answers, both triggered abilities trigger at once, and you can order the stack yourself. Here is an example stack:
Monument to Endurance’s “Draw a card” and Artist’s Talent’s “you may discard a card” trigger, and you choose to resolve the draw first, then the may-discard-then-draw.
When Artist’s Talent resolves, you choose to discard and draw. After the draw completes, because you just discarded, Monument to Endurance triggers again, and this time you choose “Create a Treasure token”, which keeps stacking on top of the existing stack. Don’t forget that Demand Answers’s “Draw two cards” is still sitting at the very bottom of the stack waiting to resolve.
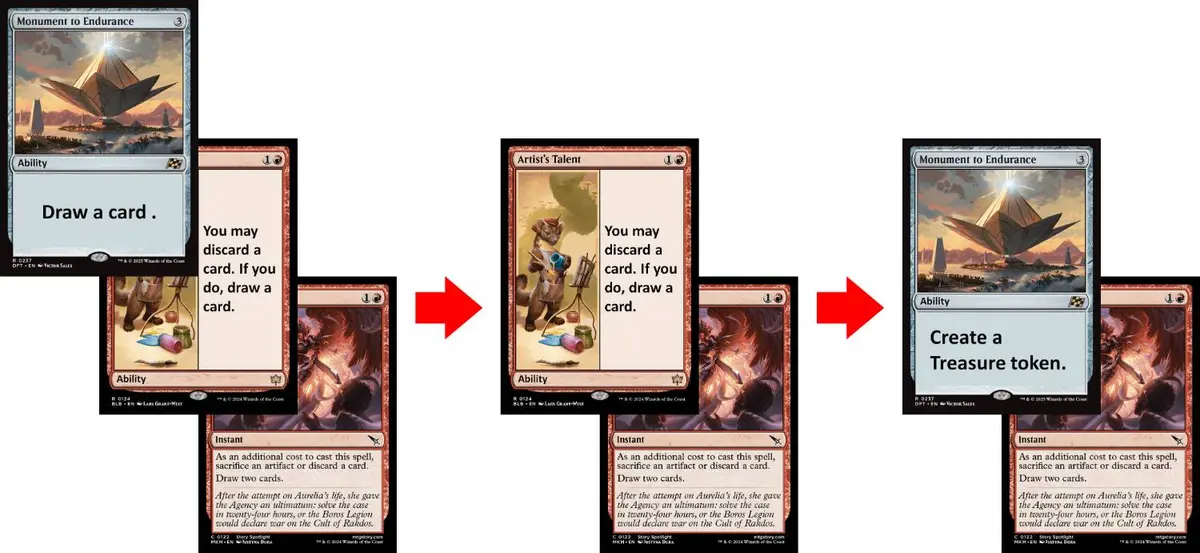
Of course, in actual games, having multiple Monument to Endurance / Artist’s Talent on the battlefield at once is the norm, and in that case the stack multiplies, but as long as you hold to the principle above and resolve the stack step by step, you can basically handle it correctly.
Conclusion
The most important thing when playing this Izzet discard control deck is to keep your head clear while handling the stack, but you also need to train yourself to control how long you think. In your first few games it’s inevitable to be flustered or tangled up, but once you get the hang of it, you’ll find the deck notably helps train you to handle the stack correctly and calculate large amounts of information quickly. Because there are so many discard decision points, reviewing your games is also especially important. Overall, this is a deck that really showcases the player’s technical skill.
Before playing this deck, there’s one more thing to mentally prepare for: while handling these endless stacks, you’ll have a lot to do, but the opponent usually has few chances to respond, resulting in a scene that looks like you’re telling a story all by yourself. When the storytelling takes up a large share of the time, it can sometimes make for an unpleasant game experience, for both sides, which is why I emphasized training yourself to control thinking time above.
- Title
- Stack Frenzy: Standard Izzet Discard Control
- Author
- Jru
- Created at
- March 13, 2025
- License
- This work is licensed under CC BY-NC-SA 4.0 .